# Integrate Infobridge with Inforiver (for 2.x users)

{% hint style="info" %}
This guide is intended for customers who are upgrading from Inforiver 2.x to Inforiver 3.x. **If you are deploying Inforiver 3.x for the first time, Infobridge is integrated by default.**
{% endhint %}

{% hint style="warning" %}
Make sure you have already updated your existing Inforiver 2.x instances to 3.x by following the instructions on the previous [Overview page](/inforiver-enterprise-on-prem/upgrade/overview.md).
{% endhint %}

Follow the steps mentioned in this guide to integrate Infobridge into your existing Inforiver environment. Infobridge is a powerful add-on that enhances Inforiver's data connectivity and management capabilities, offering a seamless bridge between your Power BI reports and a wider range of data sources.

You can find detailed instructions and screenshots to assist you through the process. Follow them carefully to ensure a smooth and successful update.

## 1. Create a file share

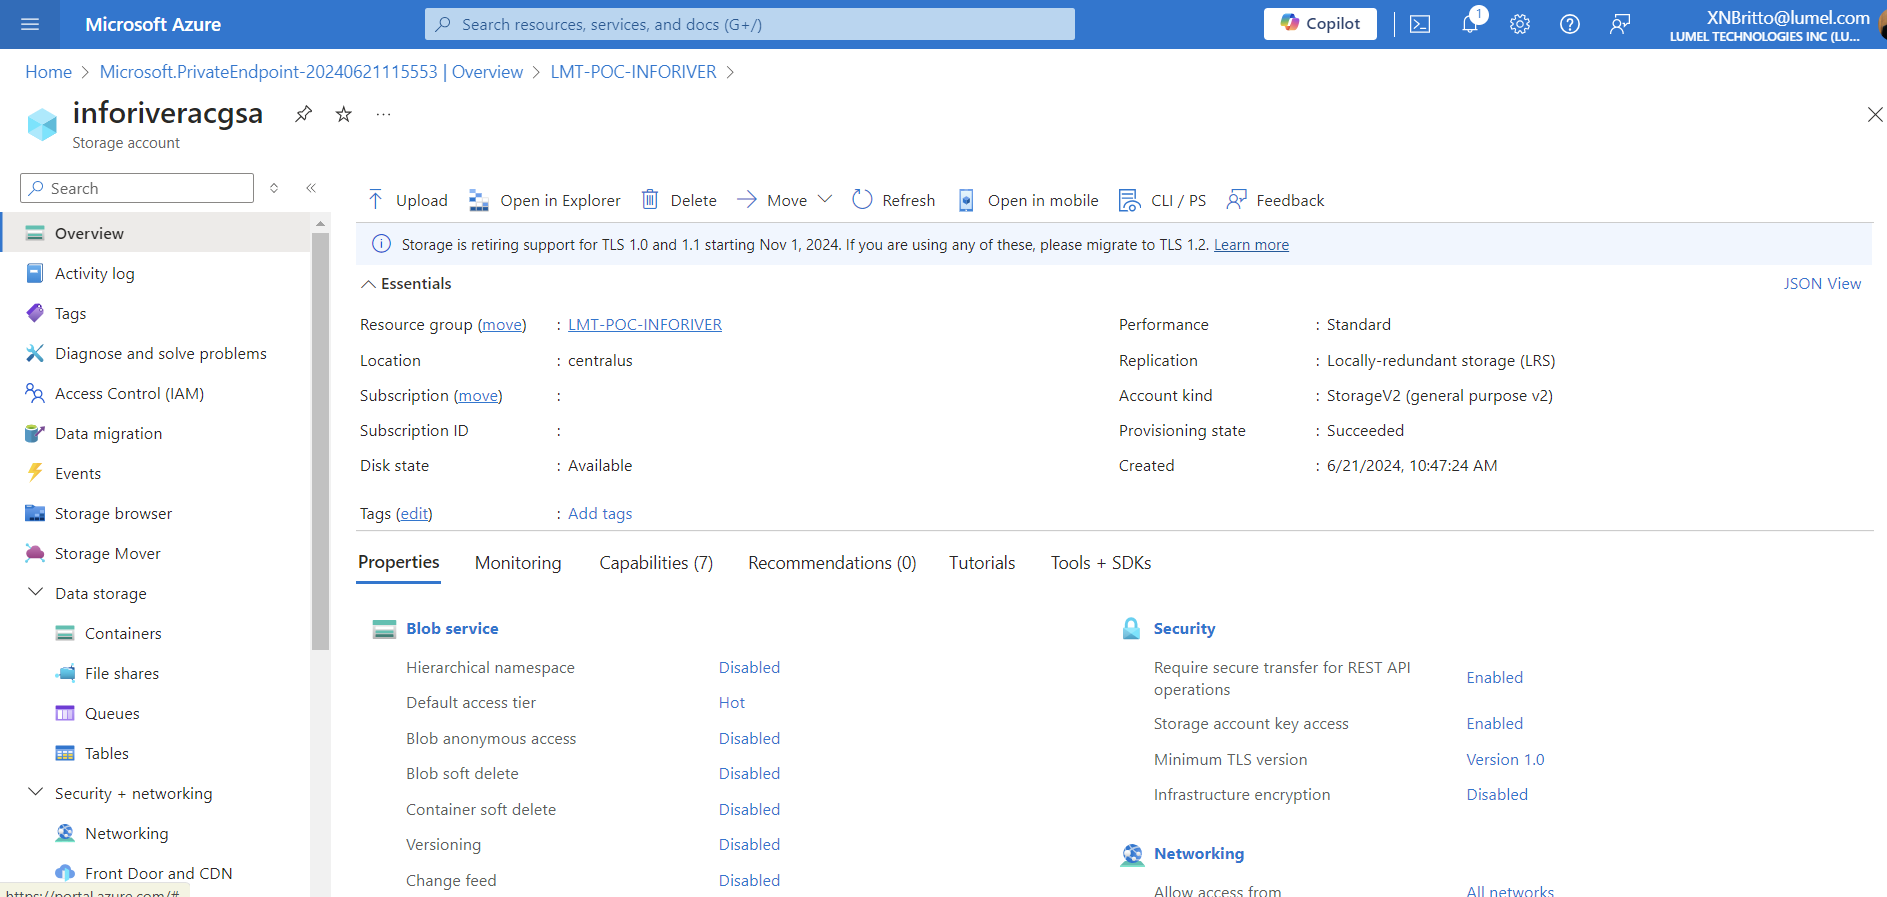
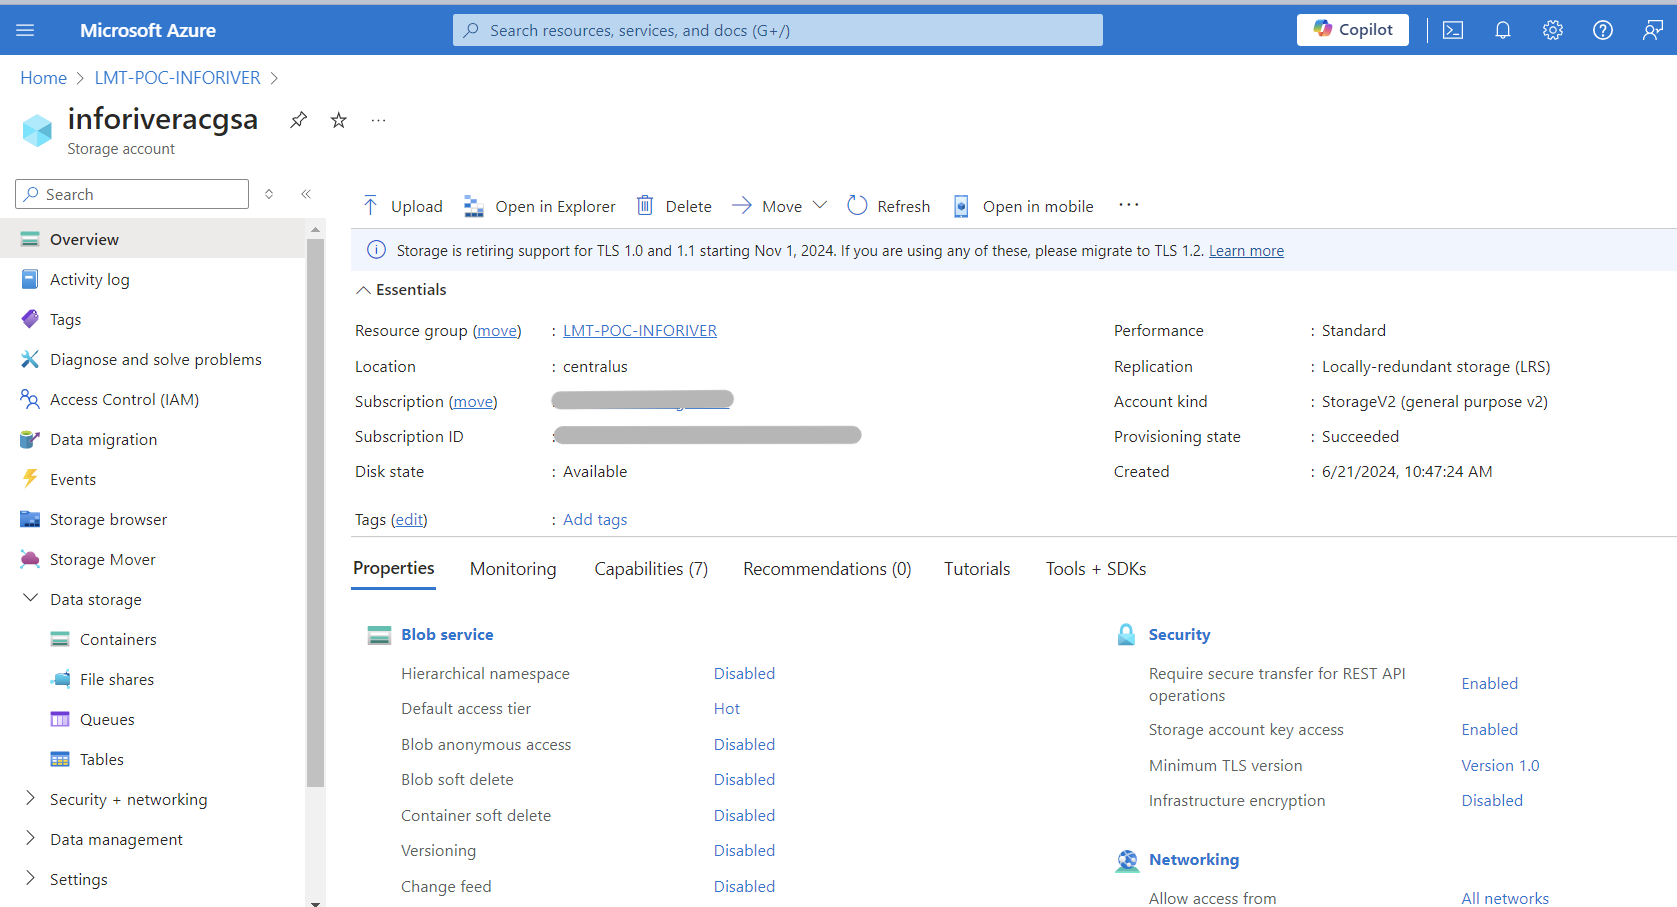
1. In the Azure portal, navigate to **Storage accounts** and select your storage account.

<figure><img src="/files/HhXjmSVPkyEk2714u0zA" alt=""><figcaption><p>Select your storage account</p></figcaption></figure>

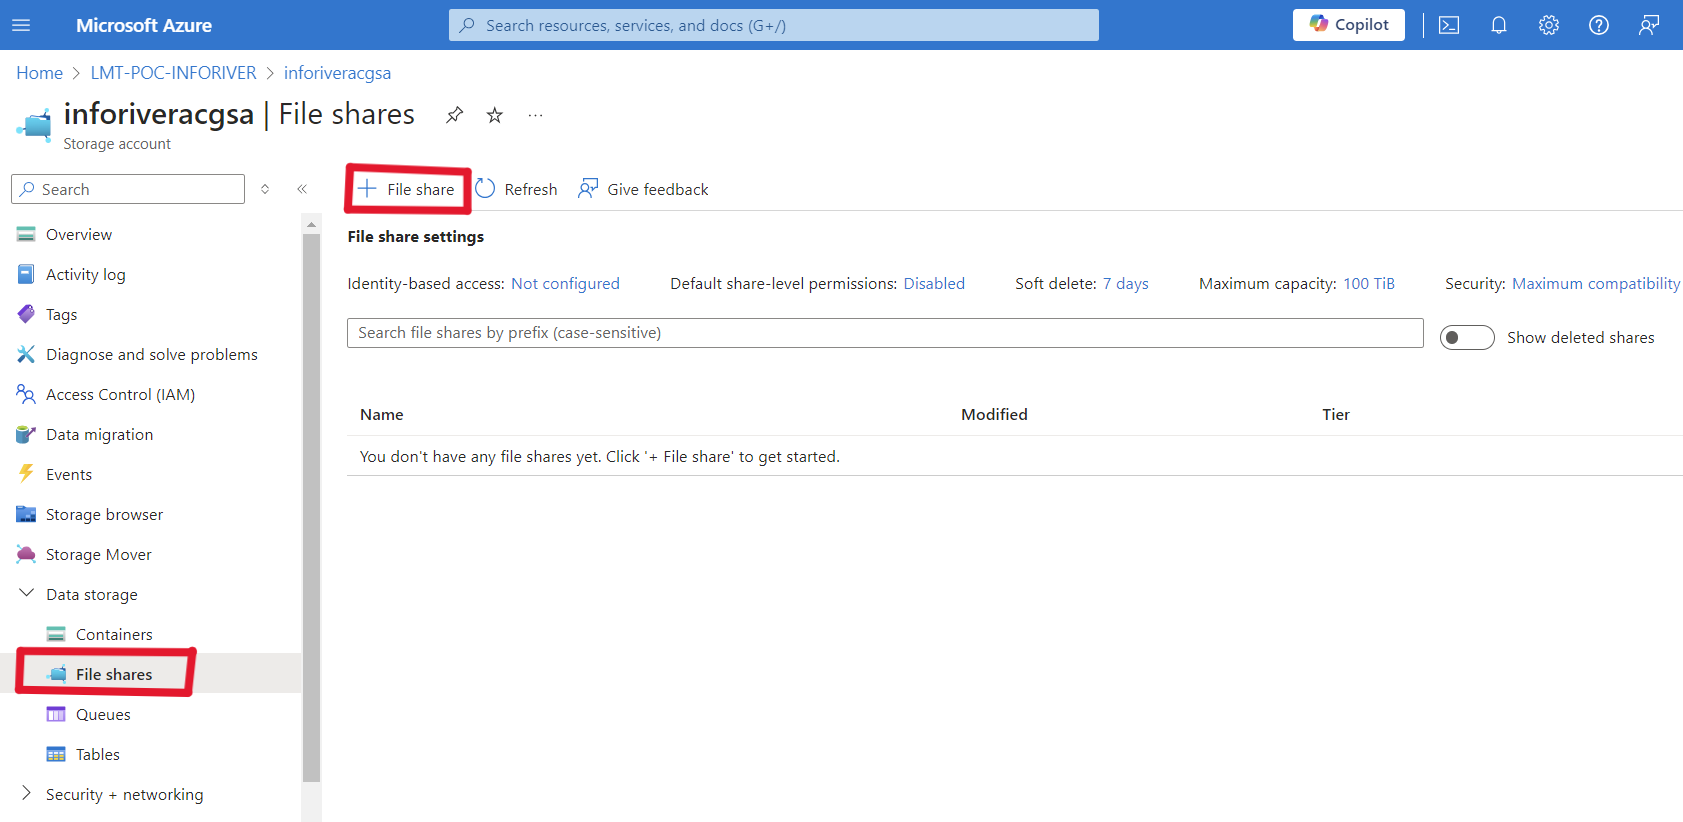
2. To create a file share, select **File shares** under the **Data storage** menu. On the right, click 'File share'.

<figure><img src="/files/sB6XIpSkE5o0t4TKKHsP" alt=""><figcaption><p>Select 'File share'</p></figcaption></figure>

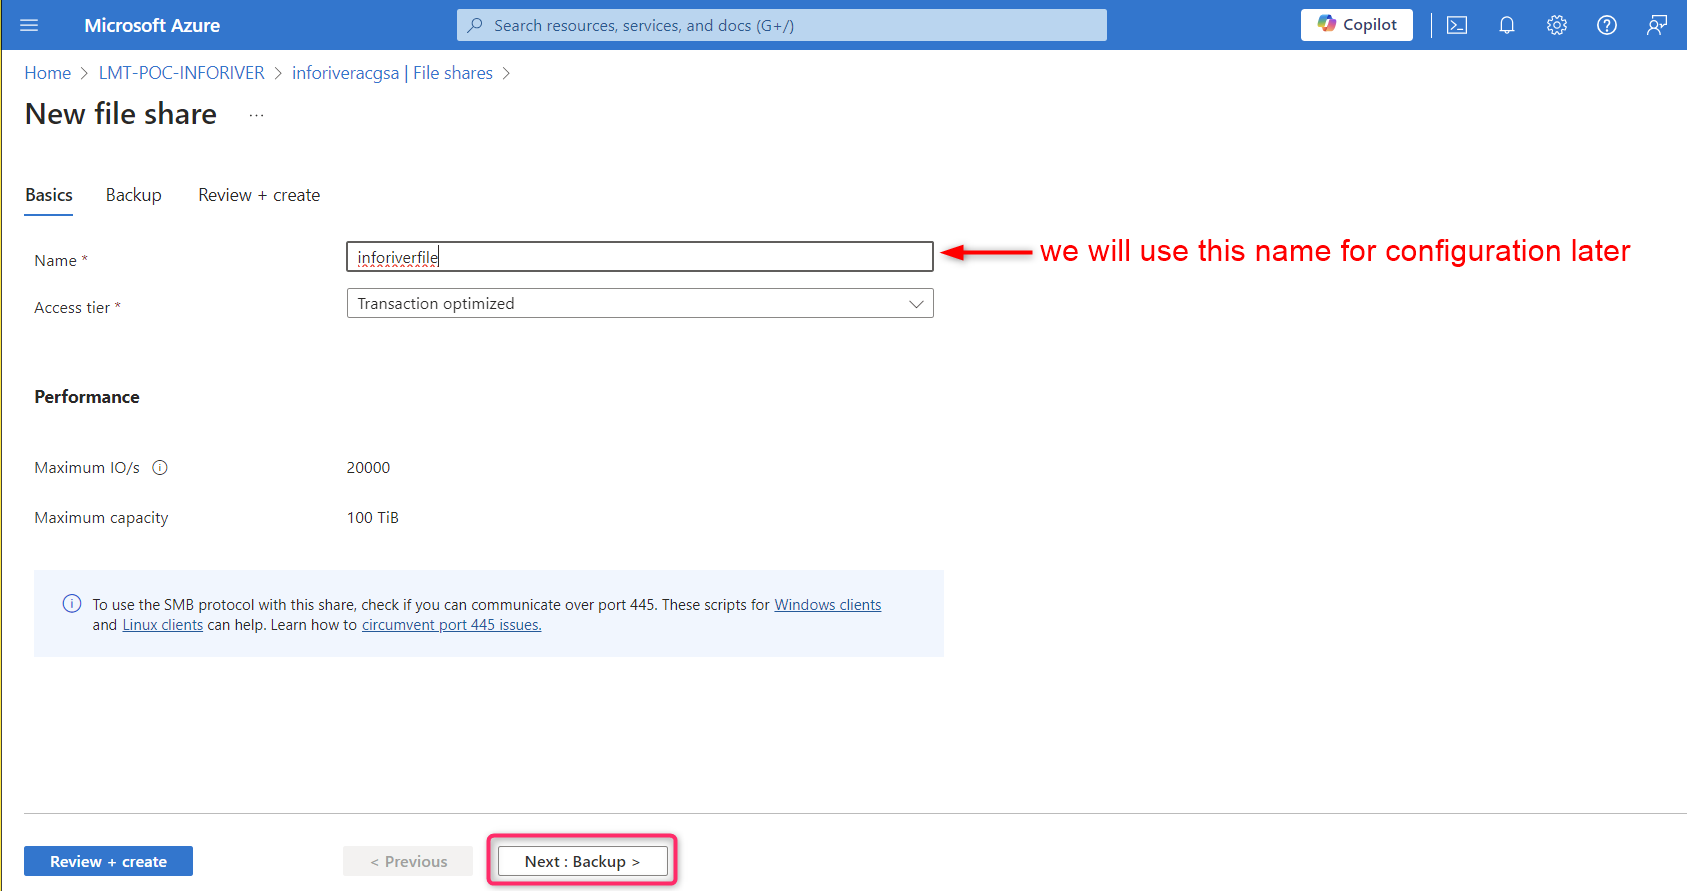
3. Enter a name for the file share and click **Next**. Note that this name will be used later to update the YAML configuration file.

<figure><img src="/files/WlqAqTmU226x7WLKEzuR" alt=""><figcaption><p>Enter a name</p></figcaption></figure>

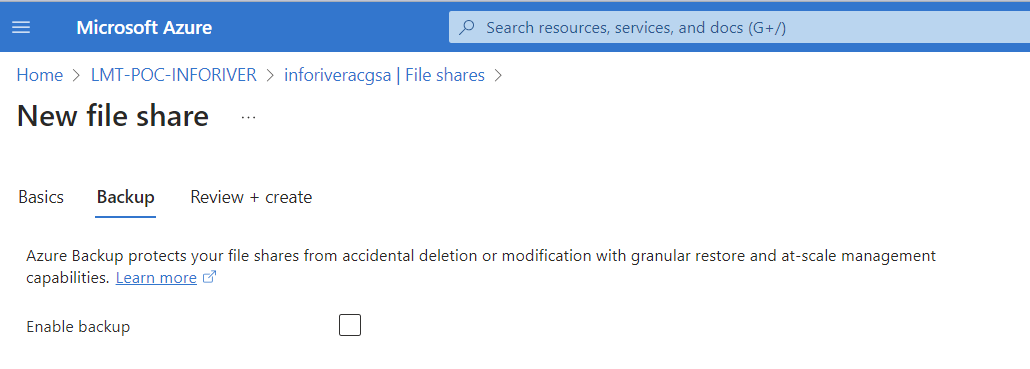
4. You can check the box in the image below if you prefer a backup. Click **Next.**

<figure><img src="/files/vKVs1bfeeNAshtHUt7Hk" alt=""><figcaption><p>Back up option</p></figcaption></figure>

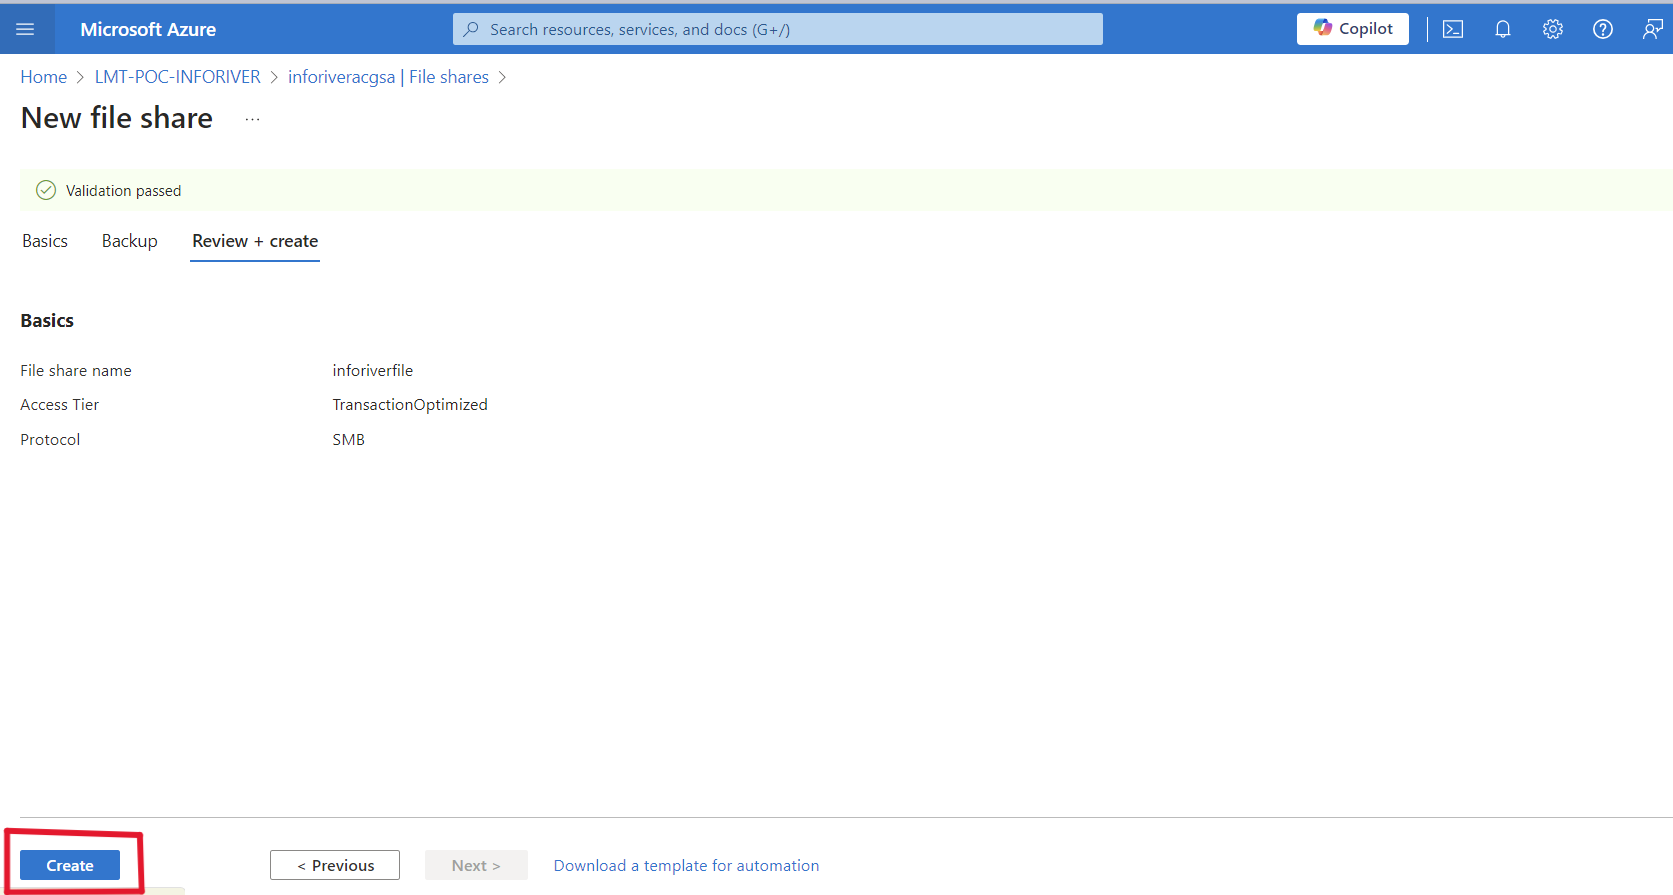
5. Once the validation is passed, click **Create.**

<figure><img src="/files/WM3hbvwUGvEkwscnmZHW" alt=""><figcaption><p>File share created</p></figcaption></figure>

## 2. Create a private endpoint for the storage account

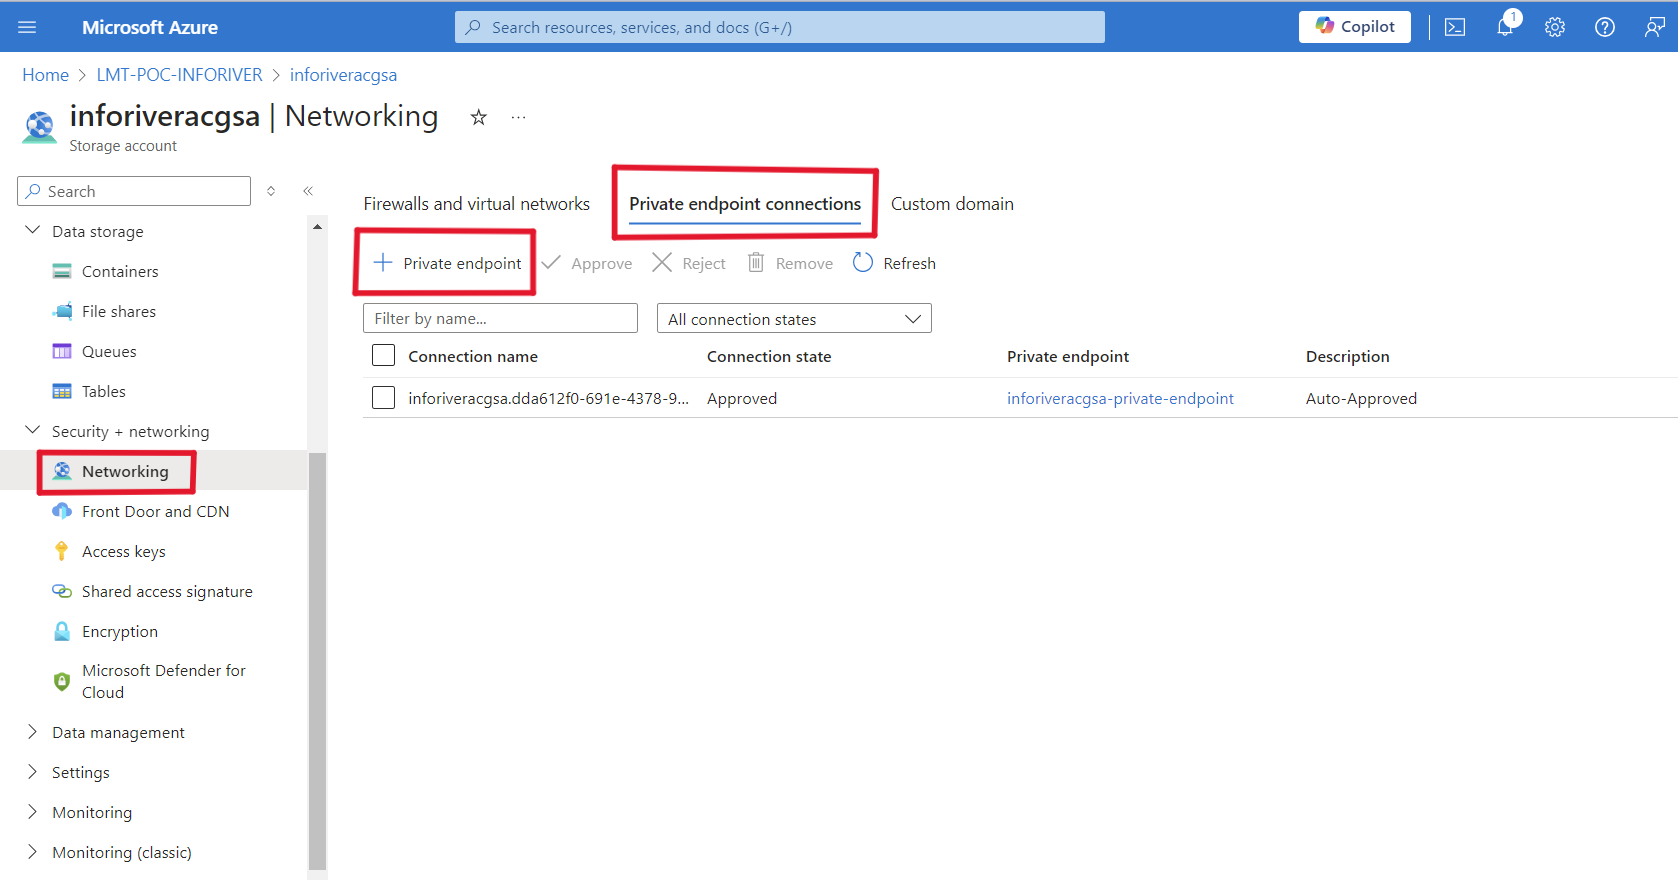
1. After creating the file share, navigate to the 'Networking' window by selecting **Networking** from the **Security + networking** menu. On the right pane, click '**+Private endpoint'** from the **Private endpoint connections** tab.&#x20;

<figure><img src="/files/QpjY4WMdX3GfexbuEUH4" alt=""><figcaption><p>Add a private endpoint</p></figcaption></figure>

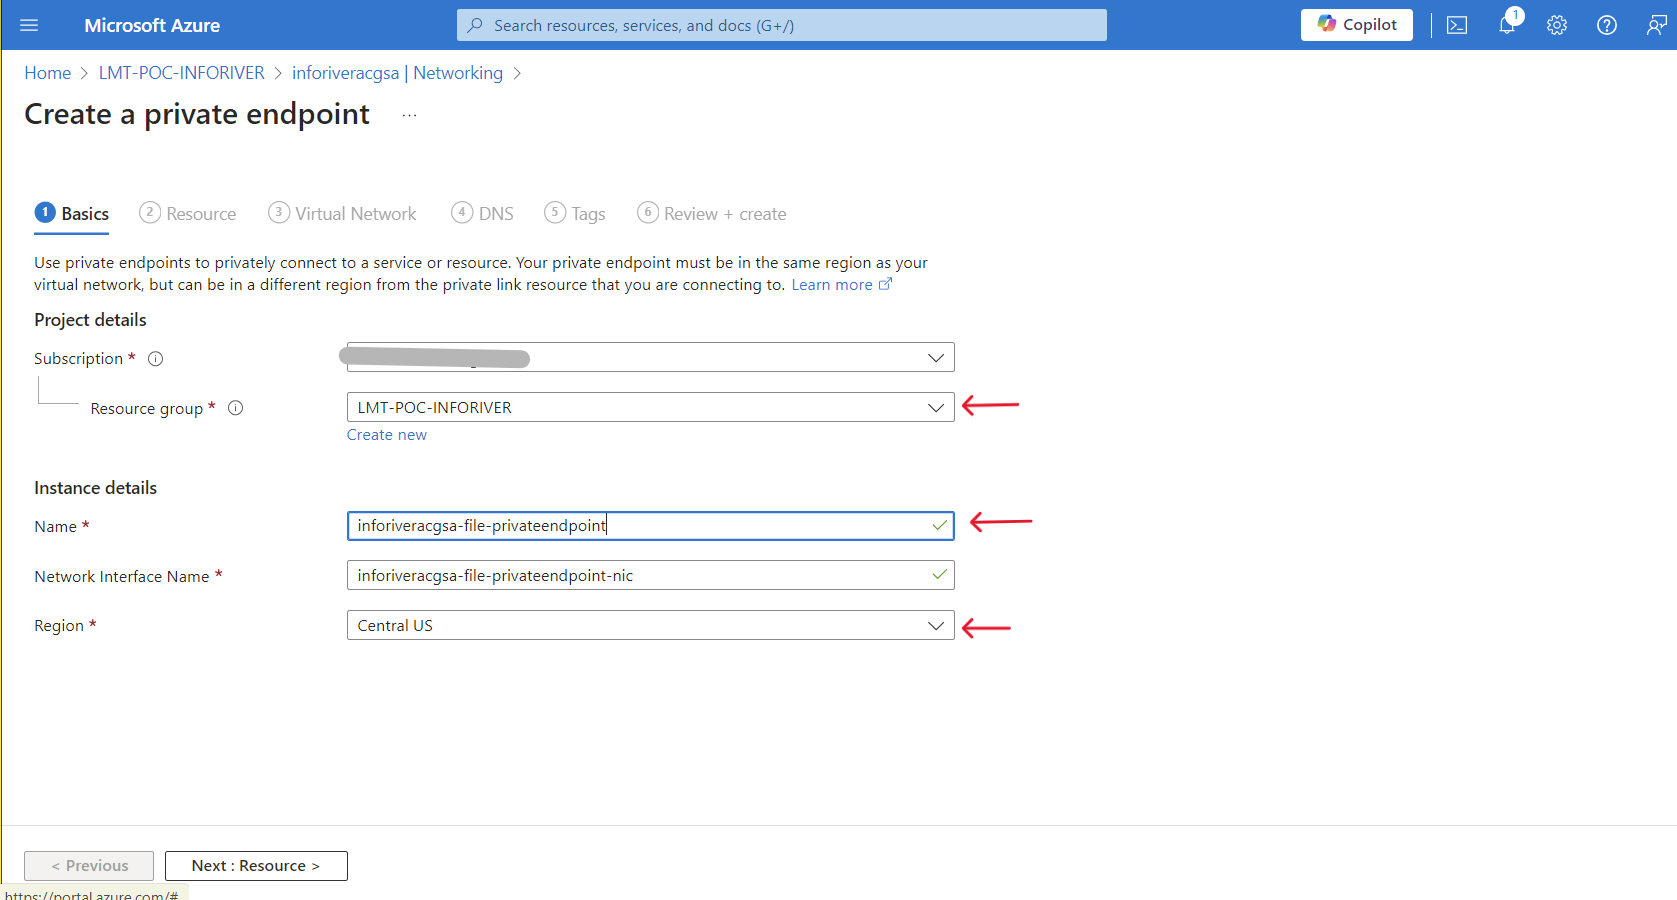
2. Enter a name for the endpoint and choose the appropriate Resource Group and Region. Click **Next.**

<figure><img src="/files/MR7t92XaCkVB1Hu9SwYK" alt=""><figcaption><p>Configuring name, resource group and region</p></figcaption></figure>

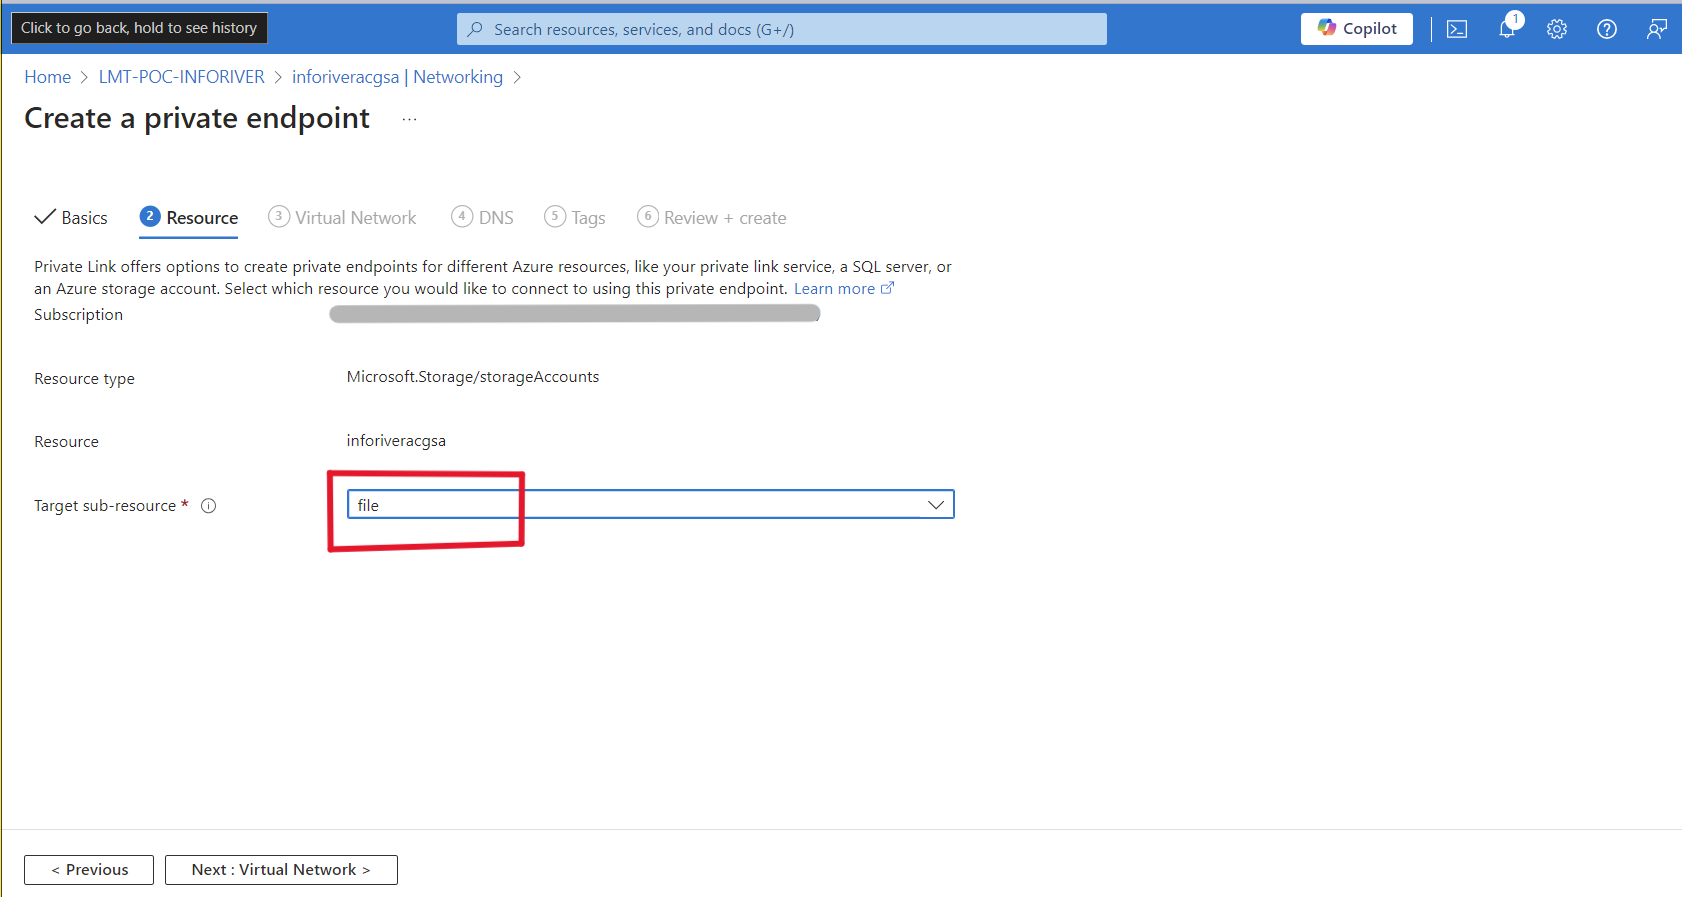
3. Select 'file' as the target sub-resource.

<figure><img src="/files/IpFQ7v7HzOhEUyN8Lek7" alt=""><figcaption><p>target sub-resource</p></figcaption></figure>

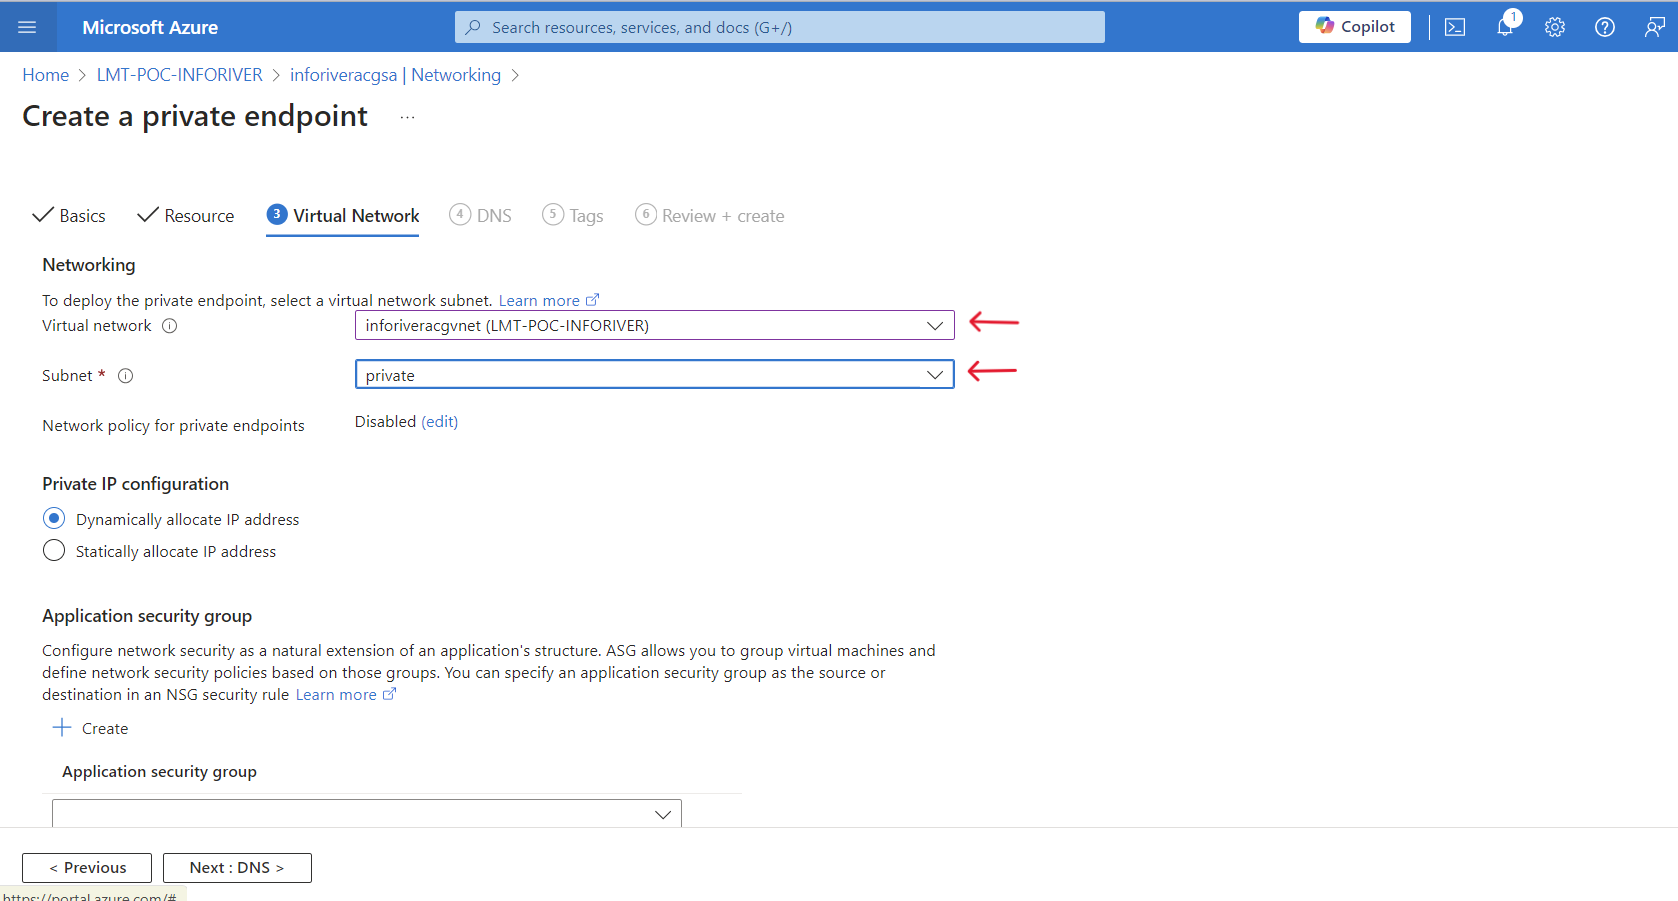
4. Choose the Virtual network and Subnet to deploy your private endpoint and proceed to the next steps.

<figure><img src="/files/fvgqs08RCseQERmcJyJe" alt=""><figcaption><p>select virtual network and subnet</p></figcaption></figure>

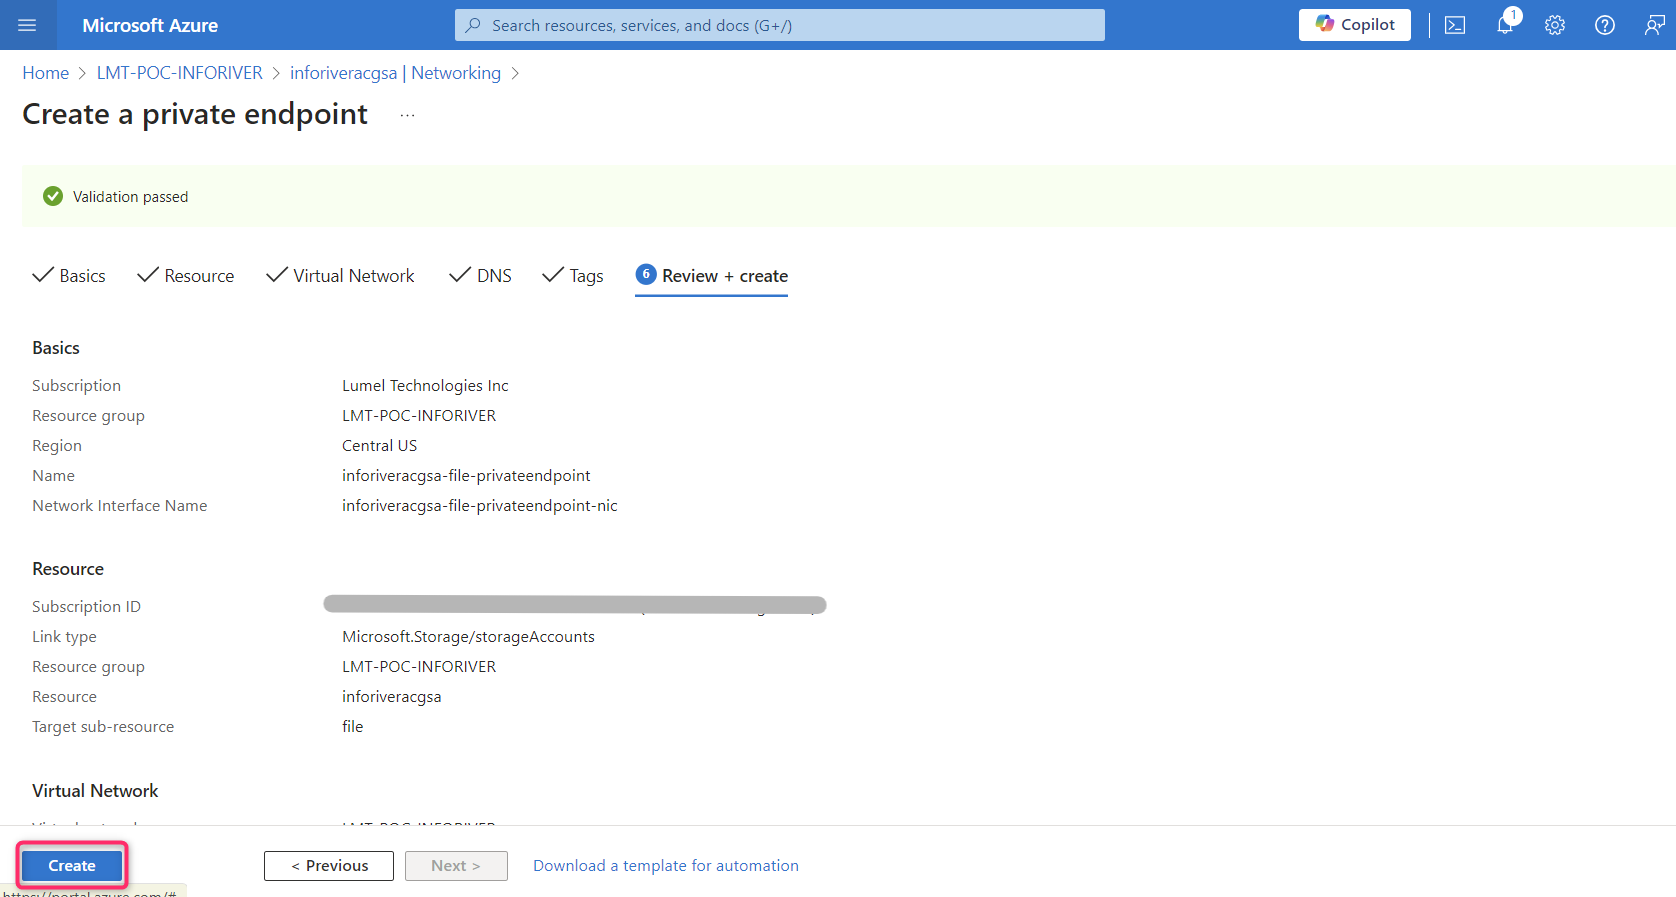
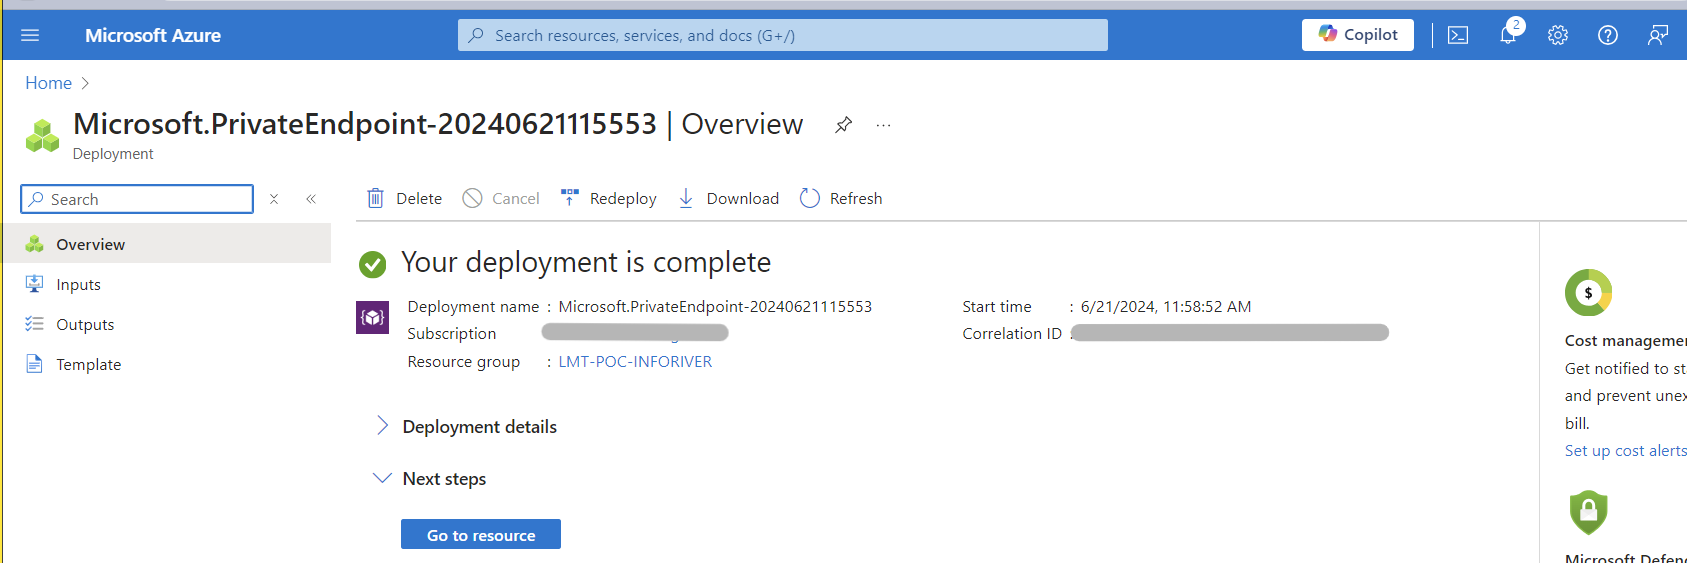
5. After the validation is passed, click **Create.** The deployment is now complete.

<figure><img src="/files/rRTTXAUkeDT72rZLFKxC" alt=""><figcaption><p>validation passed</p></figcaption></figure>

<figure><img src="/files/ewlu9jXHRxzj9iFIANZp" alt=""><figcaption><p>private endpoint - deployment complete</p></figcaption></figure>

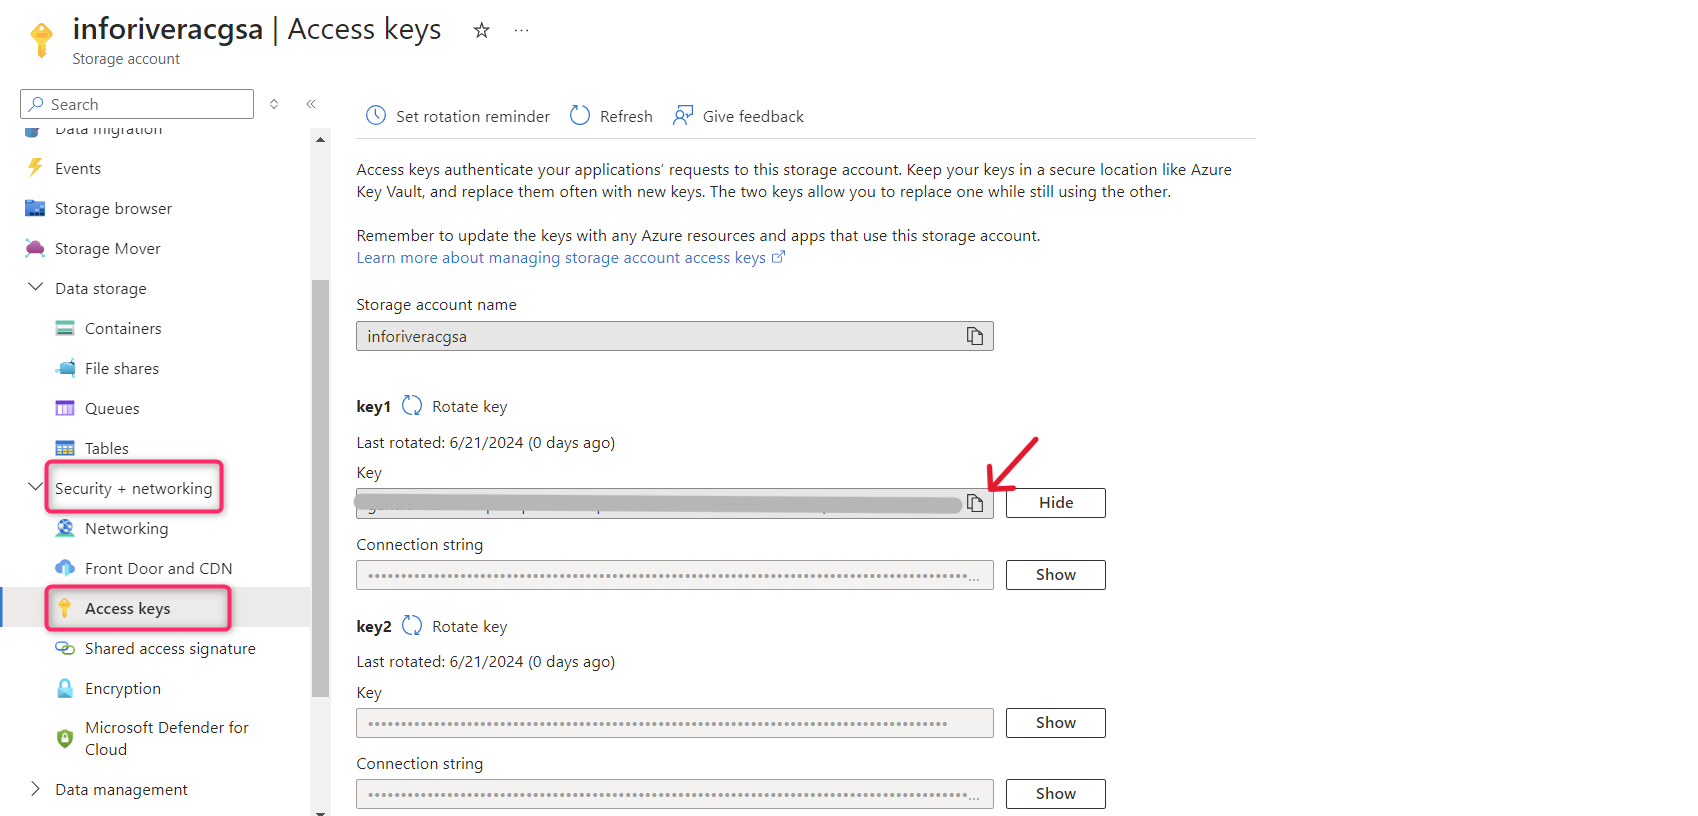
6. Navigate to the **Access keys** window in the storage account to get the access key. Copy the access key using the copy icon and retain it as it will be used while updating the Container Instances(ACI).

<figure><img src="/files/eQzjaztGr3mejwagzGOQ" alt=""><figcaption><p>Copy the access key</p></figcaption></figure>

## 3. Edit the CNI configuration

* To edit the CNI configuration for Inforiver, you can follow the steps explained in [this section](https://docs.inforiver.com/inforiver-enterprise-on-prem/upgrade/for-legacy-versions-updating-container-instances/pages/nuax9VVruMELqjfXP8md#id-1.-edit-the-cni-configuration).
* To edit the CNI configuration for Inforiver and EDITable, you can follow the steps explained in [this section.](https://docs.inforiver.com/inforiver-enterprise-on-prem/upgrade/for-legacy-versions-updating-container-instances/pages/4YMY8RHvtbeIVDblPkII#id-1.-edit-the-cni-configuration)

## 4. Create ACI

The next step is to create ACI using the steps outlined [here](https://docs.inforiver.com/inforiver-enterprise-on-prem/upgrade/for-legacy-versions-updating-container-instances/pages/nuax9VVruMELqjfXP8md#id-2.-create-aci).

## 5. Add Environment variables in the App service

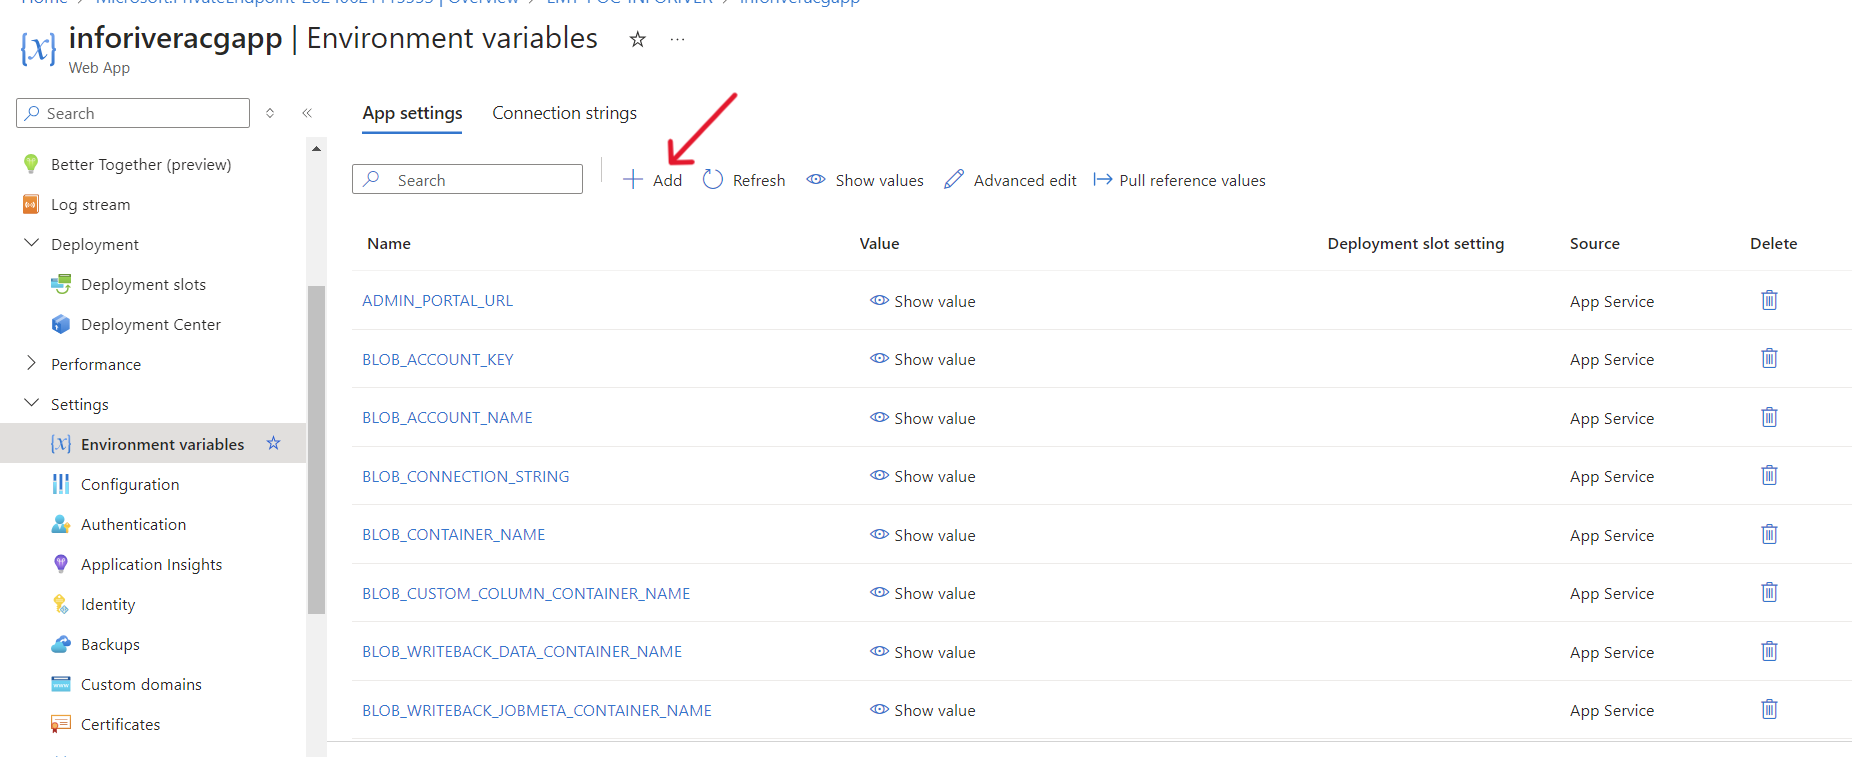
1. Go to the App service and navigate to **Settings -> Environment variables.** Click **Add** on the right.

<figure><img src="/files/mg5uITTtjKvNN6ifeGFD" alt=""><figcaption><p>Add Env variables</p></figcaption></figure>

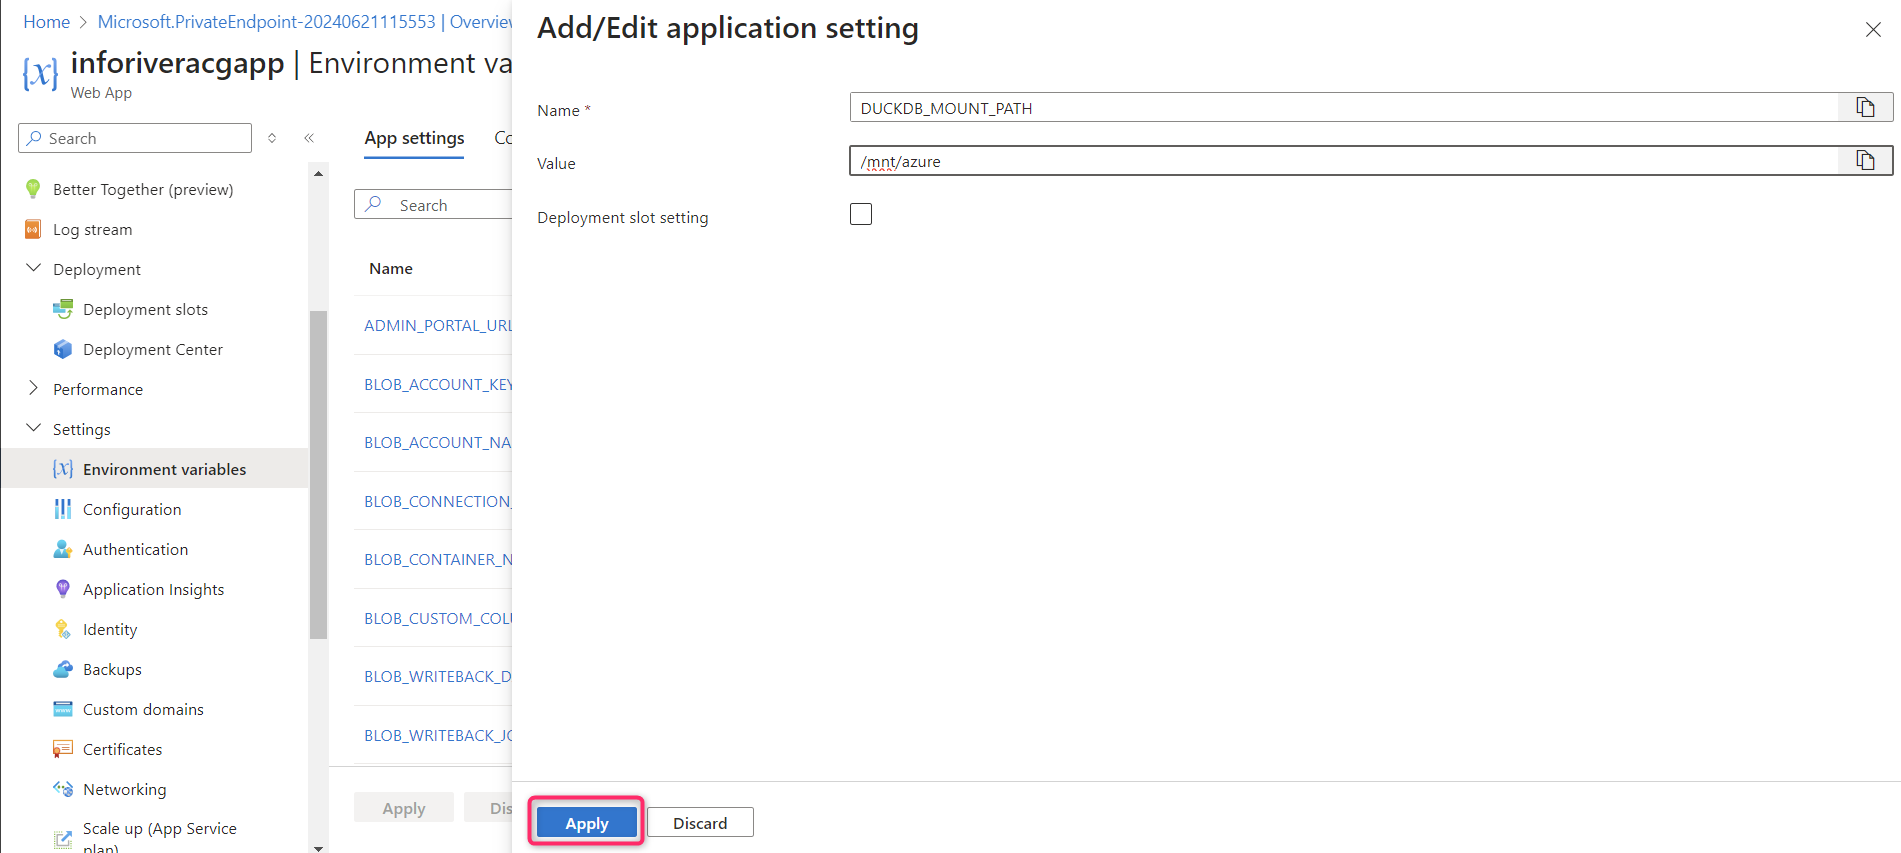
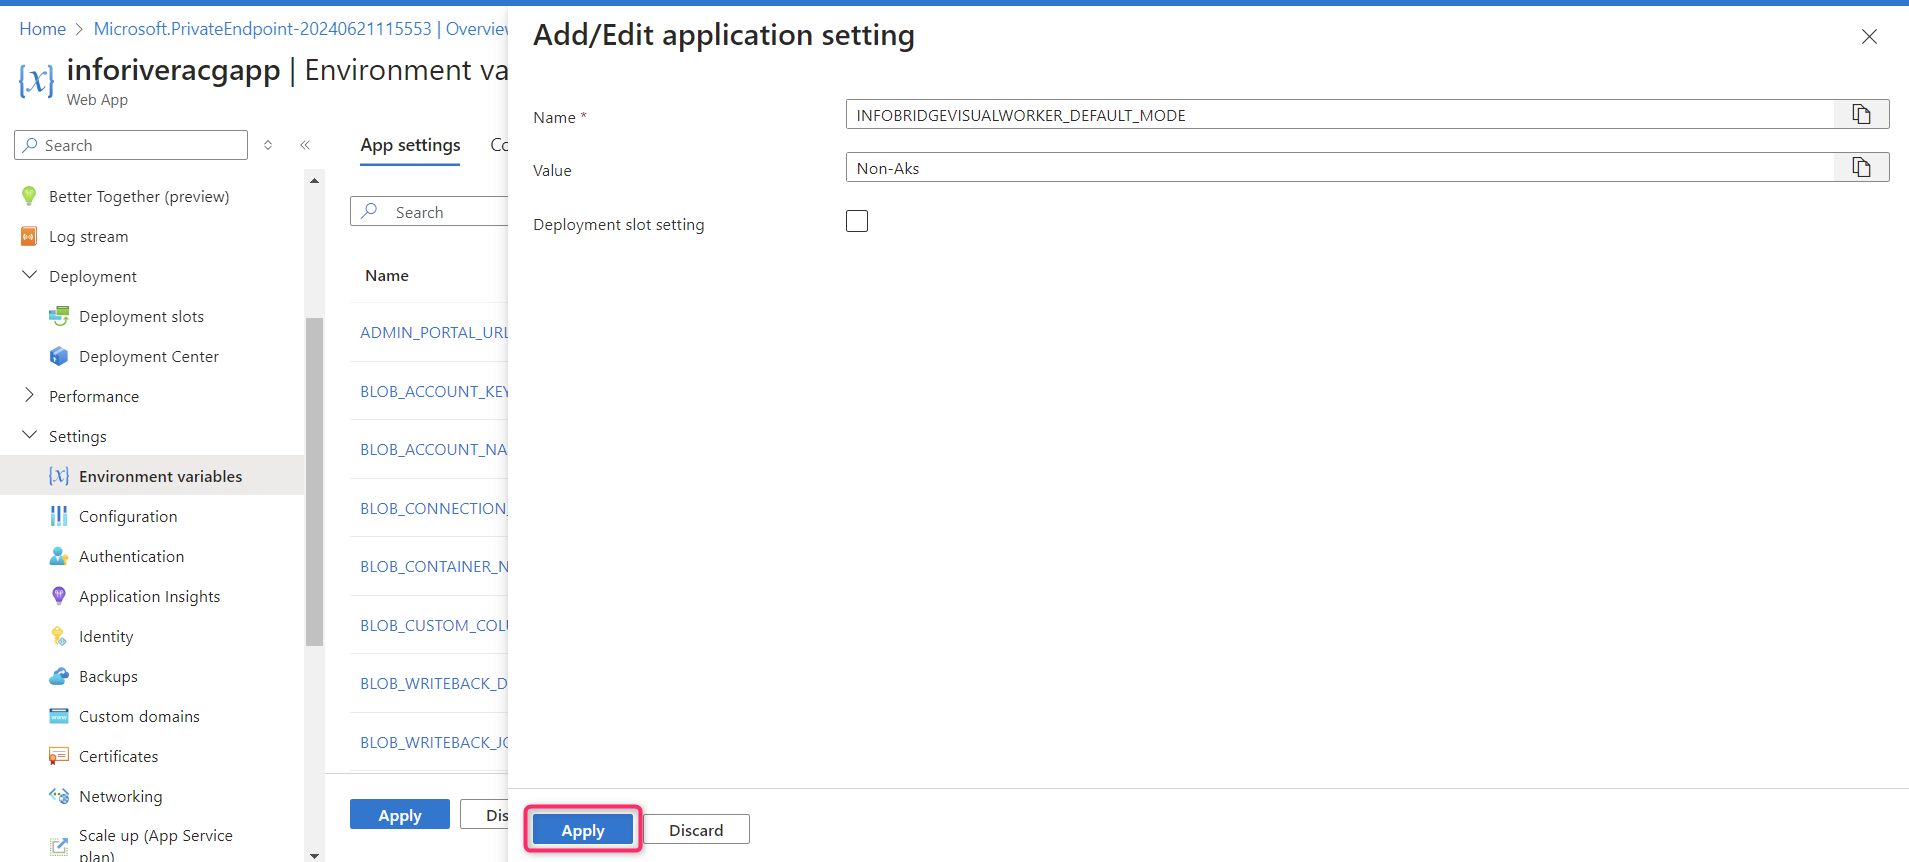
2. Add the following env values and select **Apply**.

**Environment variable 1:**

**Name:** DUCKDB\_MOUNT\_PATH

**Value:** /mnt/azure

**Environment variable 2:**

**Name:** INFOBRIDGEVISUALWORKER\_DEFAULT\_MODE

**Value:** Non-Aks

<figure><img src="/files/n1ocjRLNjY4Aljf8dbPL" alt=""><figcaption><p>Update env variable 1</p></figcaption></figure>

<figure><img src="/files/2BMtF3aGzr2niGiiXN4B" alt=""><figcaption><p>Update env variable 2</p></figcaption></figure>

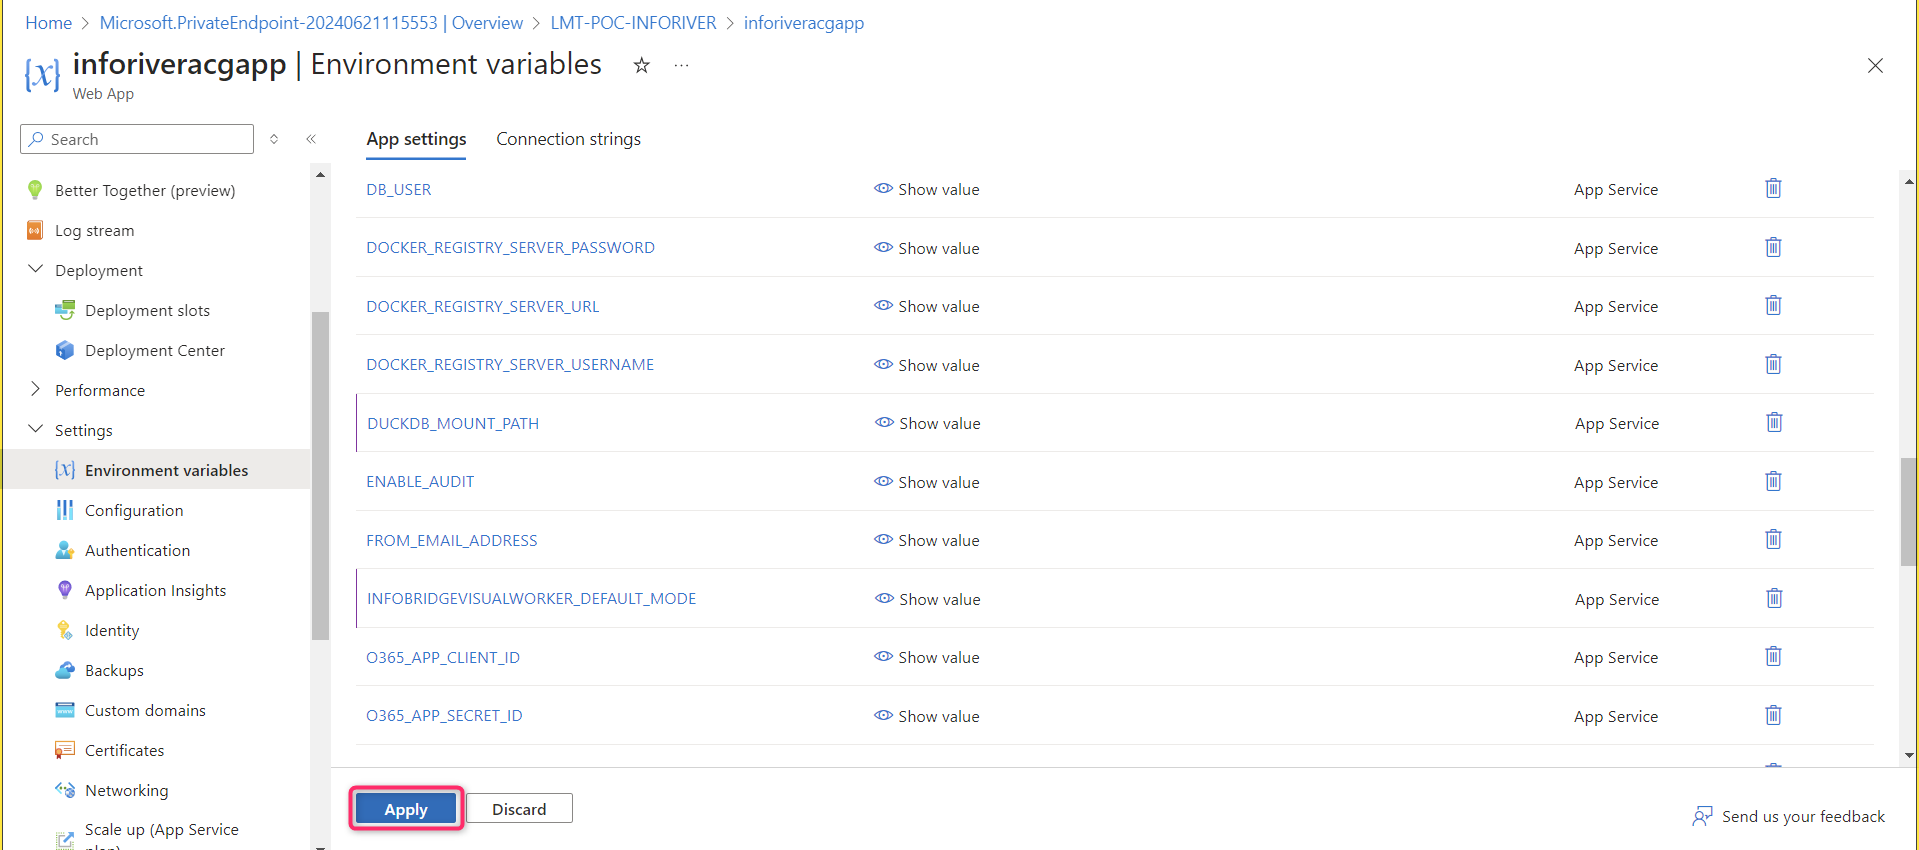
3. Click **Apply** to save the settings.&#x20;

<figure><img src="/files/3RBwKhe5amHKMBnLhc4g" alt=""><figcaption><p>click 'Apply'</p></figcaption></figure>

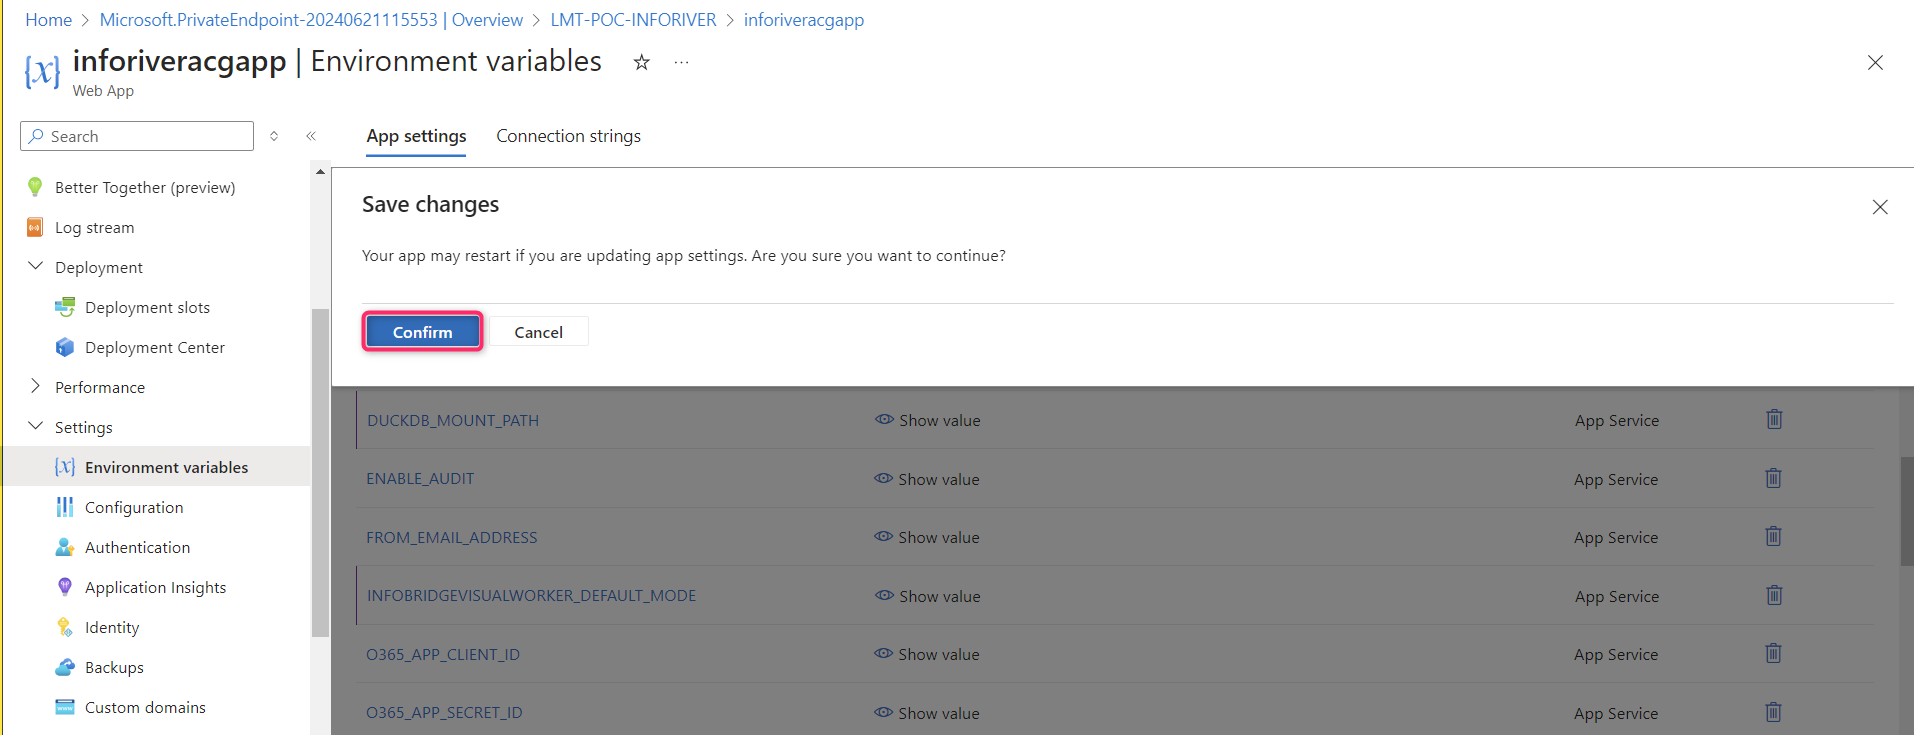
4. Select **Confirm** to restart the app.

<figure><img src="/files/JpiVrd9AgdLW5Wvt870r" alt=""><figcaption><p>Confirm restart</p></figcaption></figure>

Ensure all the above steps are completed carefully. With this, you have successfully updated your Inforiver container instances and app service to integrate Infobridge with Inforiver.

<figure><img src="/files/kCgdV8bfuOzmi7UKxtNZ" alt=""><figcaption><p>ACI Updated</p></figcaption></figure>

If you encounter any issues or require further support, please get in touch with our technical support team.


---

# Agent Instructions: Querying This Documentation

If you need additional information that is not directly available in this page, you can query the documentation dynamically by asking a question.

Perform an HTTP GET request on the current page URL with the `ask` query parameter:

```
GET https://docs.inforiver.com/inforiver-enterprise-on-prem/upgrade/for-legacy-versions-updating-container-instances/integrate-infobridge-with-inforiver-for-2.x-users.md?ask=<question>
```

The question should be specific, self-contained, and written in natural language.
The response will contain a direct answer to the question and relevant excerpts and sources from the documentation.

Use this mechanism when the answer is not explicitly present in the current page, you need clarification or additional context, or you want to retrieve related documentation sections.