Inforiver
Premium Table
Premium Table
  • Introduction to Premium Table
    • Get Started
      • Installing from AppSource
      • Installing Inforiver for your organization (Org visual)
      • Inforiver Writeback Matrix pre-requisites
        • Whitelist Inforiver IPs
        • Admin consent for Inforiver's Entra ID
          • Basic consent
          • Full admin consent
      • Inforiver Customer Portal
        • Billing Admin
          • Update Profile
          • Update Subscriptions
        • License Admin
      • Licensing
        • License renewal
      • Registering Inforiver on Azure AD (Entra ID)
  • Working with Premium Table
    • 1. Build your first Inforiver Table report
    • 2. Displaying information
      • Report interface
      • Templates
      • Basic formatting
        • Number formatting
        • Cell, header & value formatting
        • Totals & subtotals
        • Insert blank rows
      • Basic inline charts
    • 3. Basic interactions
      • Explore & filter data
        • Search & Filter
        • Explorer
        • Top N + others
      • Sort & reorder data
      • Show/hide values
      • Manage column widths
      • Manage hierarchies
      • Create visual hierarchies
      • Pin rows & columns
      • Blend measures
      • Dynamic measure headers
      • Context menus
        • Column gripper
        • Row gripper
      • Actions
        • Rails
        • Toolbar options
        • Keyboard shortcuts
        • Reset
    • 4. Adding business logic and formulae
      • Insert calculated rows
        • Template rows
      • Insert calculated columns
      • Insert manual input rows
      • Insert manual input columns
        • Number
        • Dropdown
          • Dropdown options from semantic models
          • Lookup visuals for dropdowns
        • Text, checkbox & date
        • Writeback Matrix features
        • Importing data
      • Invert sign
      • Editing cells
      • Quick formula
      • Visual column inside visual measures
      • Manage inserted rows
      • Manage inserted measures & columns
      • Pivot data
      • Insert image URLs
    • 6. Working with charts
      • Sparkline charts
      • Stacked charts
      • Bullet charts and clustered bar charts
      • Waterfall charts
      • Bar and pin charts
      • Change/deviation charts
    • 5. Conditional formatting
      • One-click options
      • Create rule
        • Rules (If conditions)
        • Color scale & data bars
        • Classification
        • Ranking
      • Manage rules
    • 7. Planning, budgeting & forecasting
      • What-if analysis & simulations
      • Goal Seek
      • Budgeting & allocations
      • Set version
    • 8. Paginated reporting
      • Pagination
      • Header & footer
        • Text
        • Images
        • Charts
        • KPI cards
      • Report layouts (Report+)
      • Display and themes
    • 10. Exporting reports
      • Export to PDF & Excel
        • Excel export - operational boundaries
      • Ad hoc emails
    • 11. Scheduling reports
      • Create new subscription
        • Select a report
        • Set subscription frequency
        • Select destination(s)
          • Email
          • OneDrive
          • Microsoft Teams
          • SharePoint
        • Review & save subscription
      • Manage your subscriptions
      • Administration
    • 12. Data writeback
      • Settings
        • General Settings
        • Data Settings
        • Destination Settings
        • Writeback security settings
        • Writeback time-out & batch size settings
        • Advanced Settings
      • Destinations
        • Azure SQL (Managed DB)
        • Azure SQL
        • Microsoft SQL Server
        • Synapse Dedicated SQL Pool
        • Azure Data Lake Storage
        • Databricks
        • Snowflake
          • Setting up Snowflake OAuth
        • Amazon Redshift
        • BigQuery
        • SingleStore
        • SAP HANA
        • Oracle
        • PostgreSQL
        • MySQL
        • OneDrive
        • SharePoint
        • Dataverse
        • Fabric Warehouse
        • Fabric lakehouse
        • Fabric SQL
        • URL as destination
      • Logs
      • Reading mode
    • 14. Manage aggregation
      • Row aggregation
      • Column aggregation
    • 18. Variables
      • Variable types
        • Number
        • Select
        • Text
        • Date
        • Date range
        • Boolean
        • Button
      • Variable bookmarks
  • Admin Console
    • Manage Profile
    • User management
      • User Roles and Permissions
      • Create custom roles and policies
    • Settings
      • General
      • Generate builds - on prem
      • Forecast
      • Holidays
      • API token
      • Writeback
      • Managed DB
      • Assets
    • Onboarding actions
    • Writeback
  • Display settings
    • General settings
    • Hierarchy settings
    • Number settings
    • Miscellaneous settings
    • On-load scripting
  • Formula syntax
    • Conditional statements
      • IF
      • IFNA
      • SWITCH
      • FILTERIF
    • Logical functions
      • AND
      • IN
      • ISBLANK
      • ISEMPTY
      • ISNUMBER
      • NOT
      • OR
      • XOR
    • Math functions
      • ABS
      • AVERAGE
      • AVERAGEEXNEG
      • AVERAGEEXZERO
      • AVERAGEEXZERONEG
      • AVERAGEIF
      • CEILING
      • COUNT
      • COUNTIF
      • DIVIDE
      • EVEN
      • EXP
      • FLOOR
      • INDEXOF
      • LOG
      • ODD
      • MAX
      • MIN
      • NORMDIST
      • NORMSDIST
      • NORMINV
      • NORMSINV
      • PCT
      • POWER
      • RAND
      • RANDBETWEEN
      • ROUND
      • ROUNDDOWN
      • ROUNDUP
      • MROUND
      • SORT
      • SQRT
      • SUM
      • PMT
    • Text formatting functions
      • CONCATENATE
      • HYPERLINK
      • LEFT
      • LOWER
      • MID
      • PROPER
      • REPLACE
      • REPT
      • RIGHT
      • TEXT
      • TRIM
      • UPPER
      • VALUE
    • Date functions
      • DATEADD
      • DATEDIFF
      • DAY
      • DATE
      • DATE.SET
      • DATE.FORMAT
      • SOWEEK
      • SOMONTH
      • SOQTR
      • SOYEAR
      • EOWEEK
      • EOMONTH
      • EOQTR
      • EOYEAR
      • NETWORKDAYS
      • ADDDAYS
      • ADDWEEKS
      • ADDMONTHS
      • ADDQTRS
      • ADDYEARS
      • FROMEXCELDATE
      • MONTH
      • NOW
      • PERIOD_RANGE
      • TODAY
      • TOEXCELDATE
      • YEAR
    • Time intelligence functions
      • AGGREGATE
      • FILTER
      • COLUMN_PERIOD
      • LASTNDAY
      • LASTNMONTH
      • LASTNQTR
      • LASTNYEAR
      • MONTHPERIOD
      • MOVINGAVERAGE
      • MOVINGSUM
      • MTD
      • NEXTNDAY
      • NEXTNMONTH
      • NEXTNQTR
      • NEXTNYEAR
      • QTD
      • QTRPERIOD
      • SHIFT
      • TOTALYTD
      • TOTALQTD
      • TOTALMTD
      • VALUEAT
      • YEARPERIOD
      • YTD
    • Other operators
    • Identifiers
      • CLOSEDPERIOD
      • COLUMN.DATE
      • COLUMN.PARENT
      • COLUMNS
      • CURRENT_PERIOD
      • DESCENDANTS
      • FORECAST.CLOSED_END
      • FORECAST.CLOSED_START
      • FORECAST.OPEN_END
      • FORECAST.OPEN_START
      • GROUP INDEX
      • HAS
      • HAS_ALL
      • HAS_SOME
      • LEAVES
      • LEVEL
      • LOGGEDIN_EMAIL
      • LOGGEDIN_NAME
      • MATCH
      • MAXDATE
      • MEMBERS
      • MINDATE
      • RELATIVE
      • RELATIVE_COLUMN
      • ROW.PARENT
      • ROW.LABEL
    • Scripting functions
      • DISPLAYTOAST
      • EXPORT
      • LAYOUT
      • SETCFRULE
      • SETFILTER
      • SETFILTERBYINDEX
      • SETVISIBILITY
      • SHOWBETWEENPERIOD
      • SHOWCLOSEDFORECAST
      • TOPN
      • DISPLAY SETTINGS
        • SETBLANKLABEL
        • SETSUPPRESSZEROS
        • SETRAGGEDHIERARCHY
        • SEPARATOR
        • SETCOMBINECOLUMNHEADER
        • SEMANTICFORMAT
        • SHOWNULLAS
        • SHOWZEROAS
        • SINGLECHILD
    • Statistical Functions
      • RANK
      • RANKEQ
      • RANKAVG
    • Miscellaneous functions
      • FETCH
      • LOOKUP
    • Measure/Column selection functions
      • GETCOLBETWEENPERIODS
      • GETMEASURE
  • Advanced topics
    • Audit log
    • Backup & restore report config
    • Enterprise themes
    • PowerPoint integration
    • Drill down and roll up in performance mode
  • Accessibility shortcut keys
Powered by GitBook
On this page
  • 1. Overview
  • 2. Writeback Modes
  • 3. Configure Destination
  • 4. Overview of writeback steps
  1. Working with Premium Table

12. Data writeback

PreviousAdministrationNextSettings

Inforiver writeback allows a user to export and save a report table to destinations of different types including file destinations, data warehouses, and data lake storage.

Inforiver, unlike other BI tools, does not require IT overhead in terms of database setup and defining the structure of writeback tables in advance. Inforiver instead supports dynamic database configuration and table creation at run time and performs semi-structured, on-the-fly writeback to more than one destination at a time.

Data writeback is a Writeback Matrix feature; you need to have a valid Inforiver Writeback Matrix subscription.

1. Overview

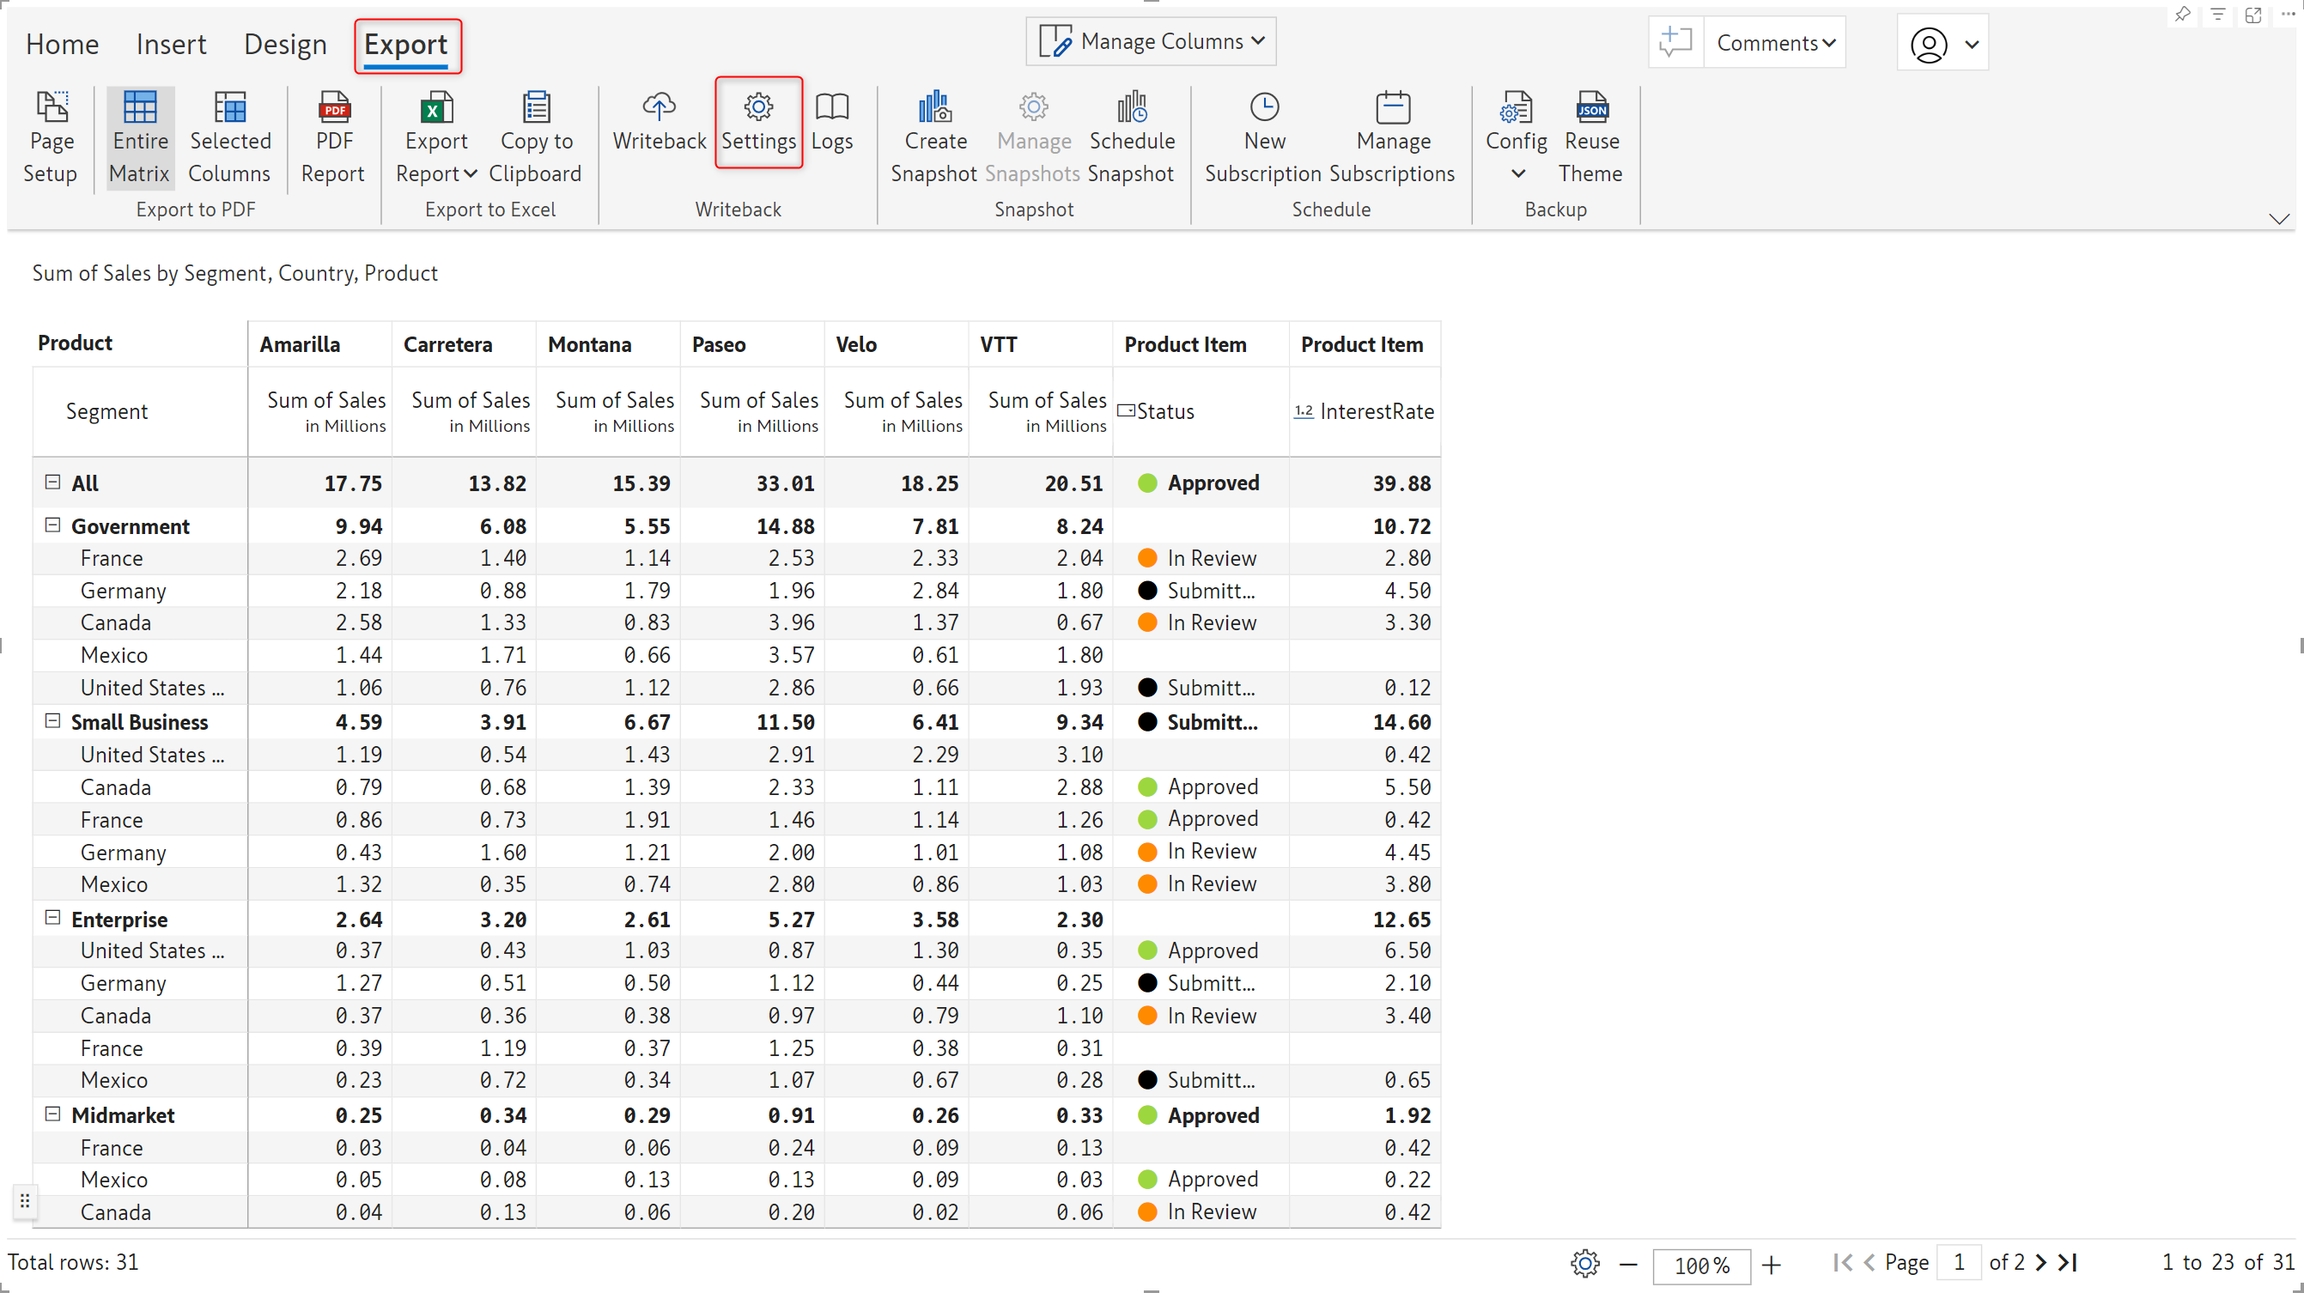
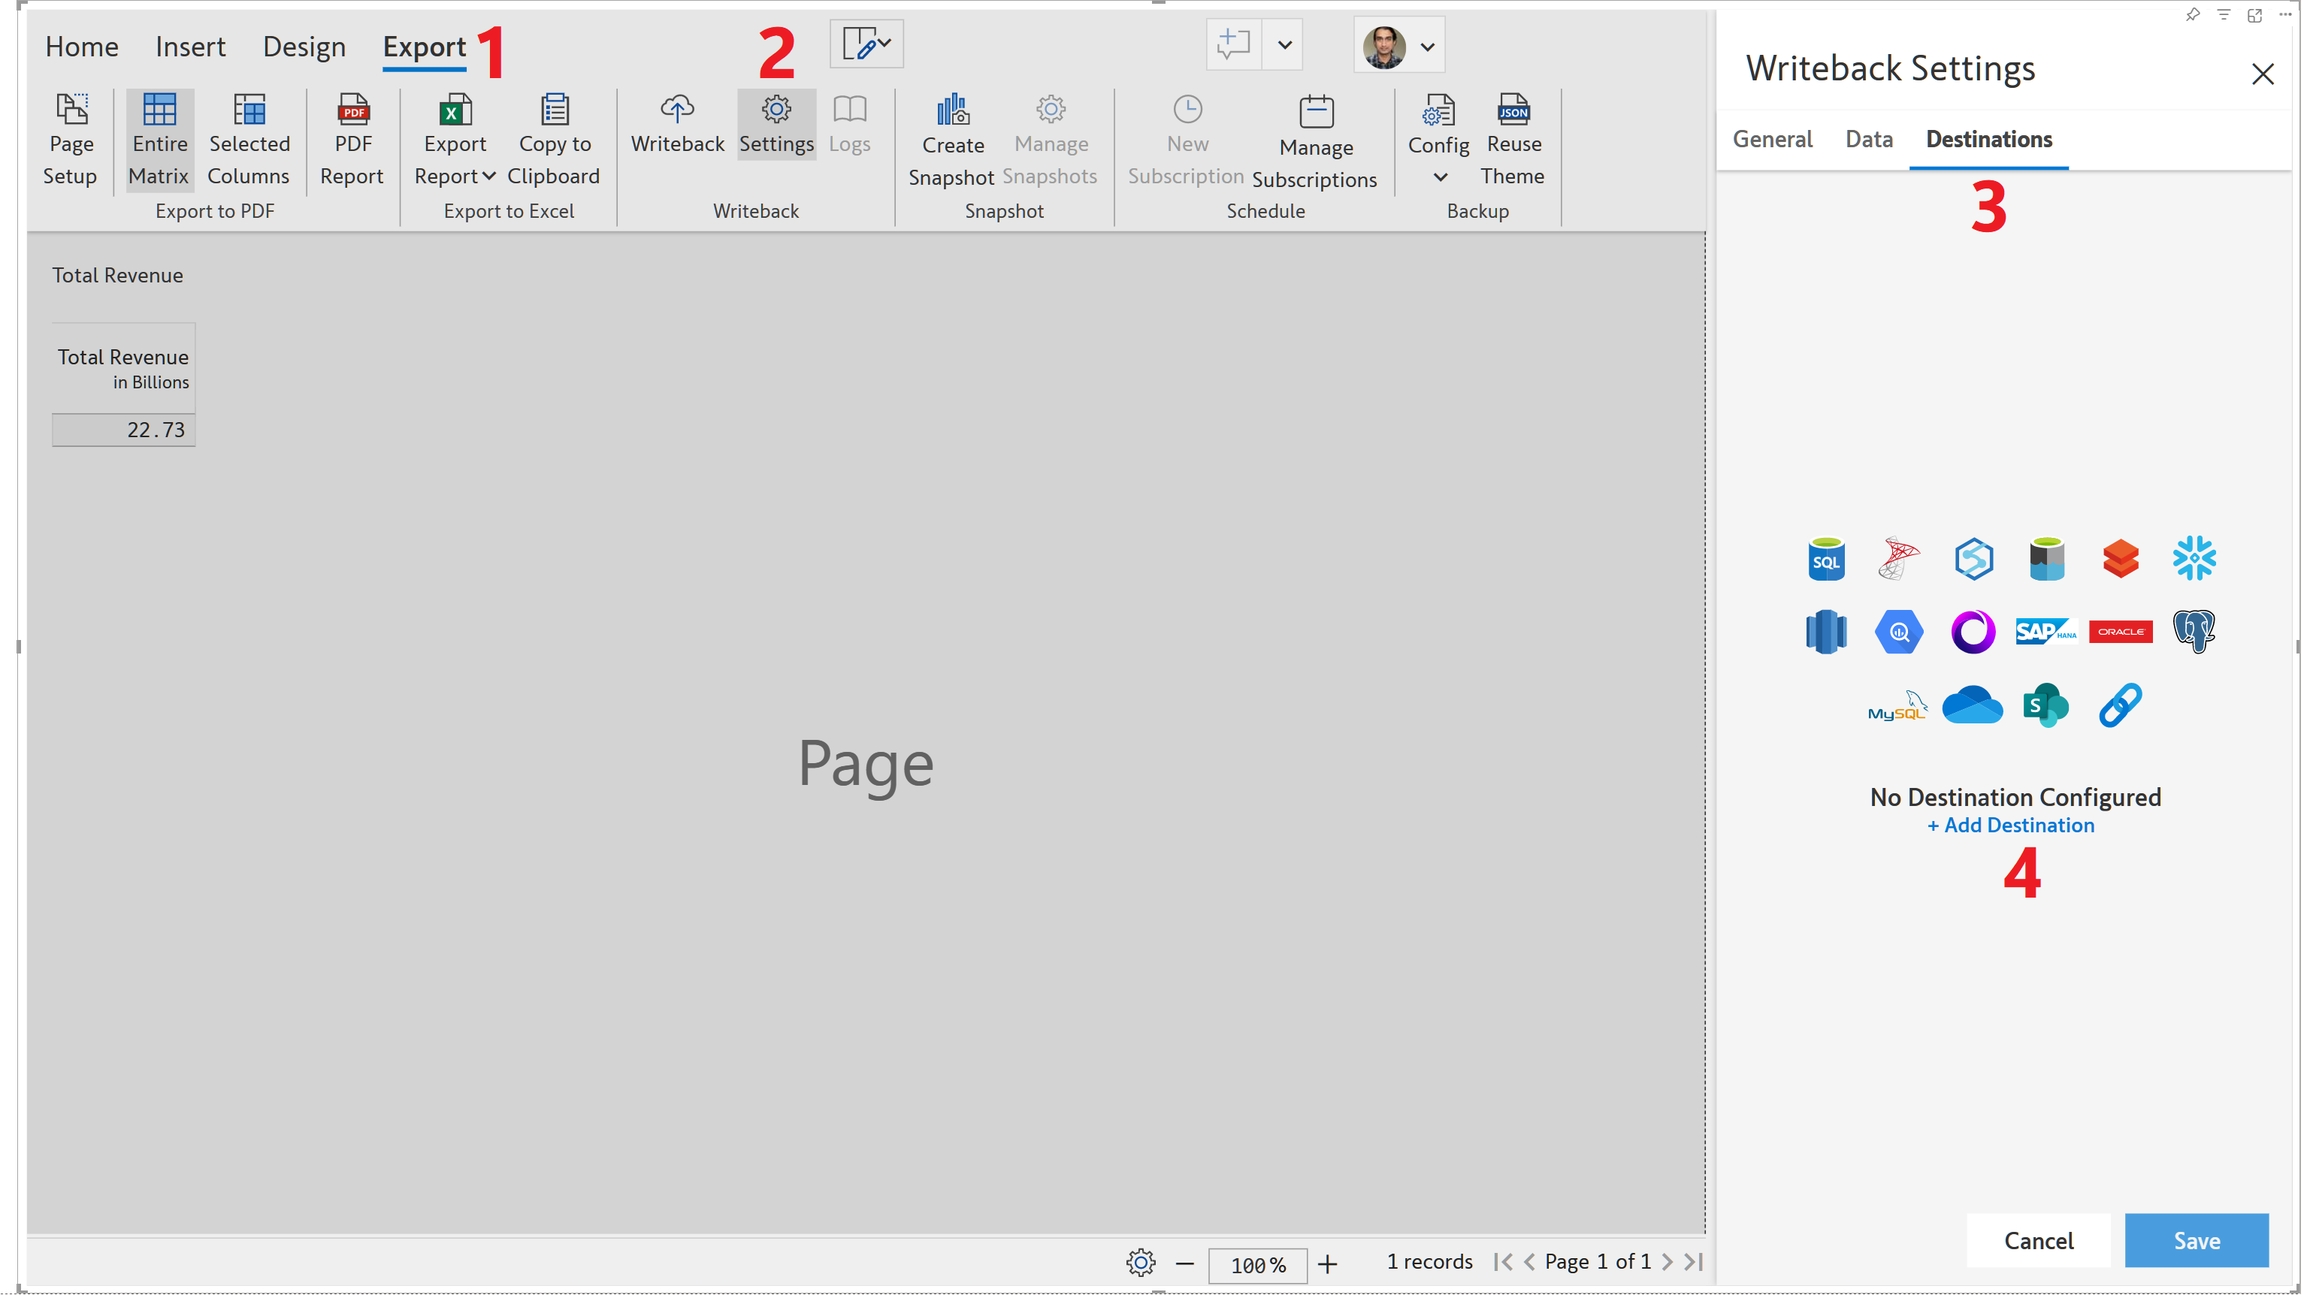
The Writeback screen is accessed by going to the Export tab in the toolbar. Three buttons give you access to writeback and related settings.

Writeback - Export report data to a destination.

Settings - Configure writeback-related settings. Navigate to the writeback settings chapter to learn more.

Logs - Every writeback event is logged with detailed information relevant to each writeback. Navigate to the writeback logs chapter to learn more.

Writeback will be disabled unless a row or column dimension is added to the visual.

2. Writeback Modes

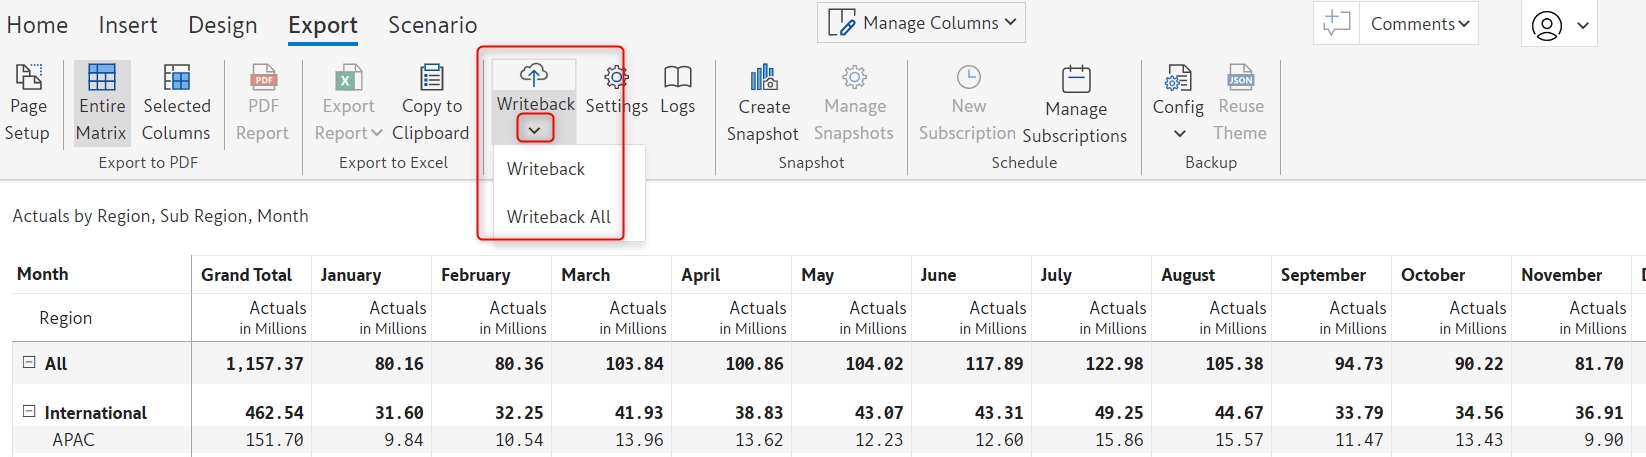
You can choose whether to writeback the report alone or to writeback the report along with any associated scenarios.

Clicking on the icon below the Writeback button will show options for writeback.

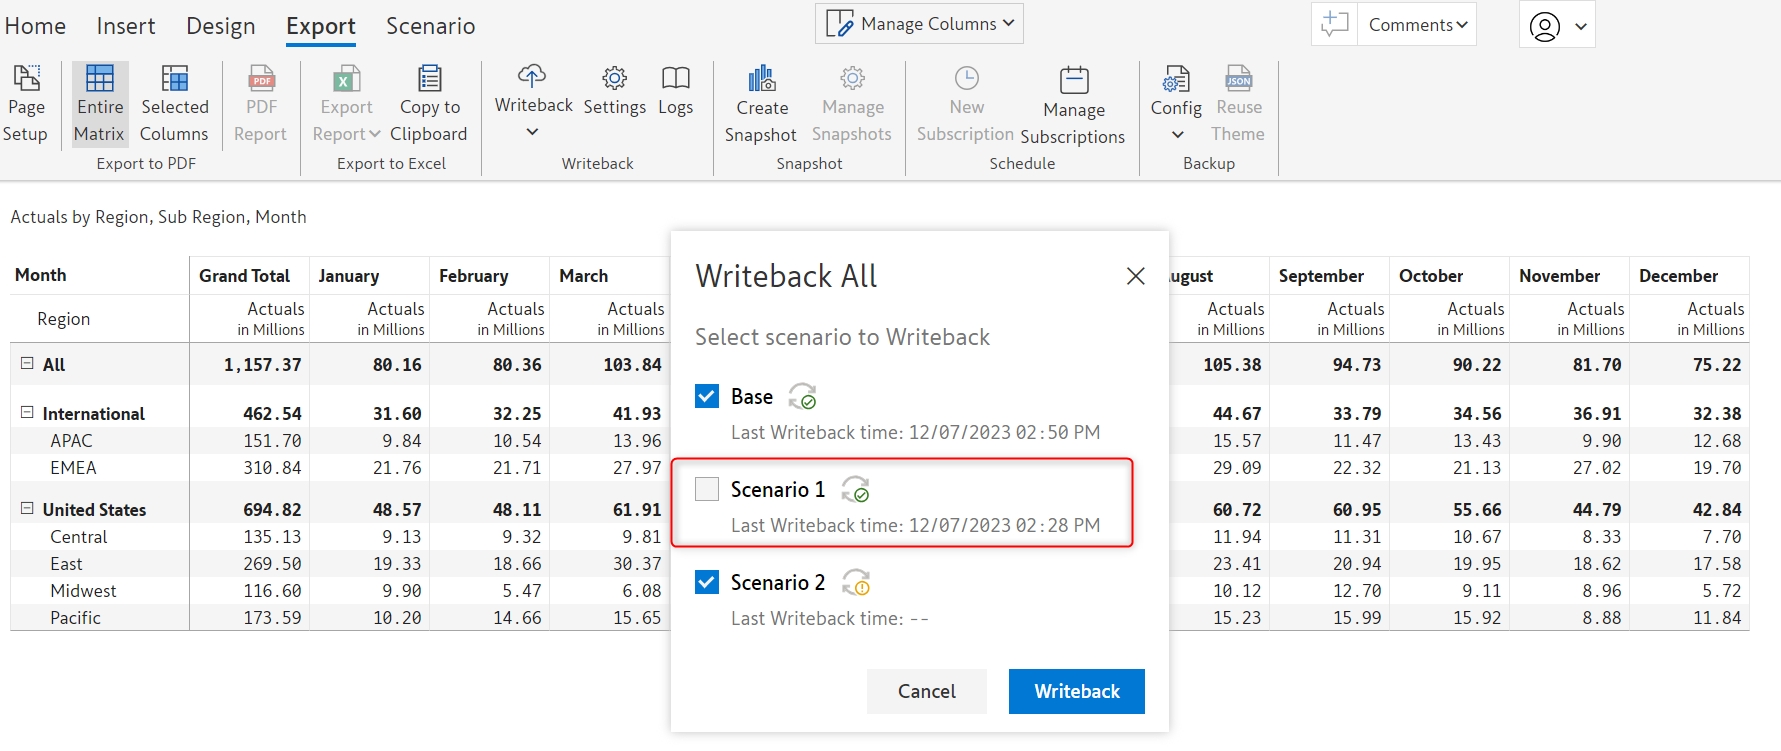
Selecting 'Writeback All' will open a dialogue box, which lets you choose which scenarios to writeback. If you do not want a particular scenario to be exported - uncheck the box adjacent to the name of that particular scenario.

3. Configure Destination

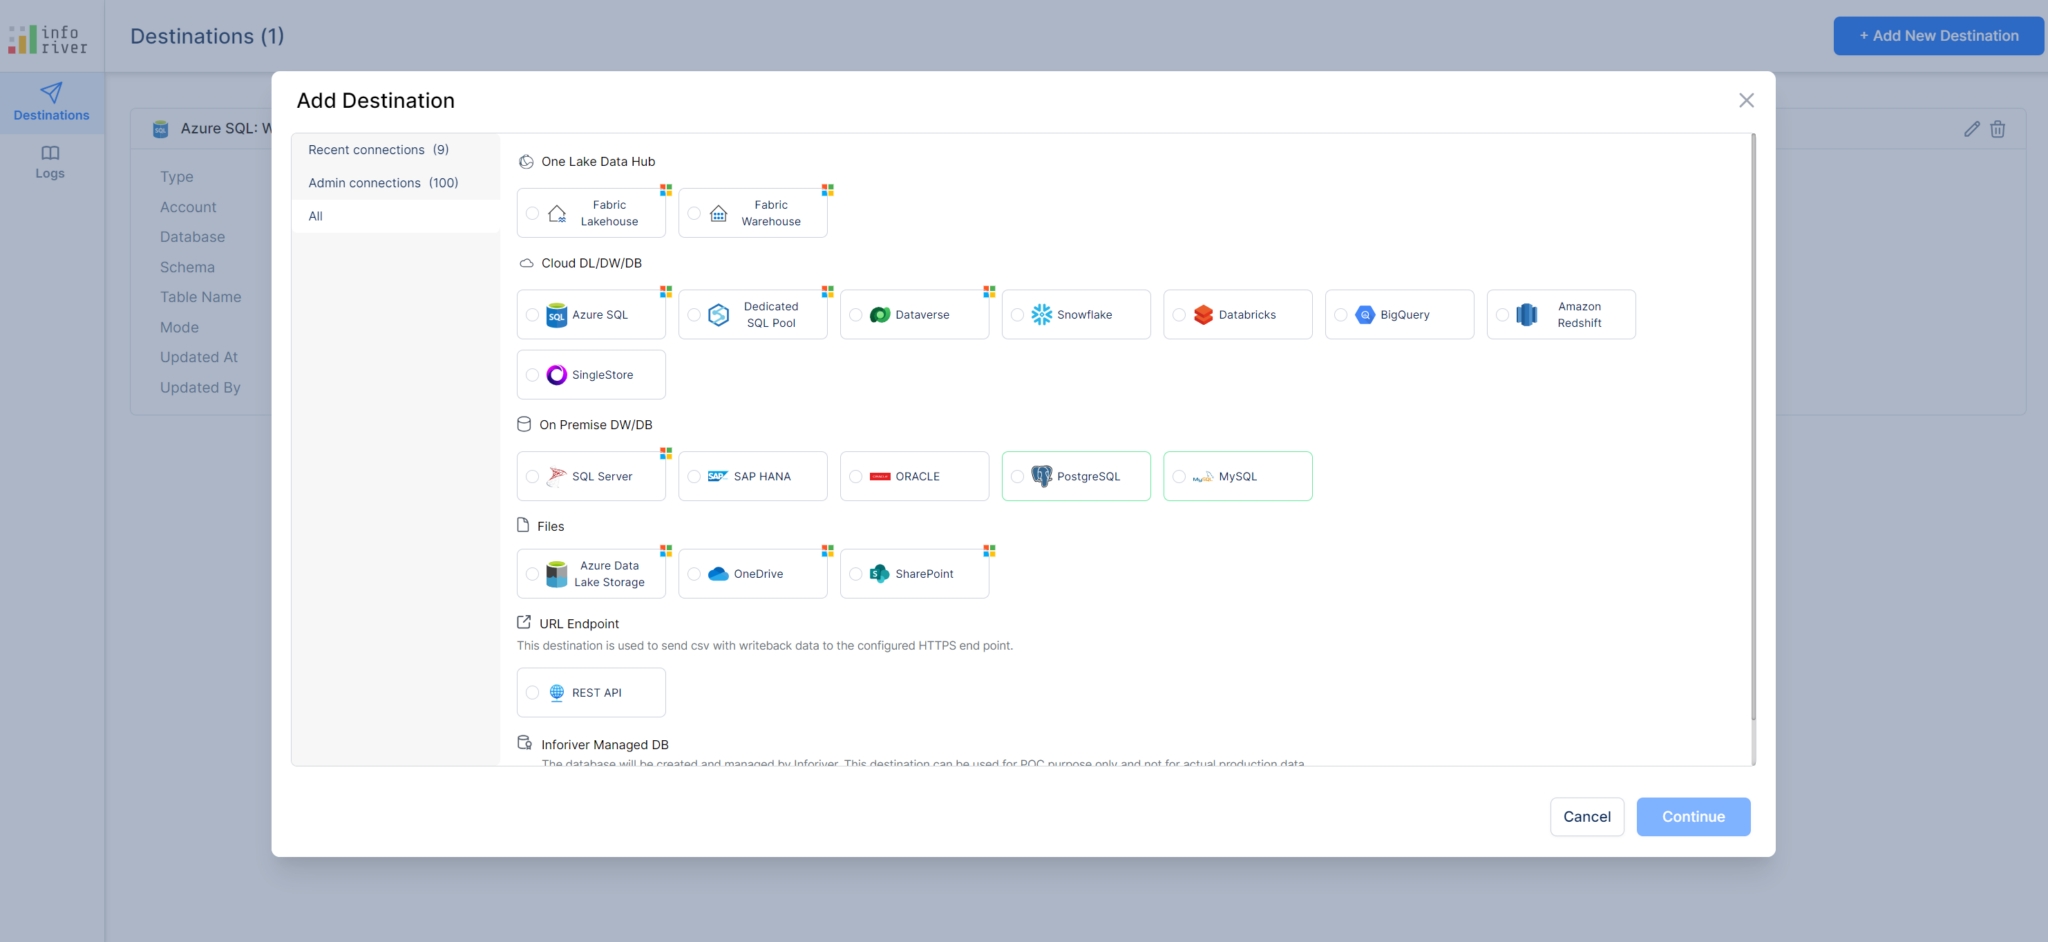
Inforiver supports fast writeback setup and execution for several types of data destinations. Configuring writeback destination(s) is straightforward and involves the same procedure (picture below) for any destination.

On-premise database servers need to be directly reachable from the internet for writeback. For this, on-premise servers must have a public IP address with port forwarding.

A list of destinations will be displayed for the users to select from.

To learn how to configure each destination in the above list, navigate to this page.

The number of rows that can be written back is 200k rows for Excel and CSV and 250 rows for OneDrive and SharePoint

4. Overview of writeback steps

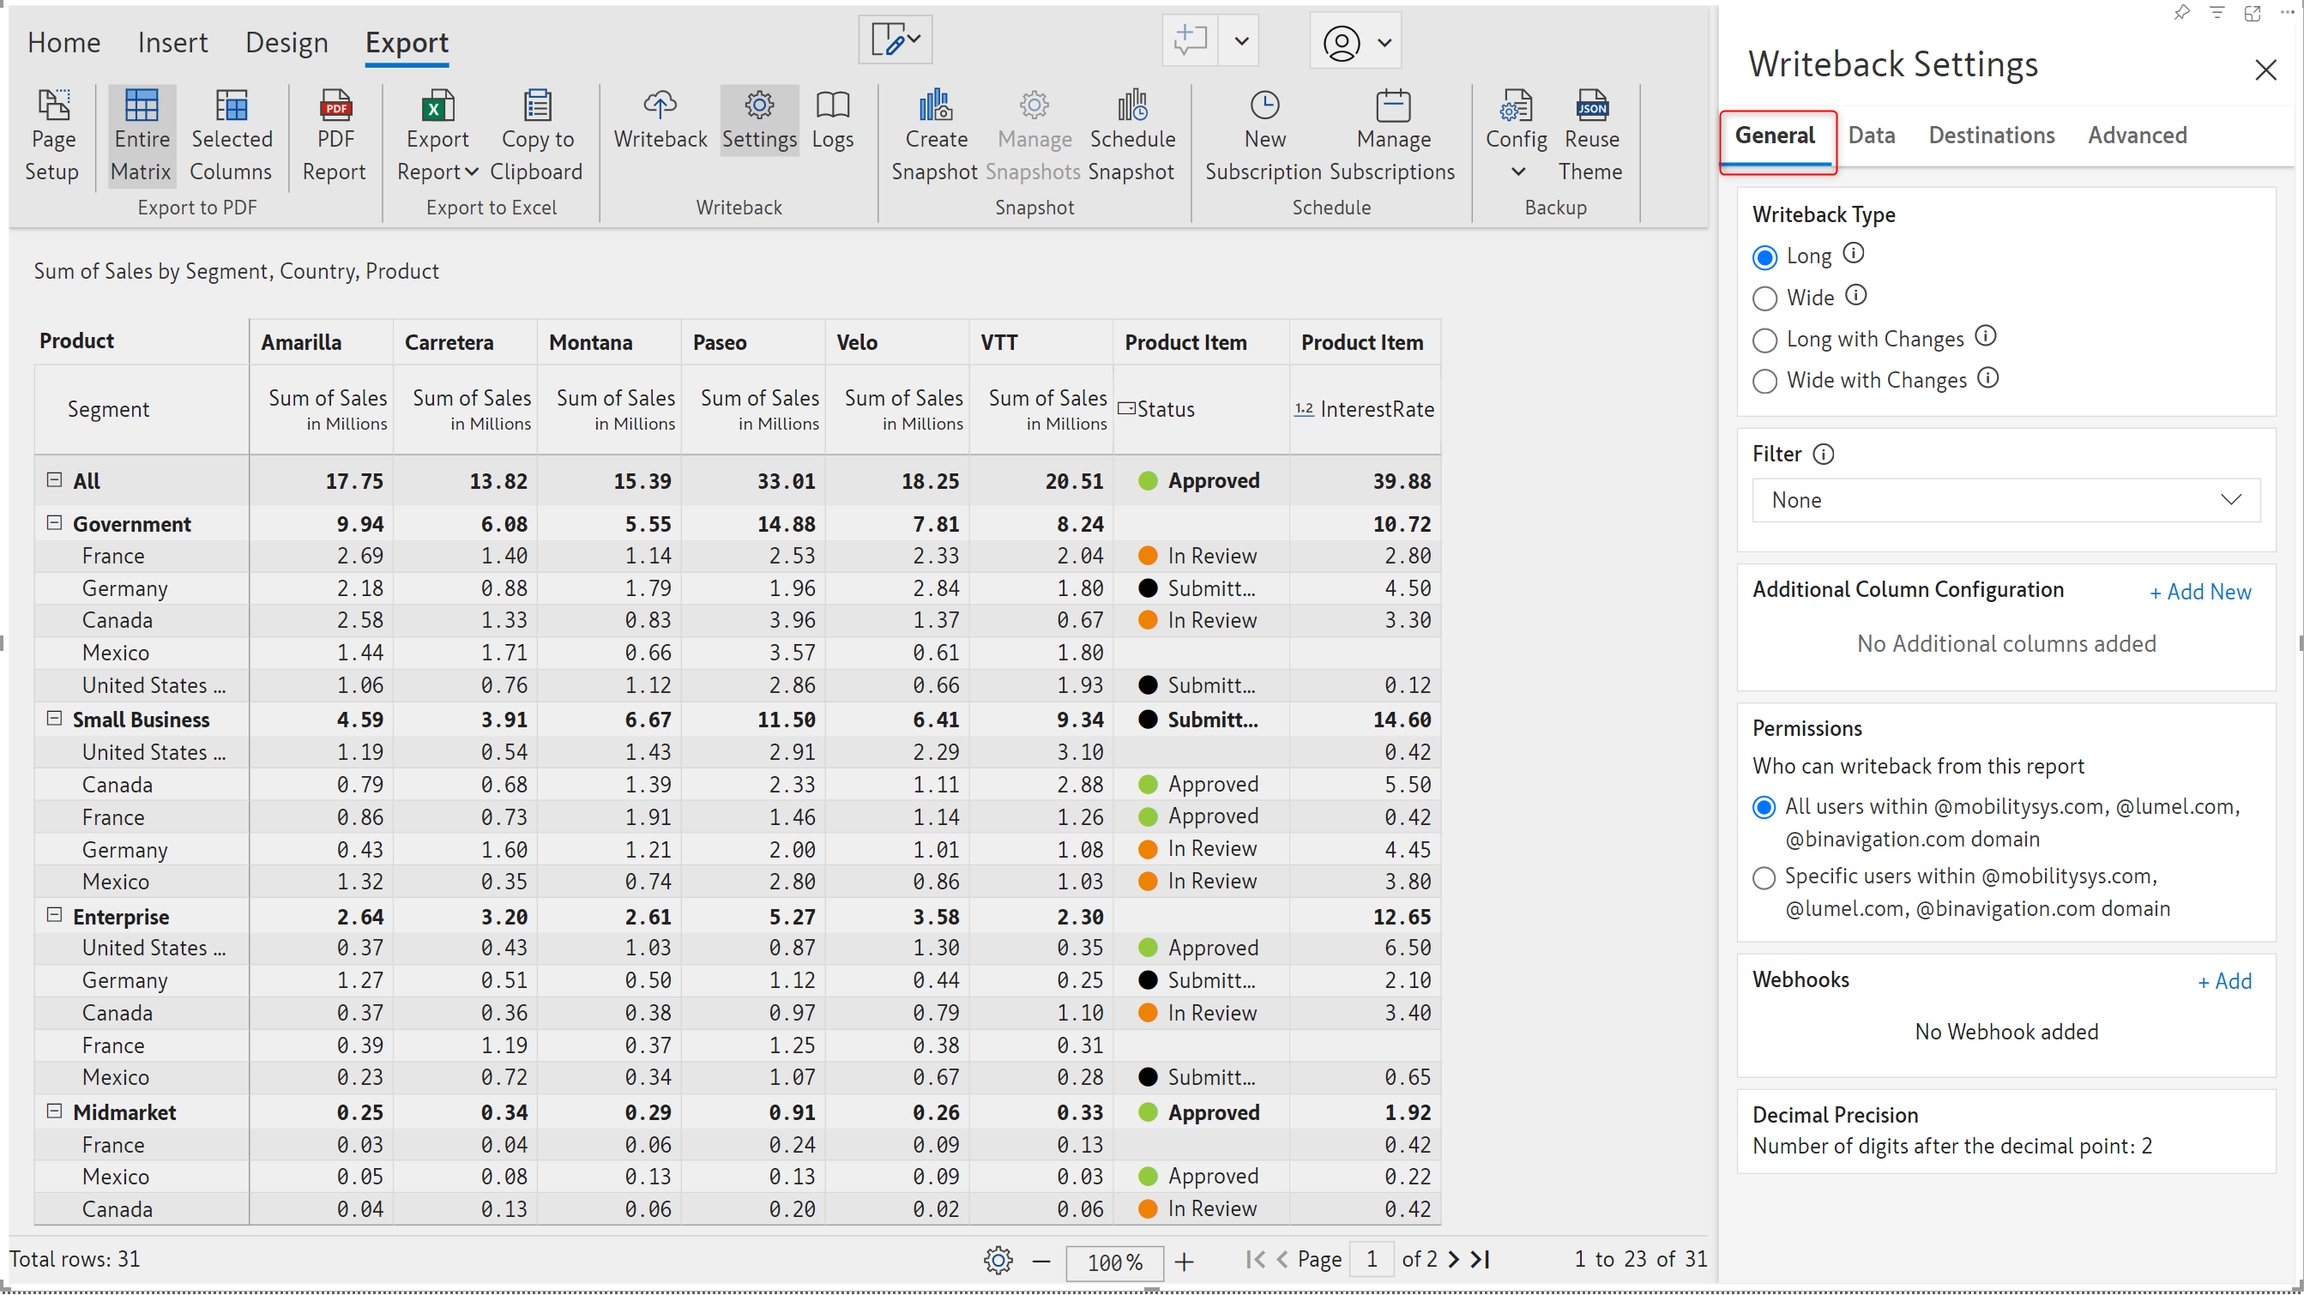
STEP 1: Navigate to the Export ribbon and click the Settings button to open the writeback settings side pane.

STEP 2: In the general tab, set the writeback type, and optionally add filters and permissions. Learn more about General writeback options.

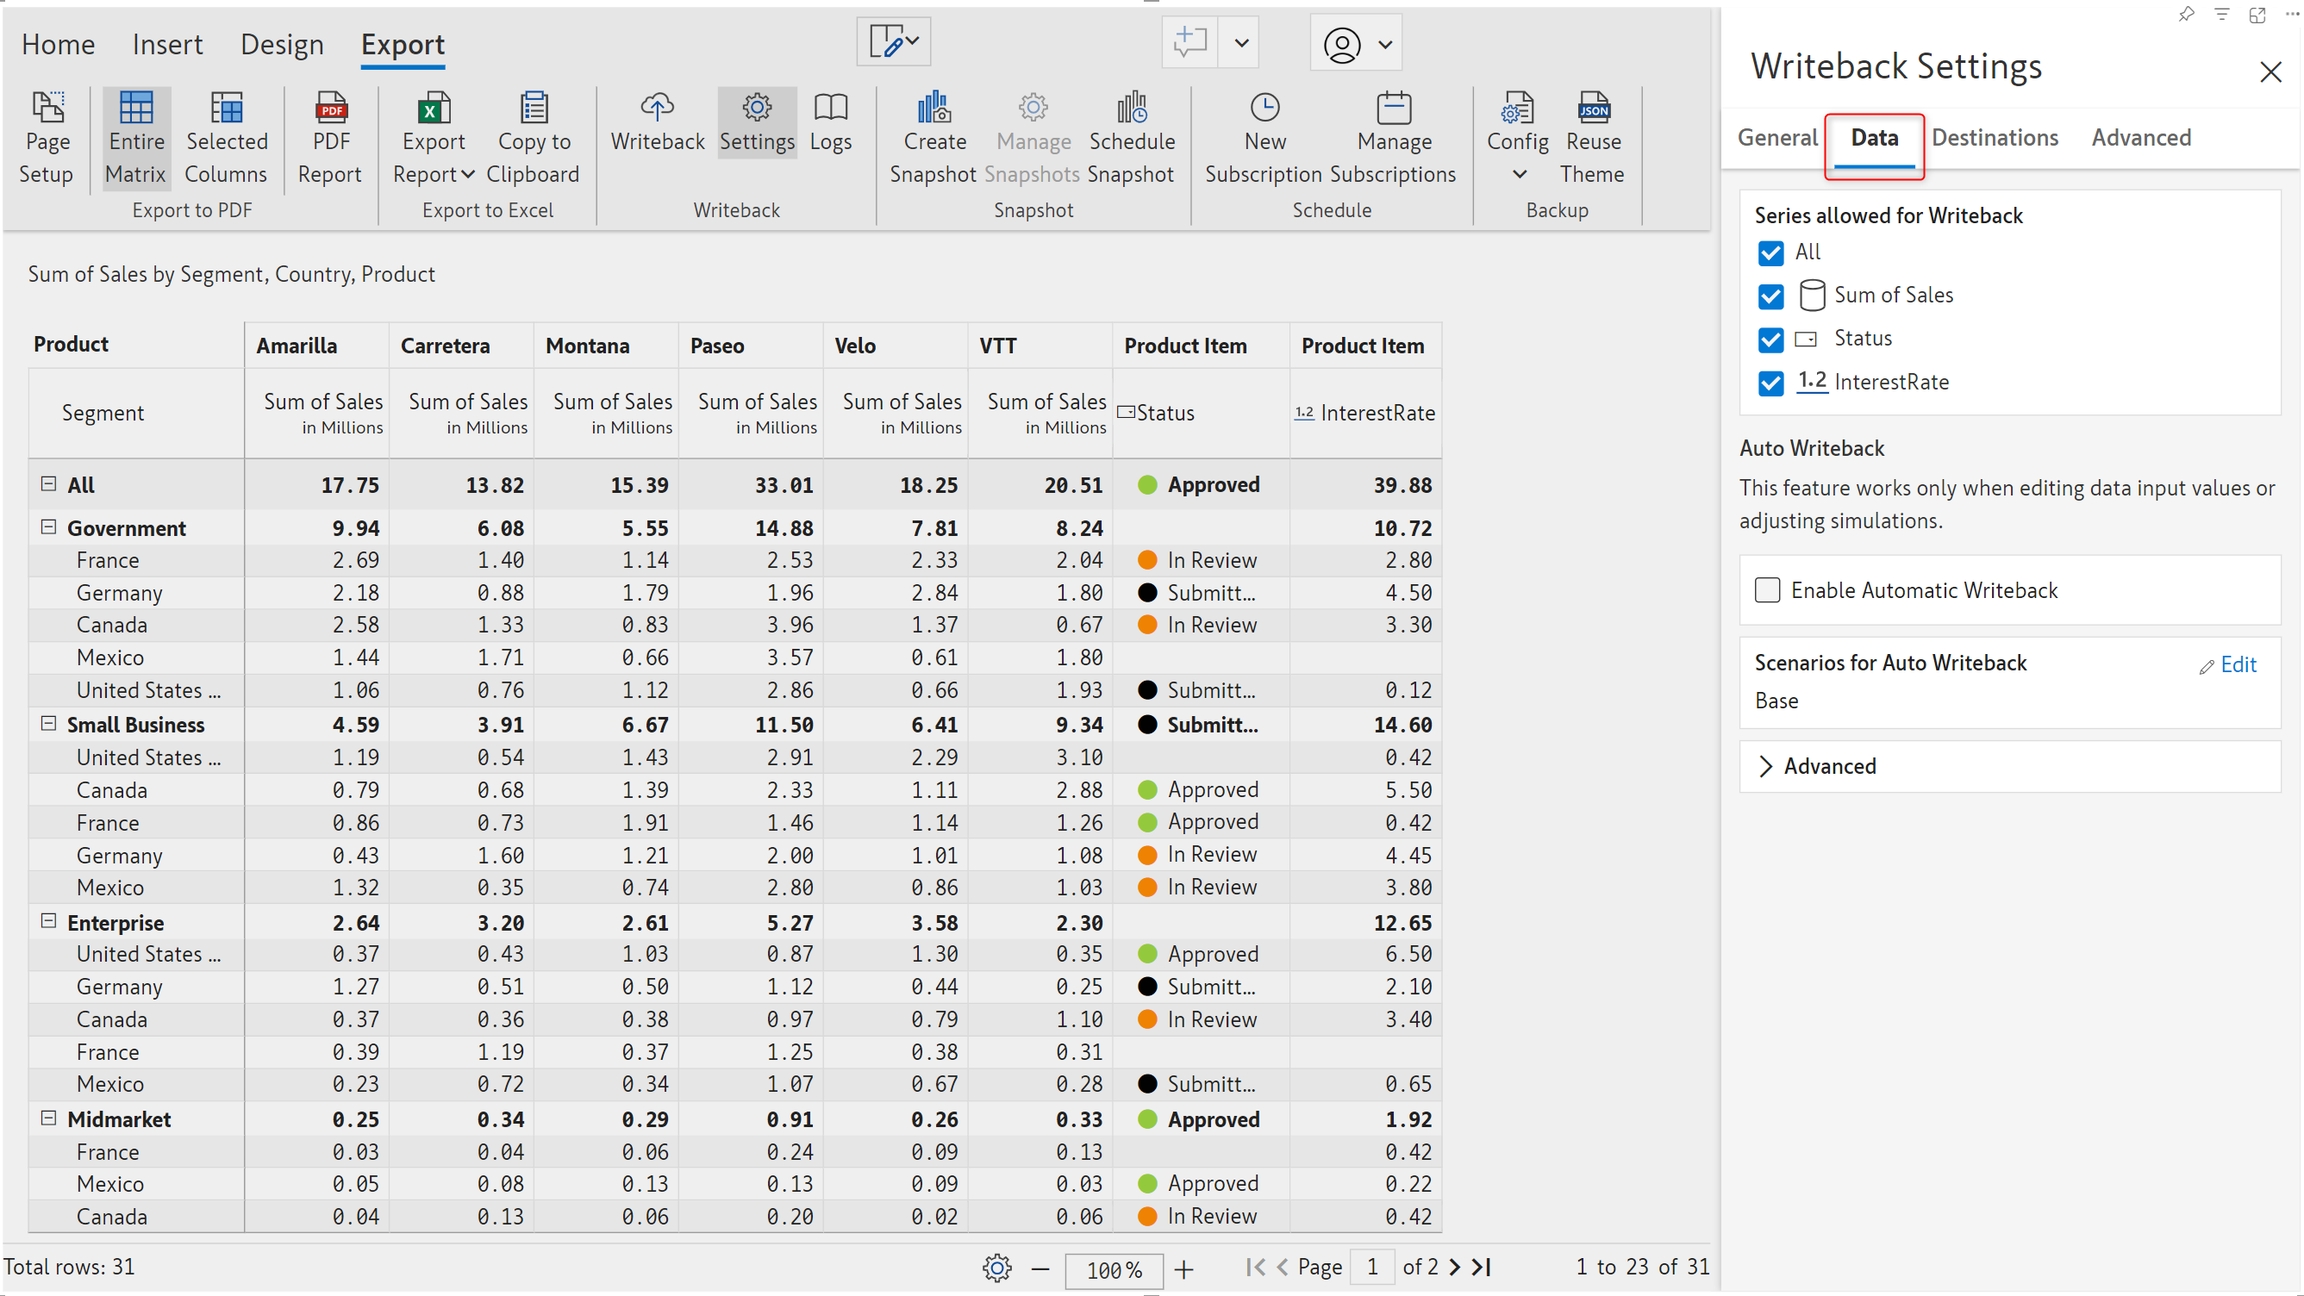
STEP 3: In the data tab, determine the scenarios and series to be written back and enable automatic writeback if applicable. Learn more about Data settings for writeback.

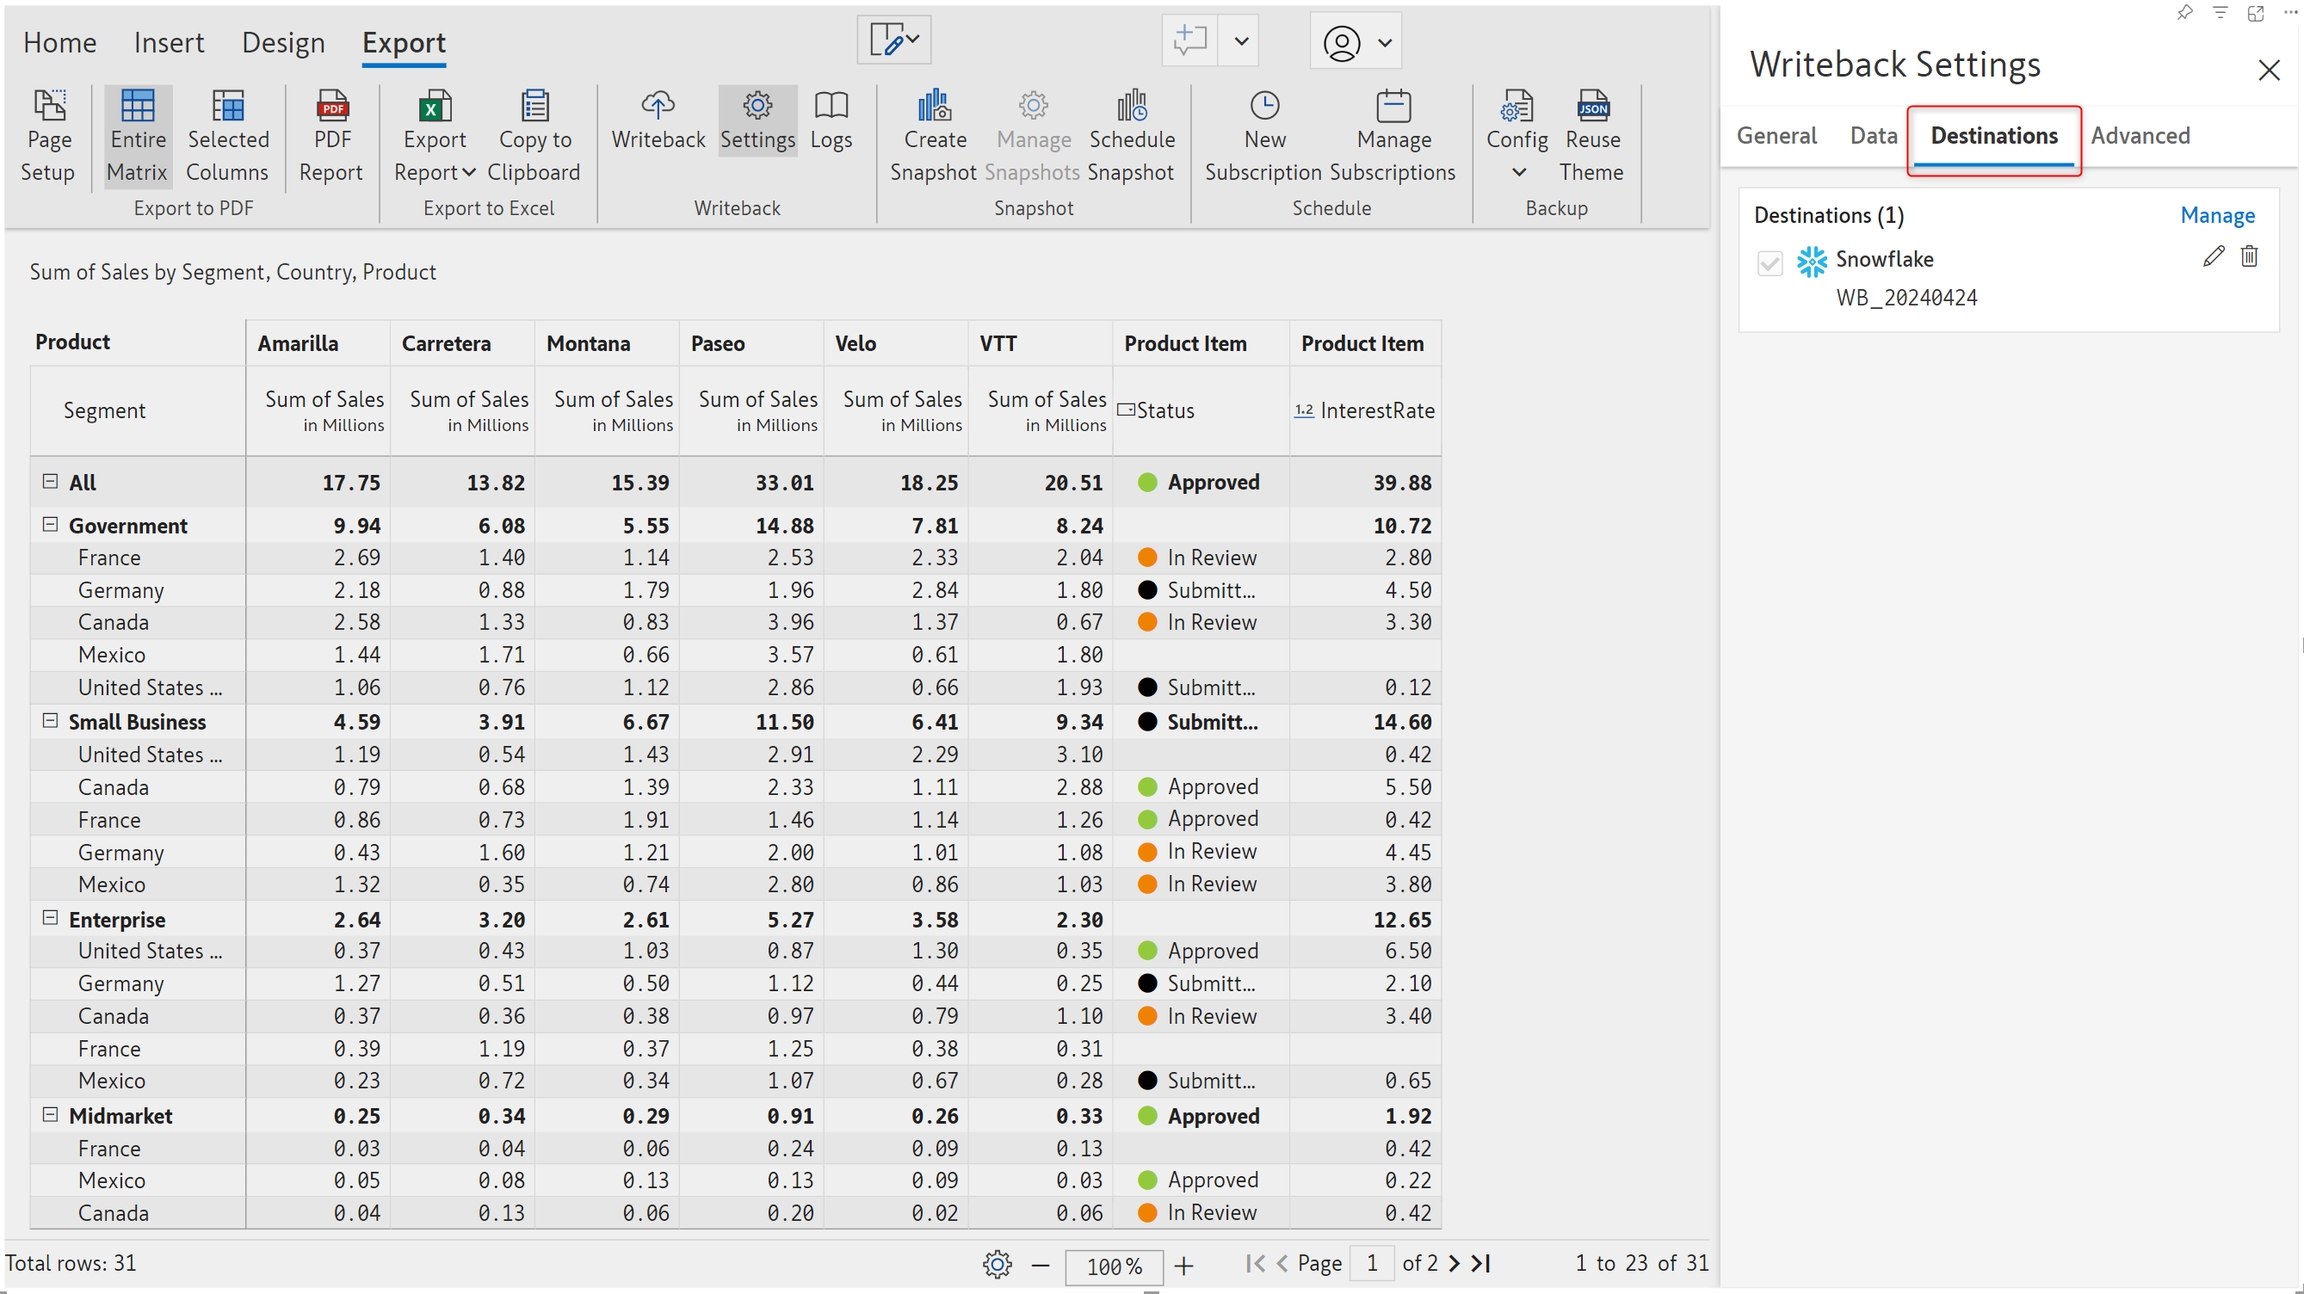
STEP 4: Configure writeback destinations from the Destinations tab. Learn more about configuring destinations.

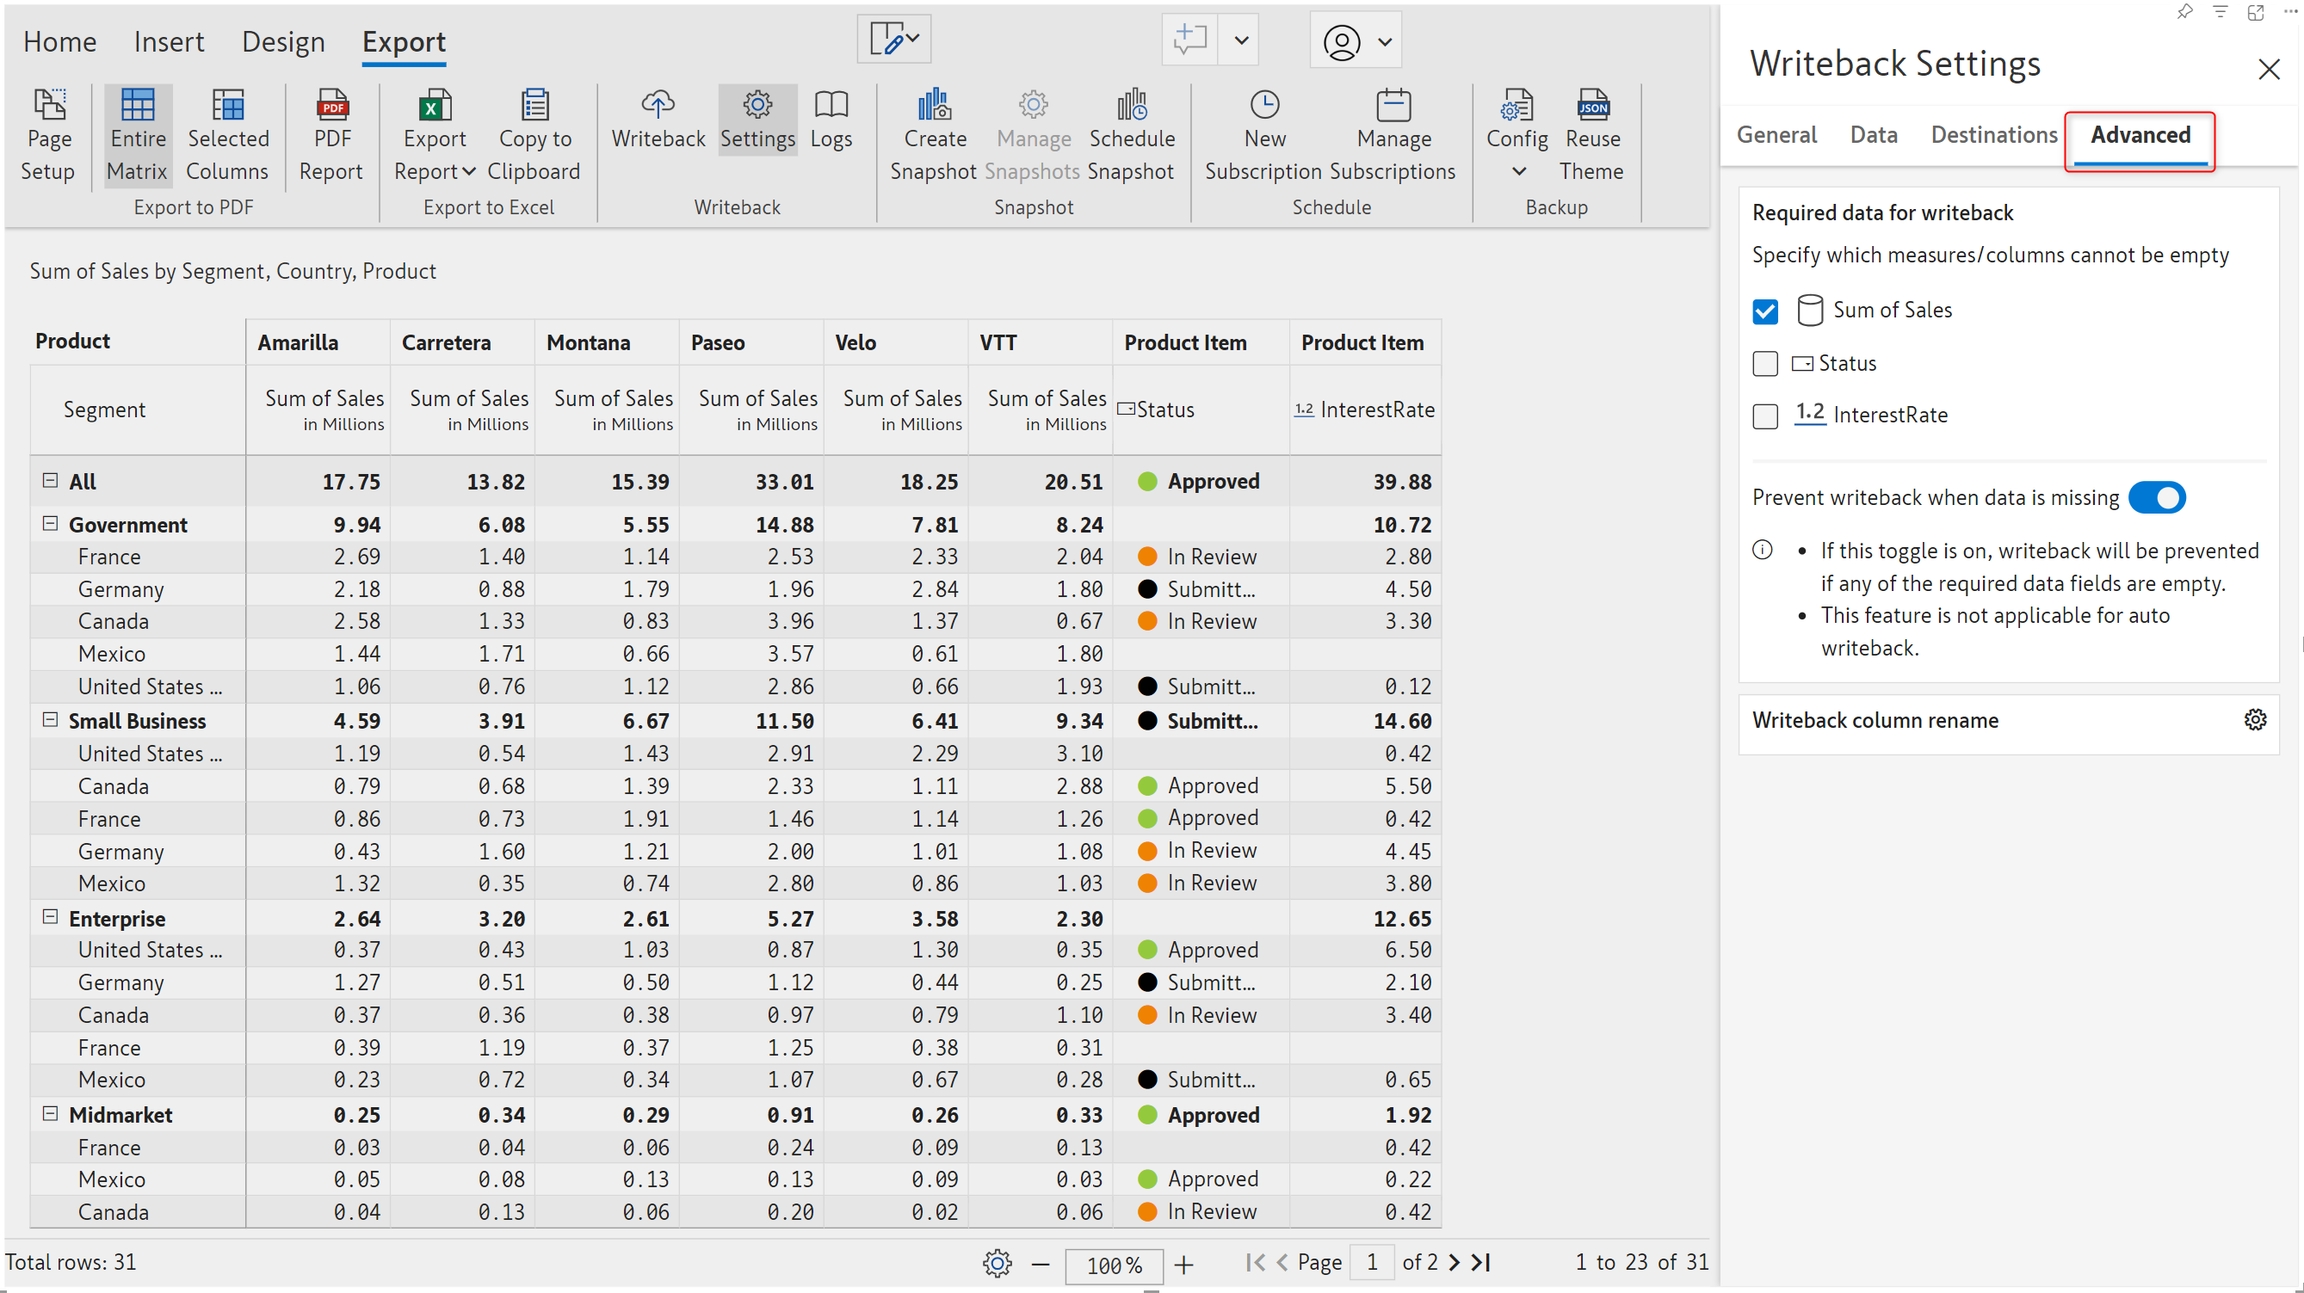
STEP 5: In the advanced tab, you can prevent writing back if a specific column that should not be empty contains null values. You can also rename native fields and specify a different column name to be written back. Learn more about advanced writeback settings.

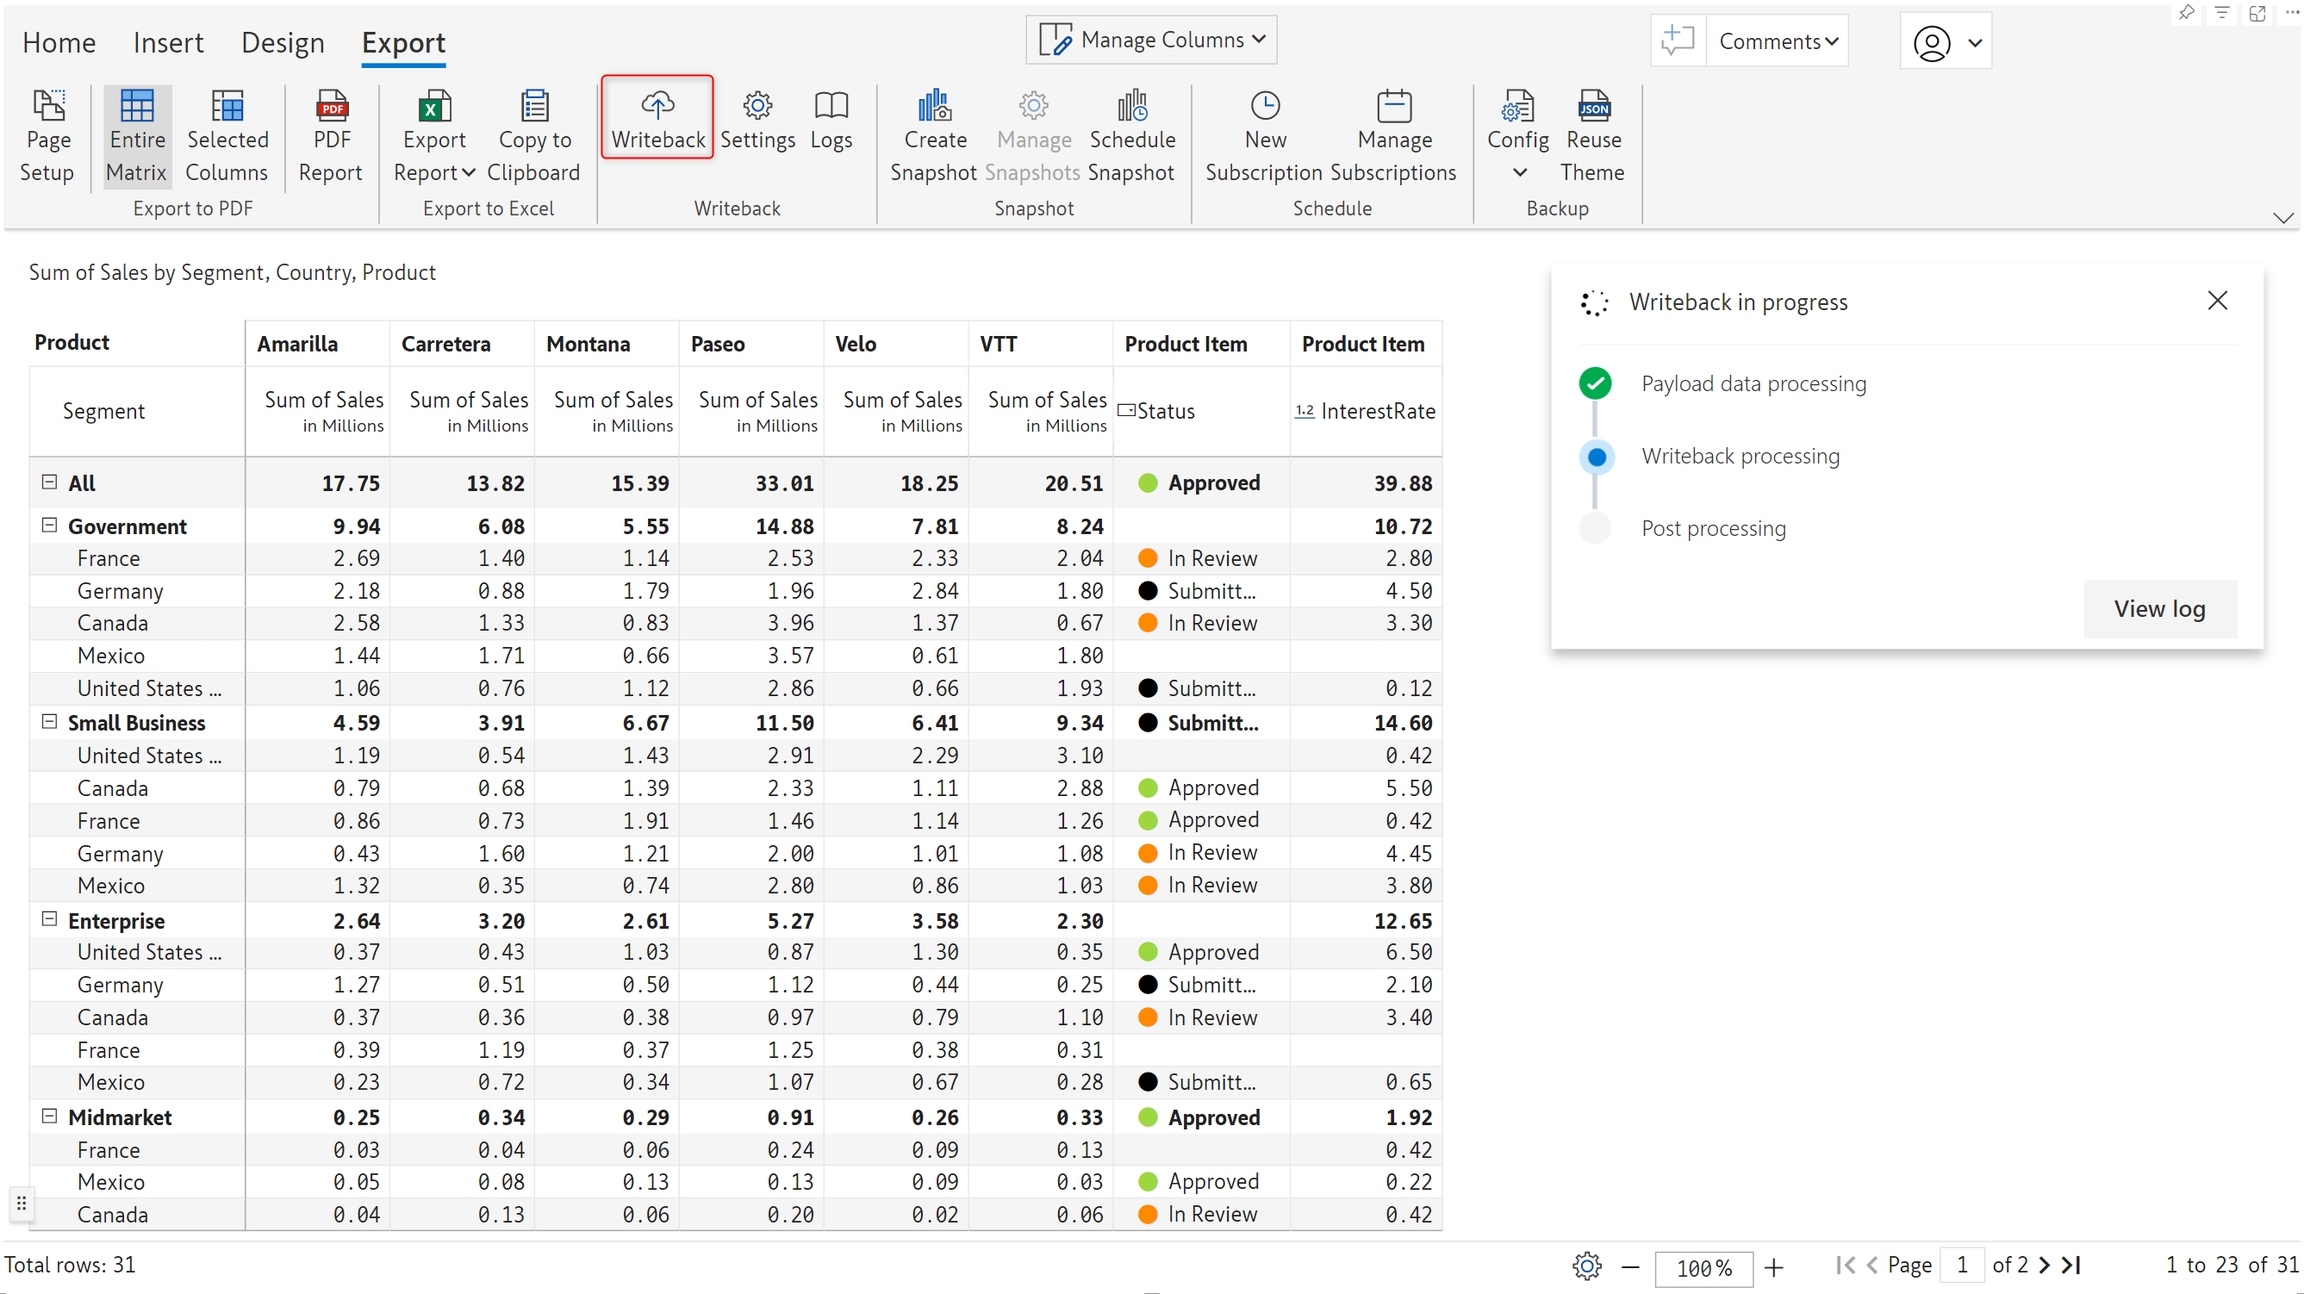
STEP 6: After configuring writeback settings, close the side panel and click the Writeback button. A notification window will display the progress and status of the writeback.

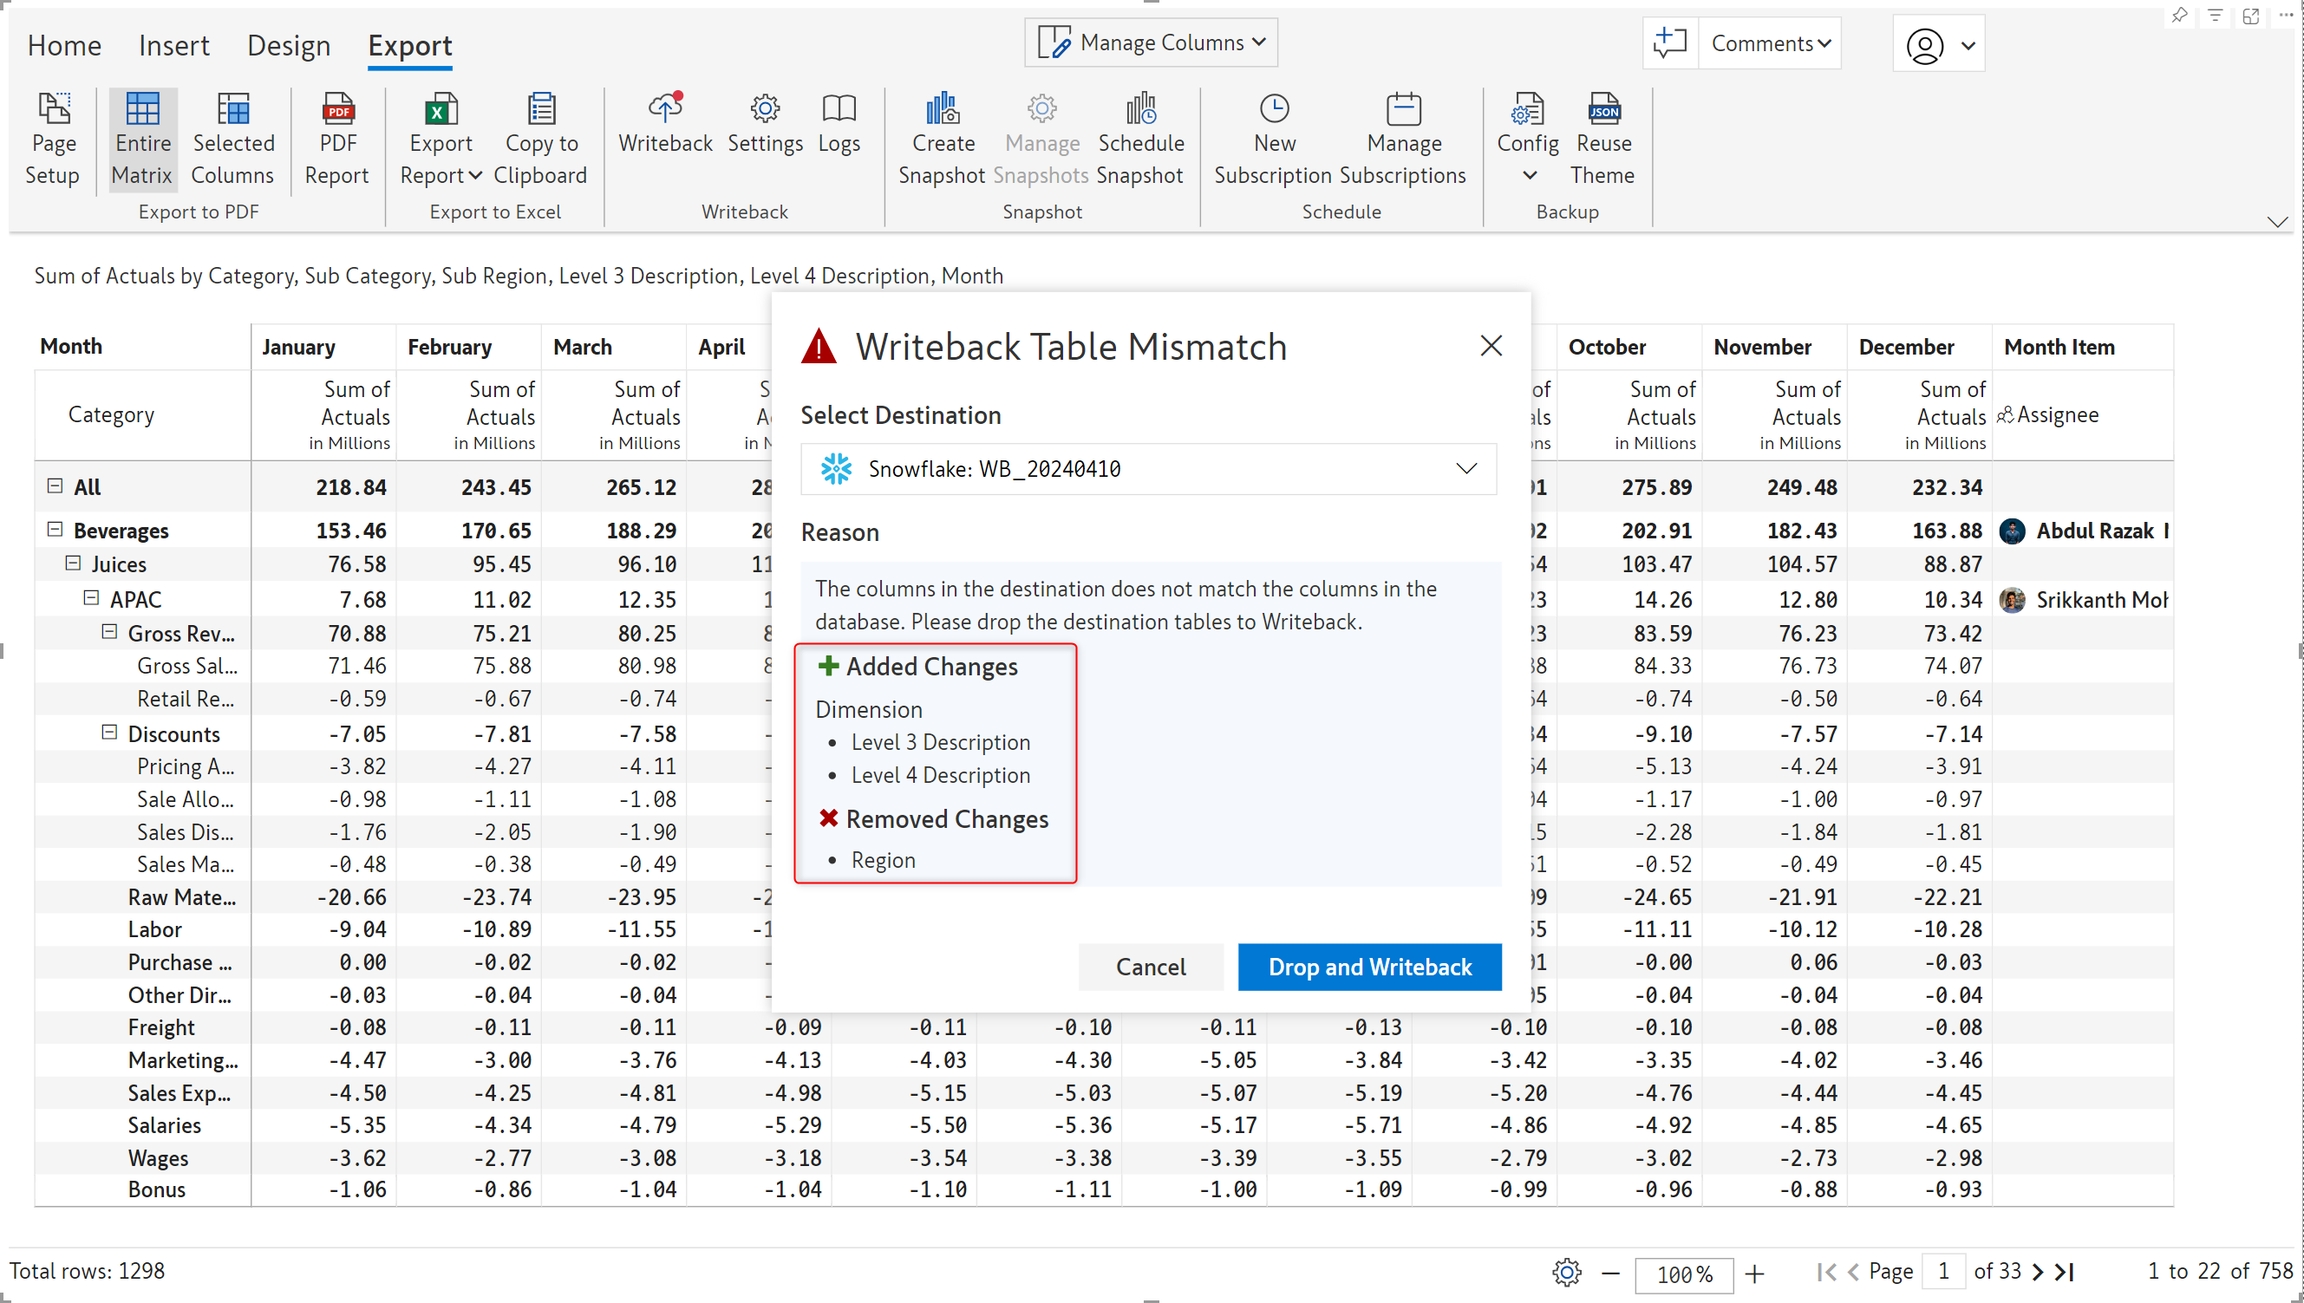
After performing an initial writeback, you may need to add or remove visual parameters as you build your report. Any table structure changes required in the destination due to adding or removing visual parameters will be displayed in a notification window. You can choose whether to drop the existing table and re-create it with the new structure before writing back.

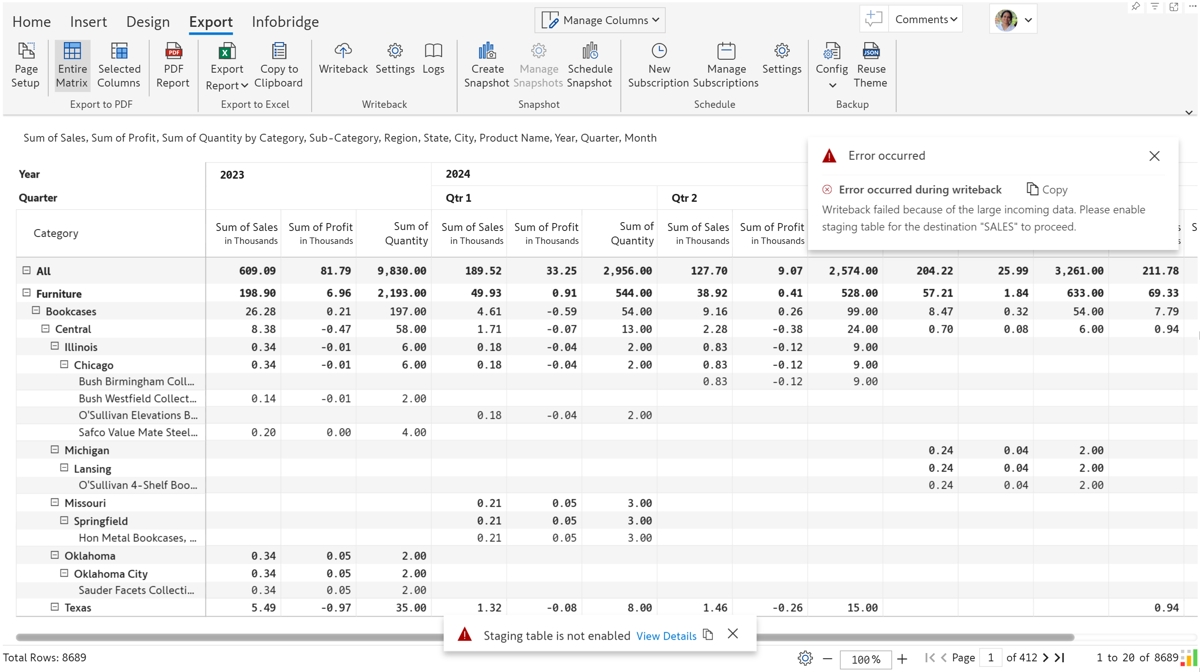
When the number of rows being written back exceeds a threshold, you'll need to enable a temporary staging table in the destination config. Writeback will fail unless the staging table option is enabled.

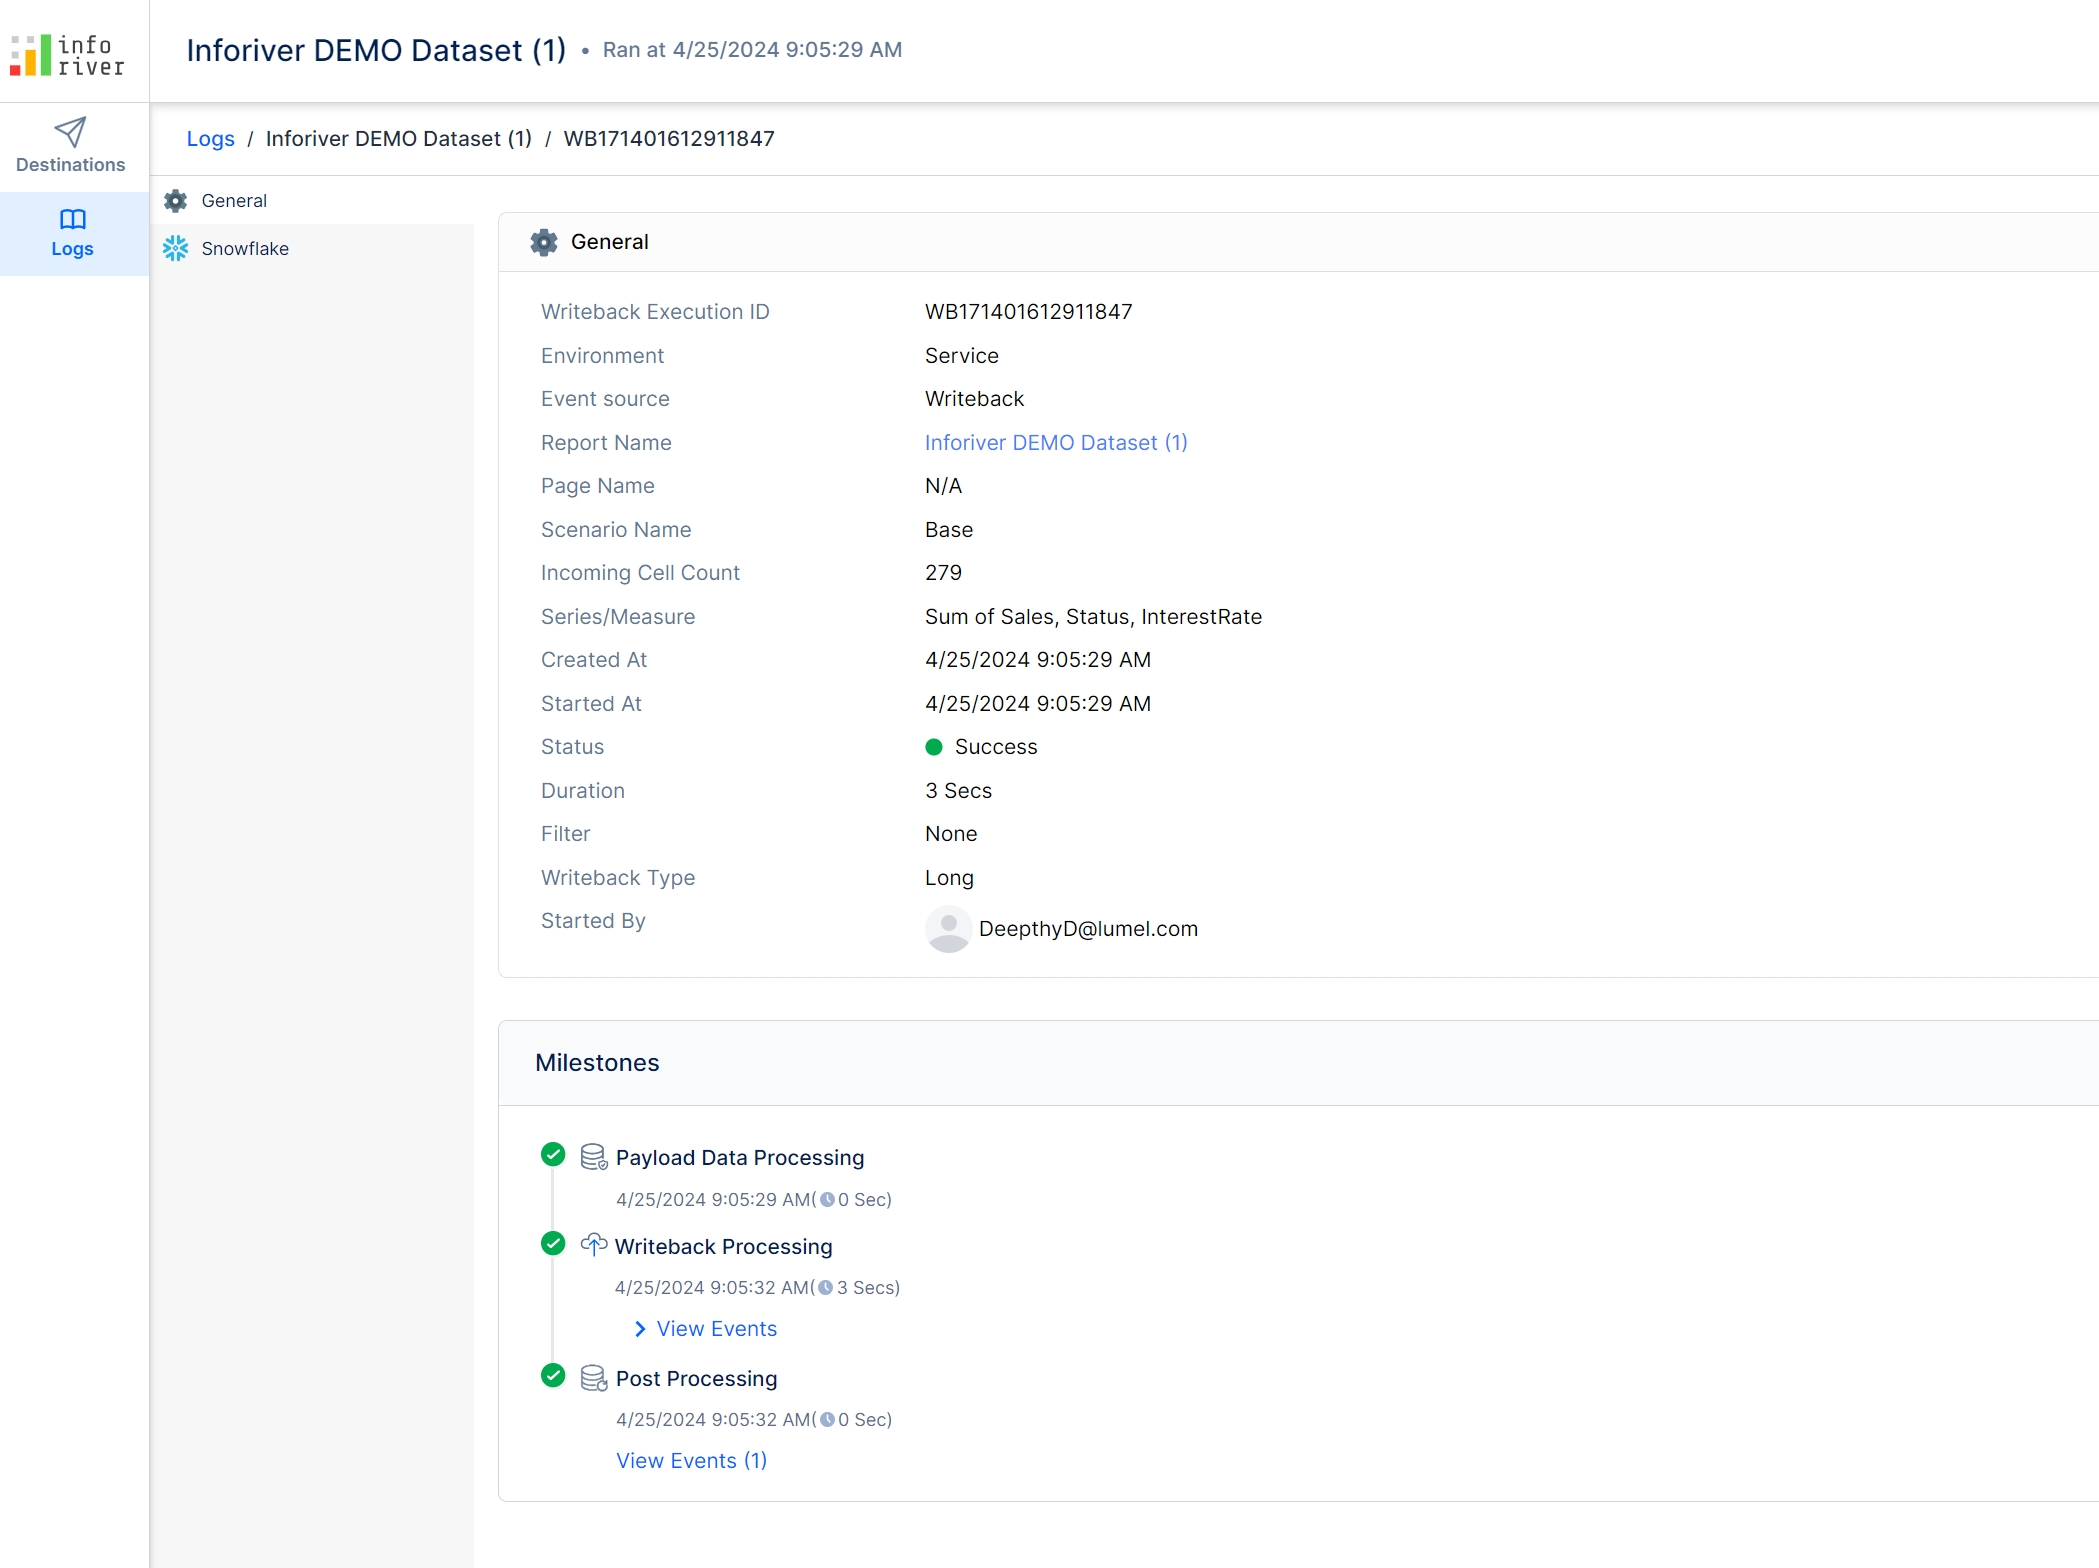
STEP 7: Click the logs button to navigate to the writeback log console and view details like the milestones, payload size, duration of the writeback, etc. Learn more about writeback logs.

Resources

Writeback data and comments using Inforiver

Power BI Writeback is as easy as 1-2-3: A Step-By-Step Tutorial

Write back data & comments to a database or file

5 Reasons why Writeback is required in a Modern BI Stack

Why Writeback using Power BI + Power Apps is Not for Everyone

10 Key Considerations for Choosing a Writeback Solution in Power BI

Writeback options
Writeback all
Navigating to Inforiver writeback destination setup
Writeback settings
General settings for writeback
Data settings tab for writeback
Destinations tab in writeback settings
Advanced writeback settings
Writeback initiated
Table mismatch notification
Notification to enable temporary staging table
Writeback logs