> For the complete documentation index, see [llms.txt](https://docs.inforiver.com/llms.txt). Markdown versions of documentation pages are available by appending `.md` to page URLs; this page is available as [Markdown](https://docs.inforiver.com/working-with-inforiver/4.-adding-business-logic-and-formulae/insert-manual-input-columns.md).
# Insert manual input columns
Inforiver provides six different options to manually enter data in your Power BI report which are listed below. Data can be entered in a single cell or several cells at the same time and they can be formatted in a variety of ways. There are several settings that you can adjust to make data entry easier for you.
Input users from your organization (only available in Inforiver Writeback Matrix)
{% hint style="warning" %}
Inforiver Reporting Matrix offers only the first five types. Input types and features specific to Inforiver Writeback Matrix are covered in a later [section](/working-with-inforiver/4.-adding-business-logic-and-formulae/insert-manual-input-columns/writeback-matrix-features.md).
{% endhint %}
In this video, we discuss the data input functionality in the reading and editing modes.
{% embed url="" %}
### 1. Sign in
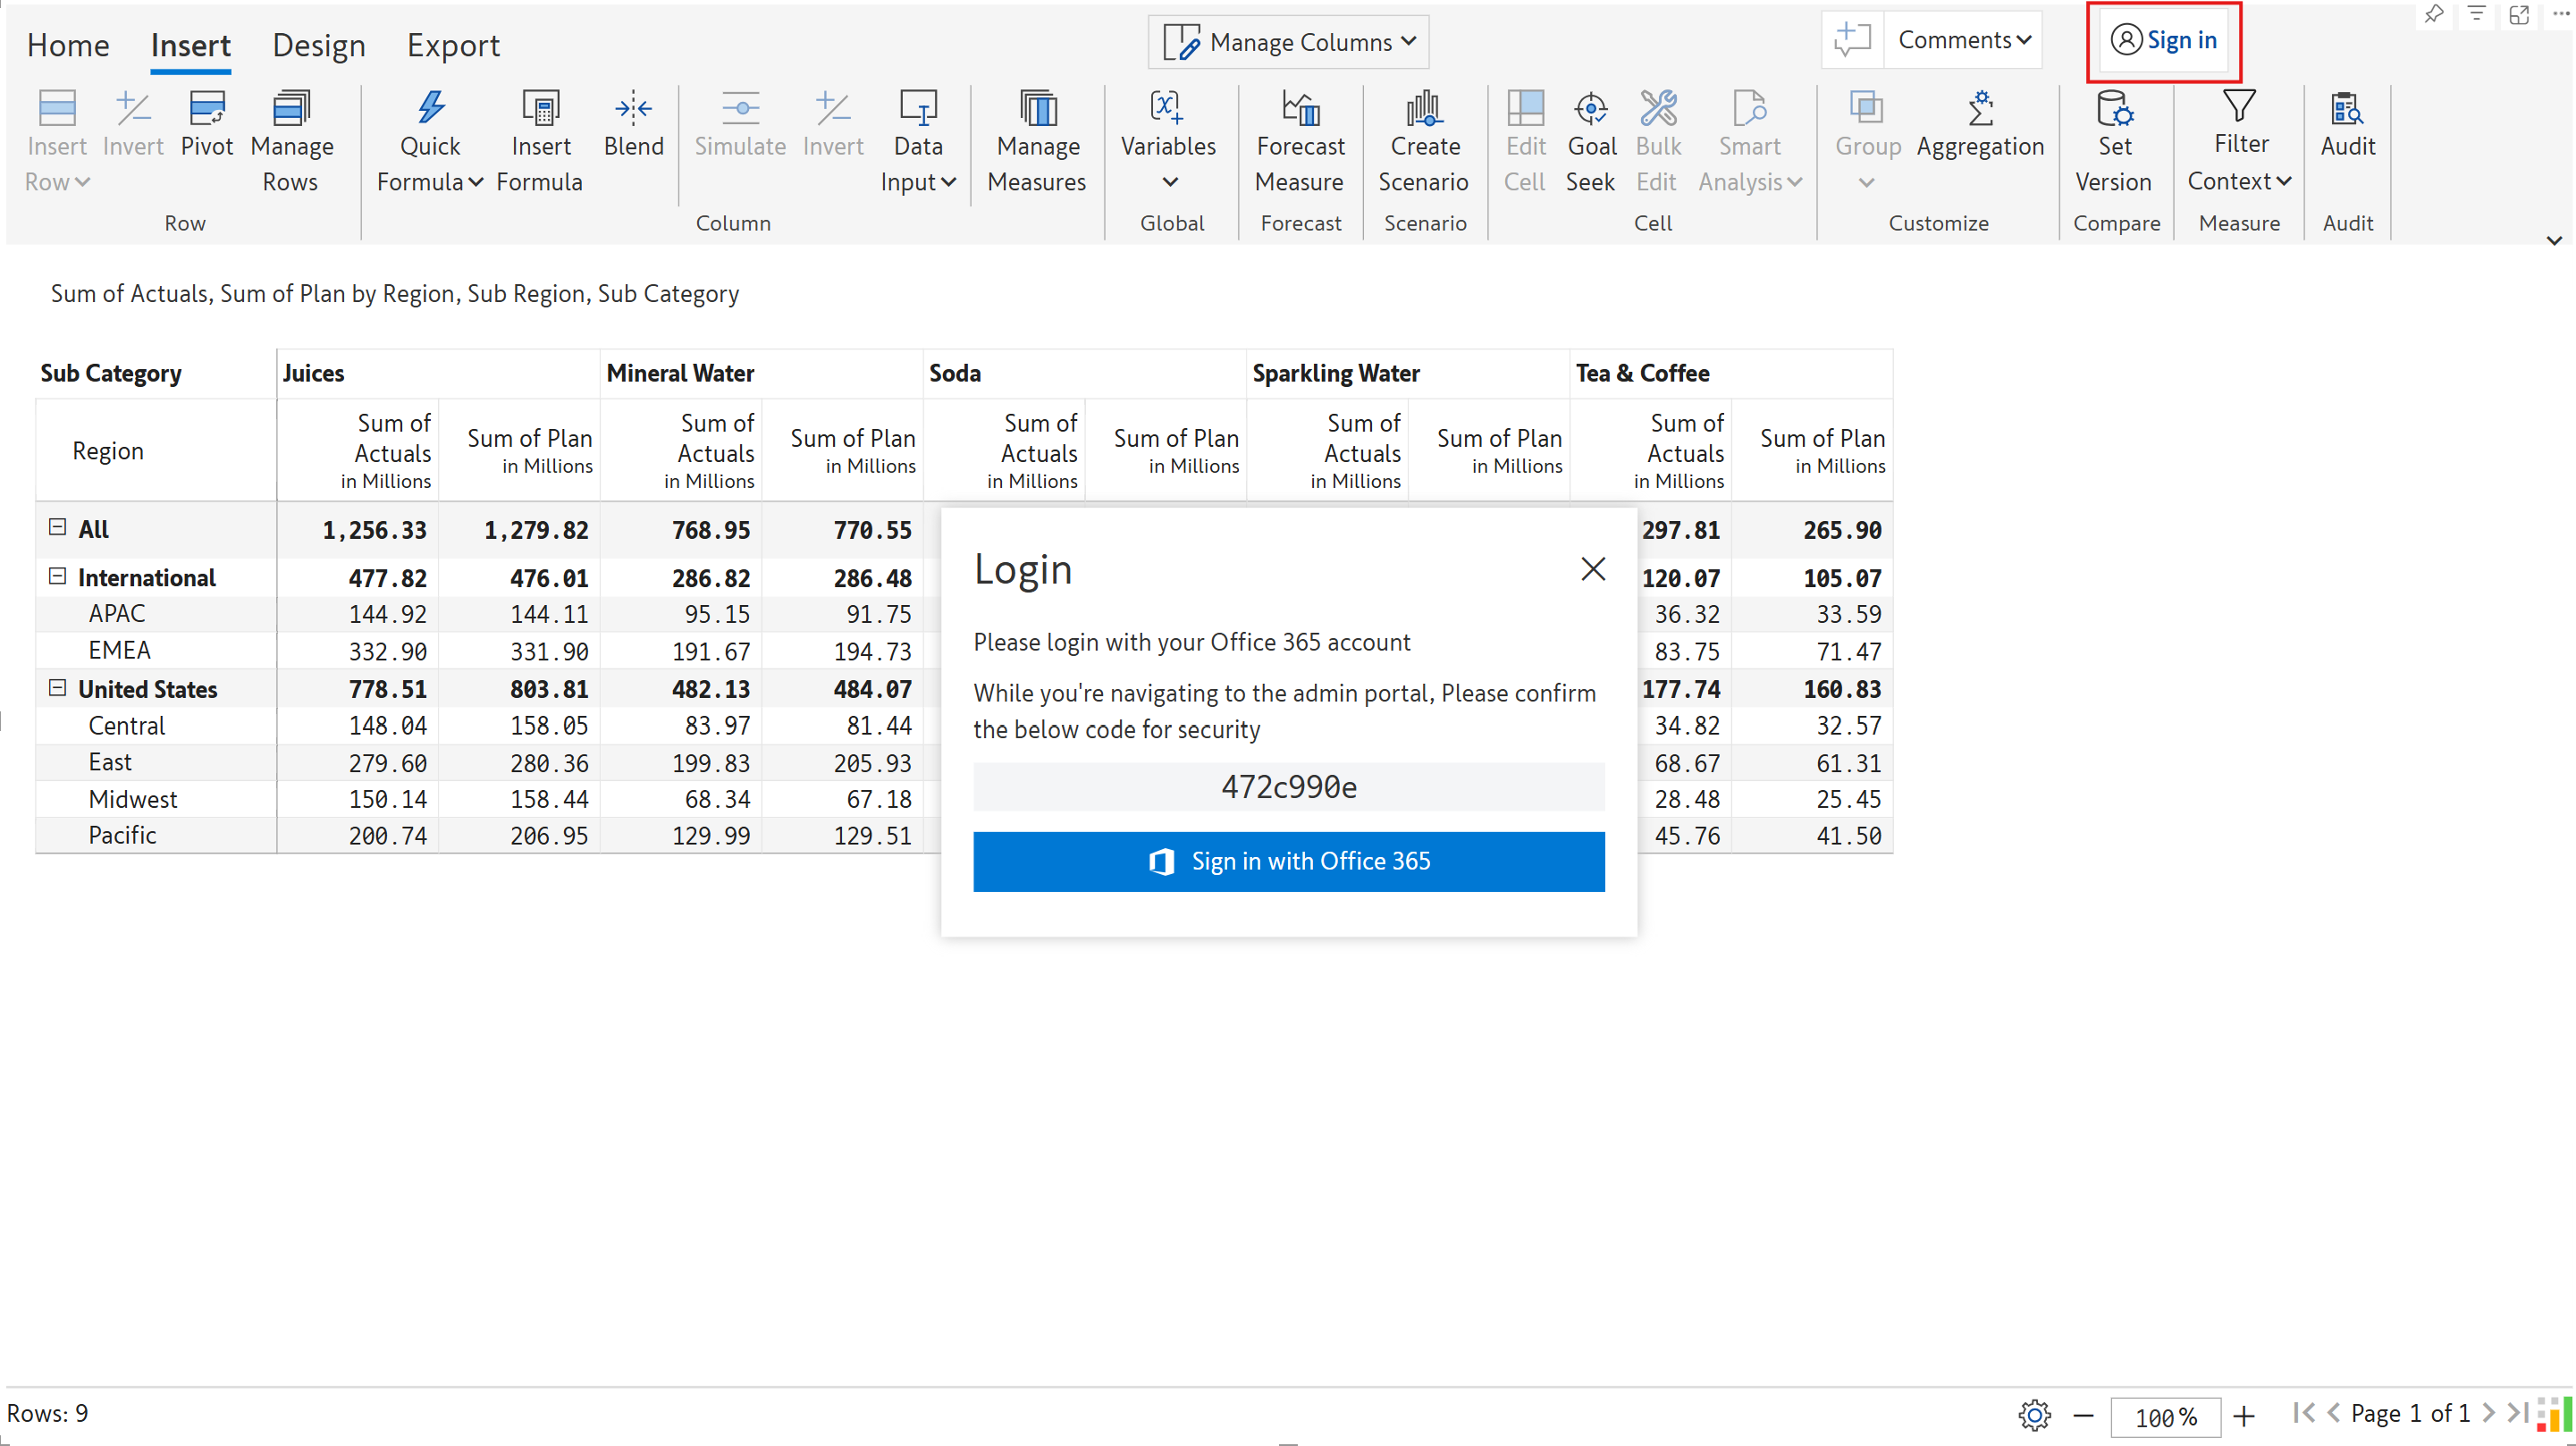
If you are using Inforiver Writeback Matrix, you need to sign in as shown below.
{% hint style="info" %}
Sign-in is optional. Unless specified, all these features are available in the Inforiver Reporting Matrix as well.
{% endhint %}
Click the Sign in button
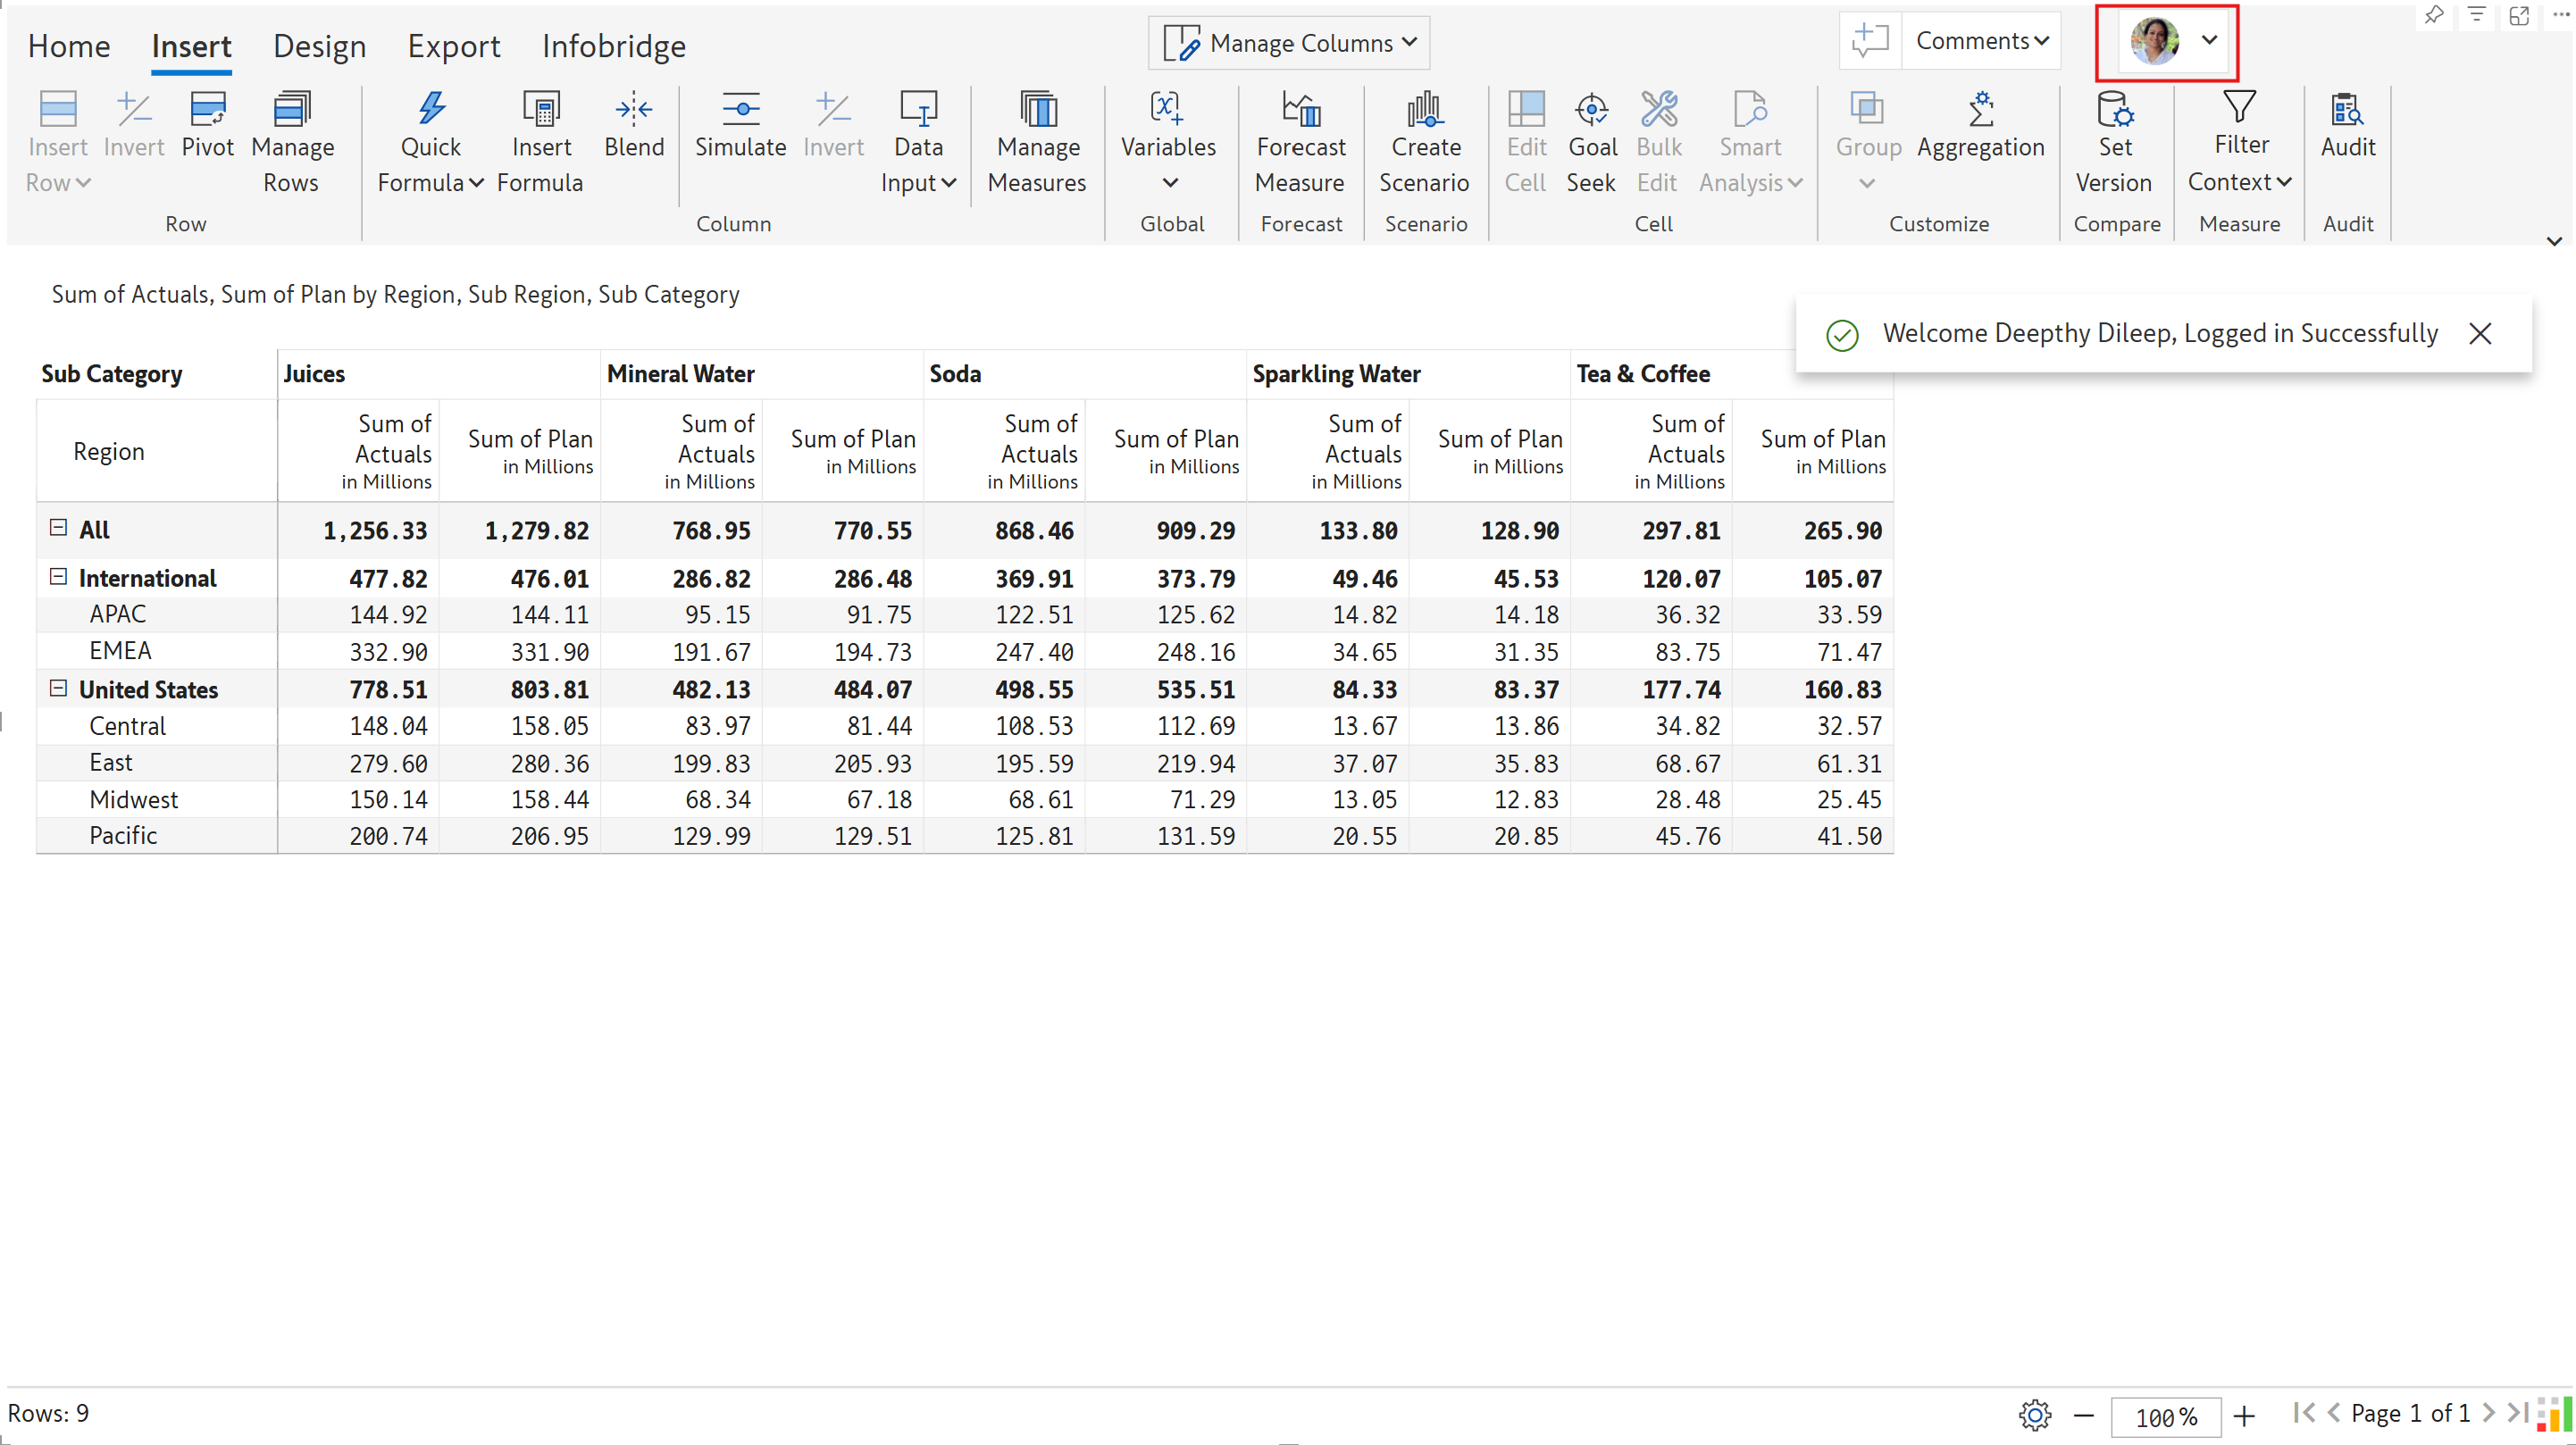
Once you sign in successfully, your profile picture will be displayed as seen in the image.
Profile picture is updated after signing in
You can now start inserting a column to capture your data inputs by clicking the Data Input dropdown in the Insert tab.
Menu for inserting data input columns
Before we look at inserting data input columns, let's look at some common properties available for all the input types.
### 2. Common properties
#### 2.1. Insert as
Data input columns can be inserted as a measure or a column.
**Visual measure:** If a column dimension or hierarchy is added to the visual, the input column is inserted for each category. In the case of no column dimensions, a single column is inserted.
In the image, a text column has been inserted as a measure by selecting **Insert as** > **Visual Measure**.
Insert as visual measure
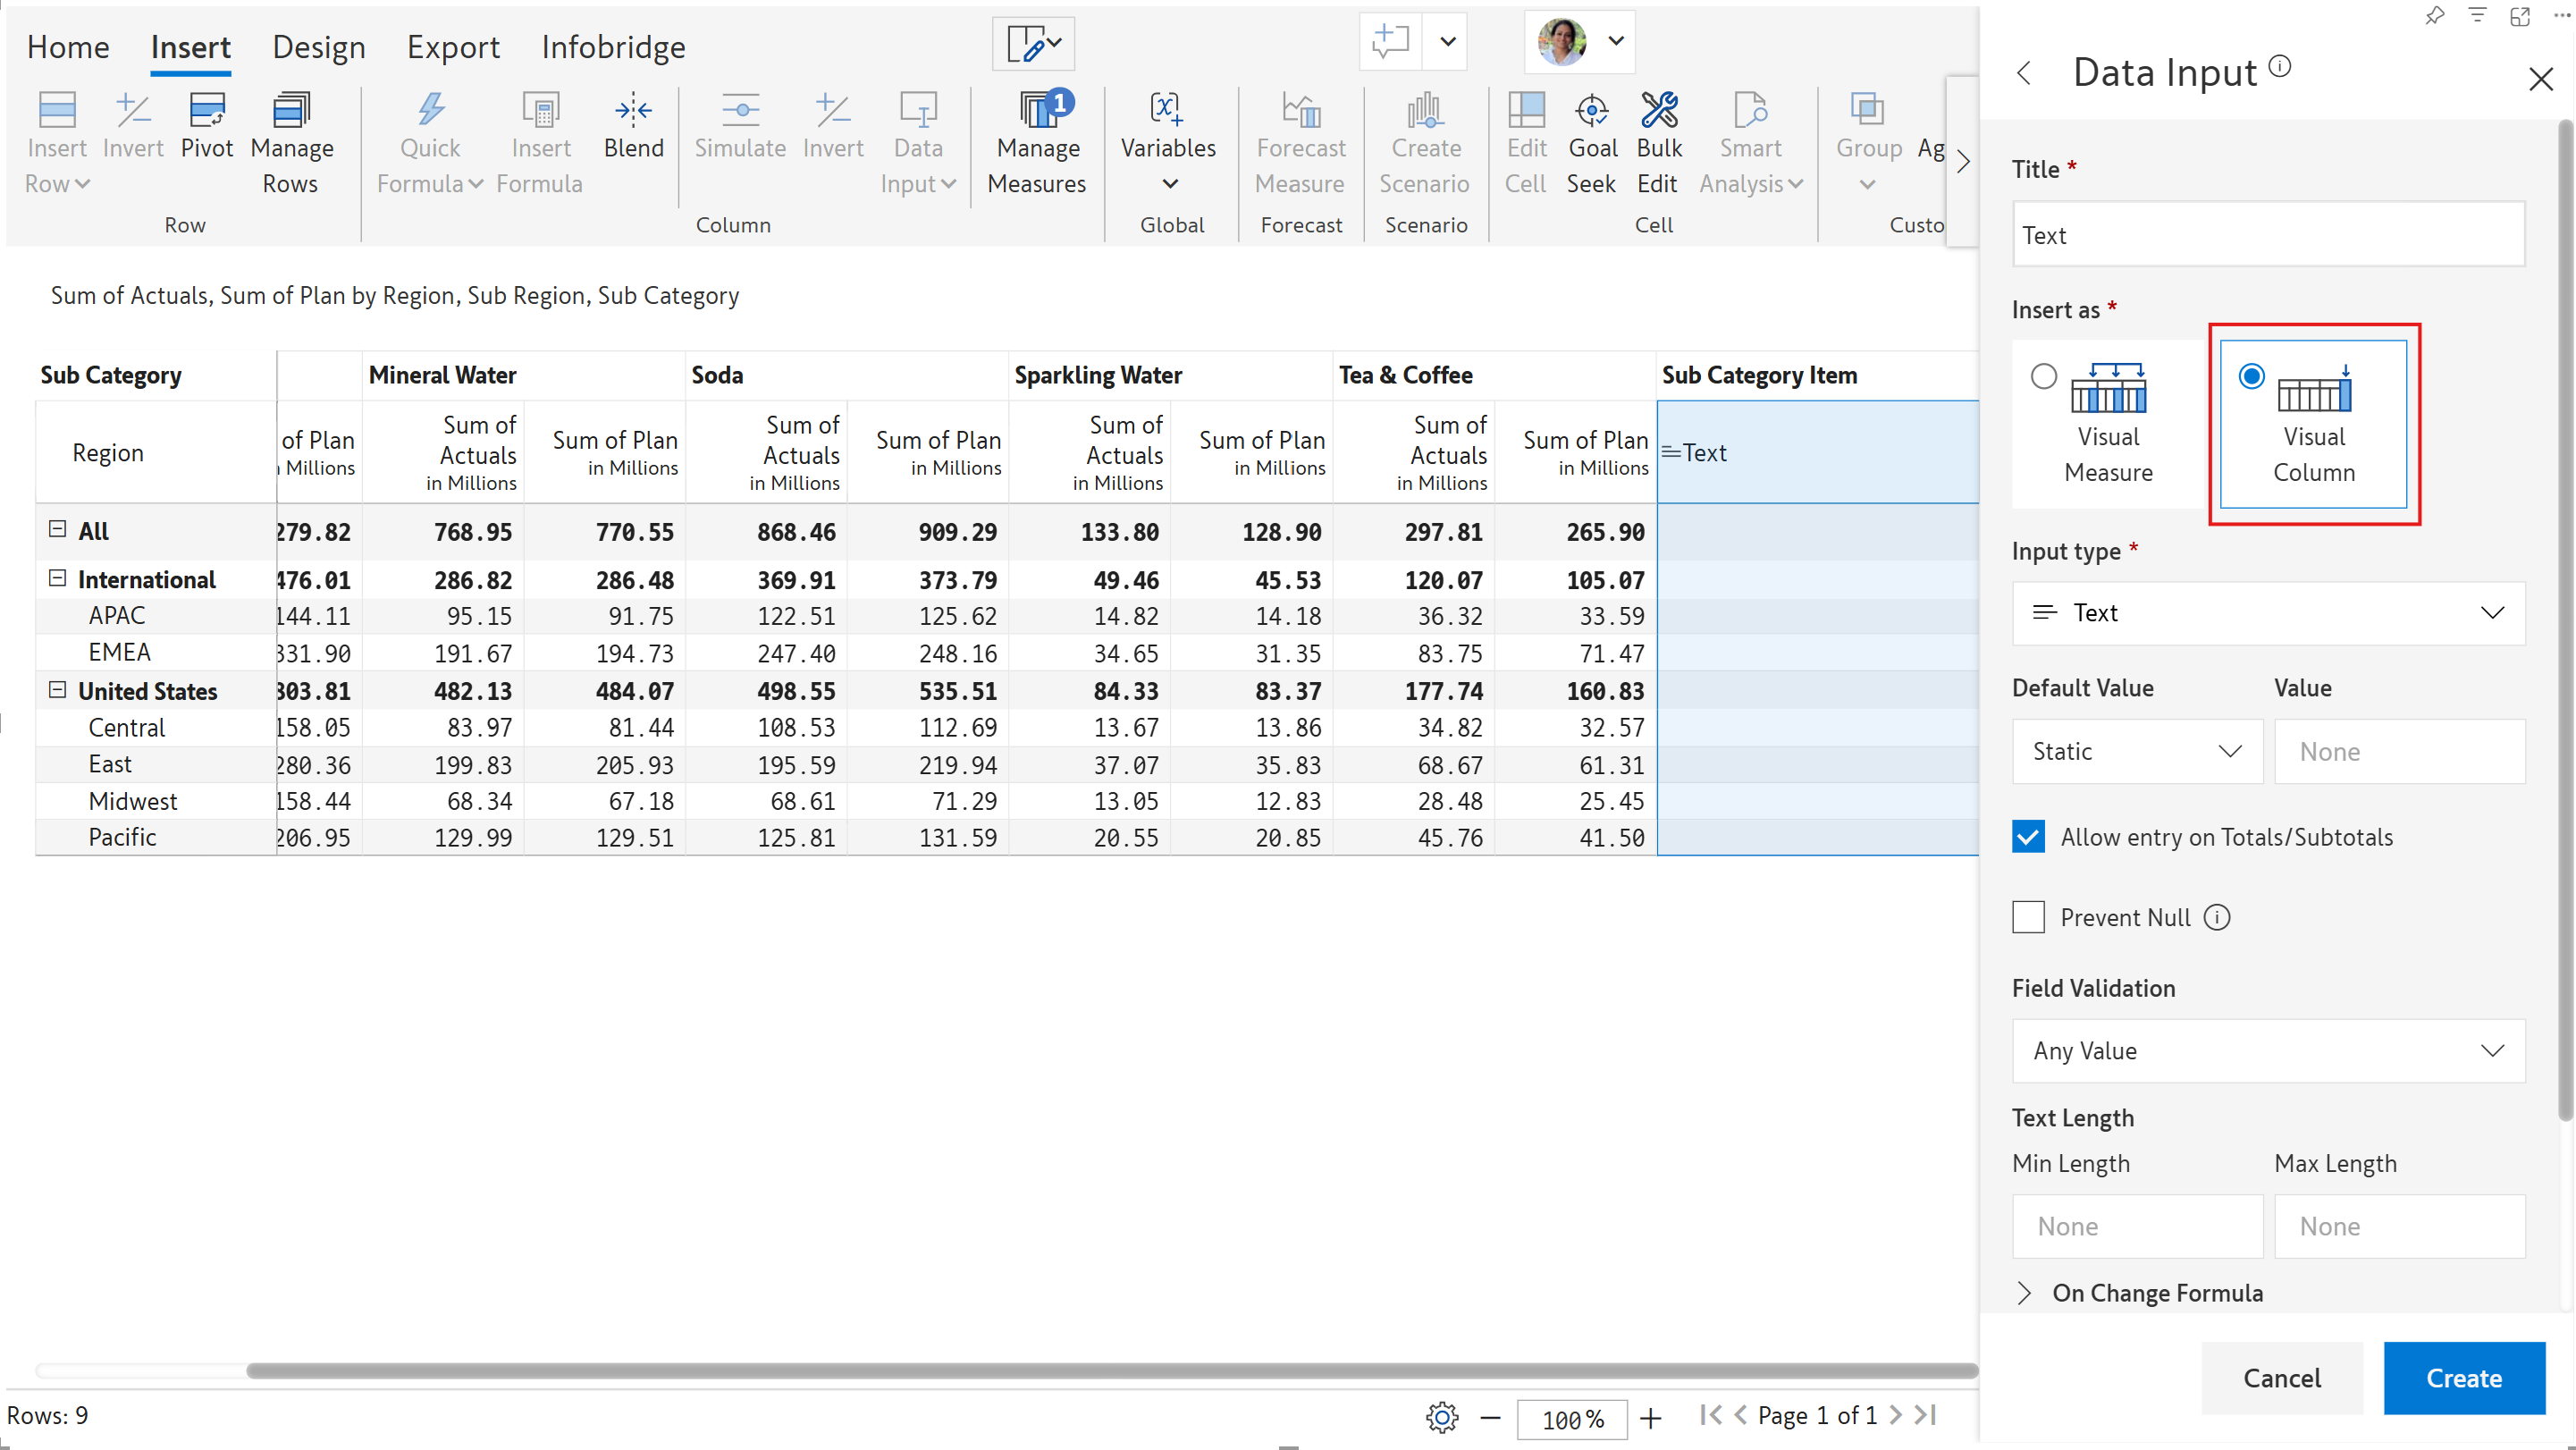
**Visual column:** Irrespective of whether there is a column hierarchy or not, a single column gets inserted.
In the image, a text column has been inserted as a column by selecting **Insert as > Visual column**.
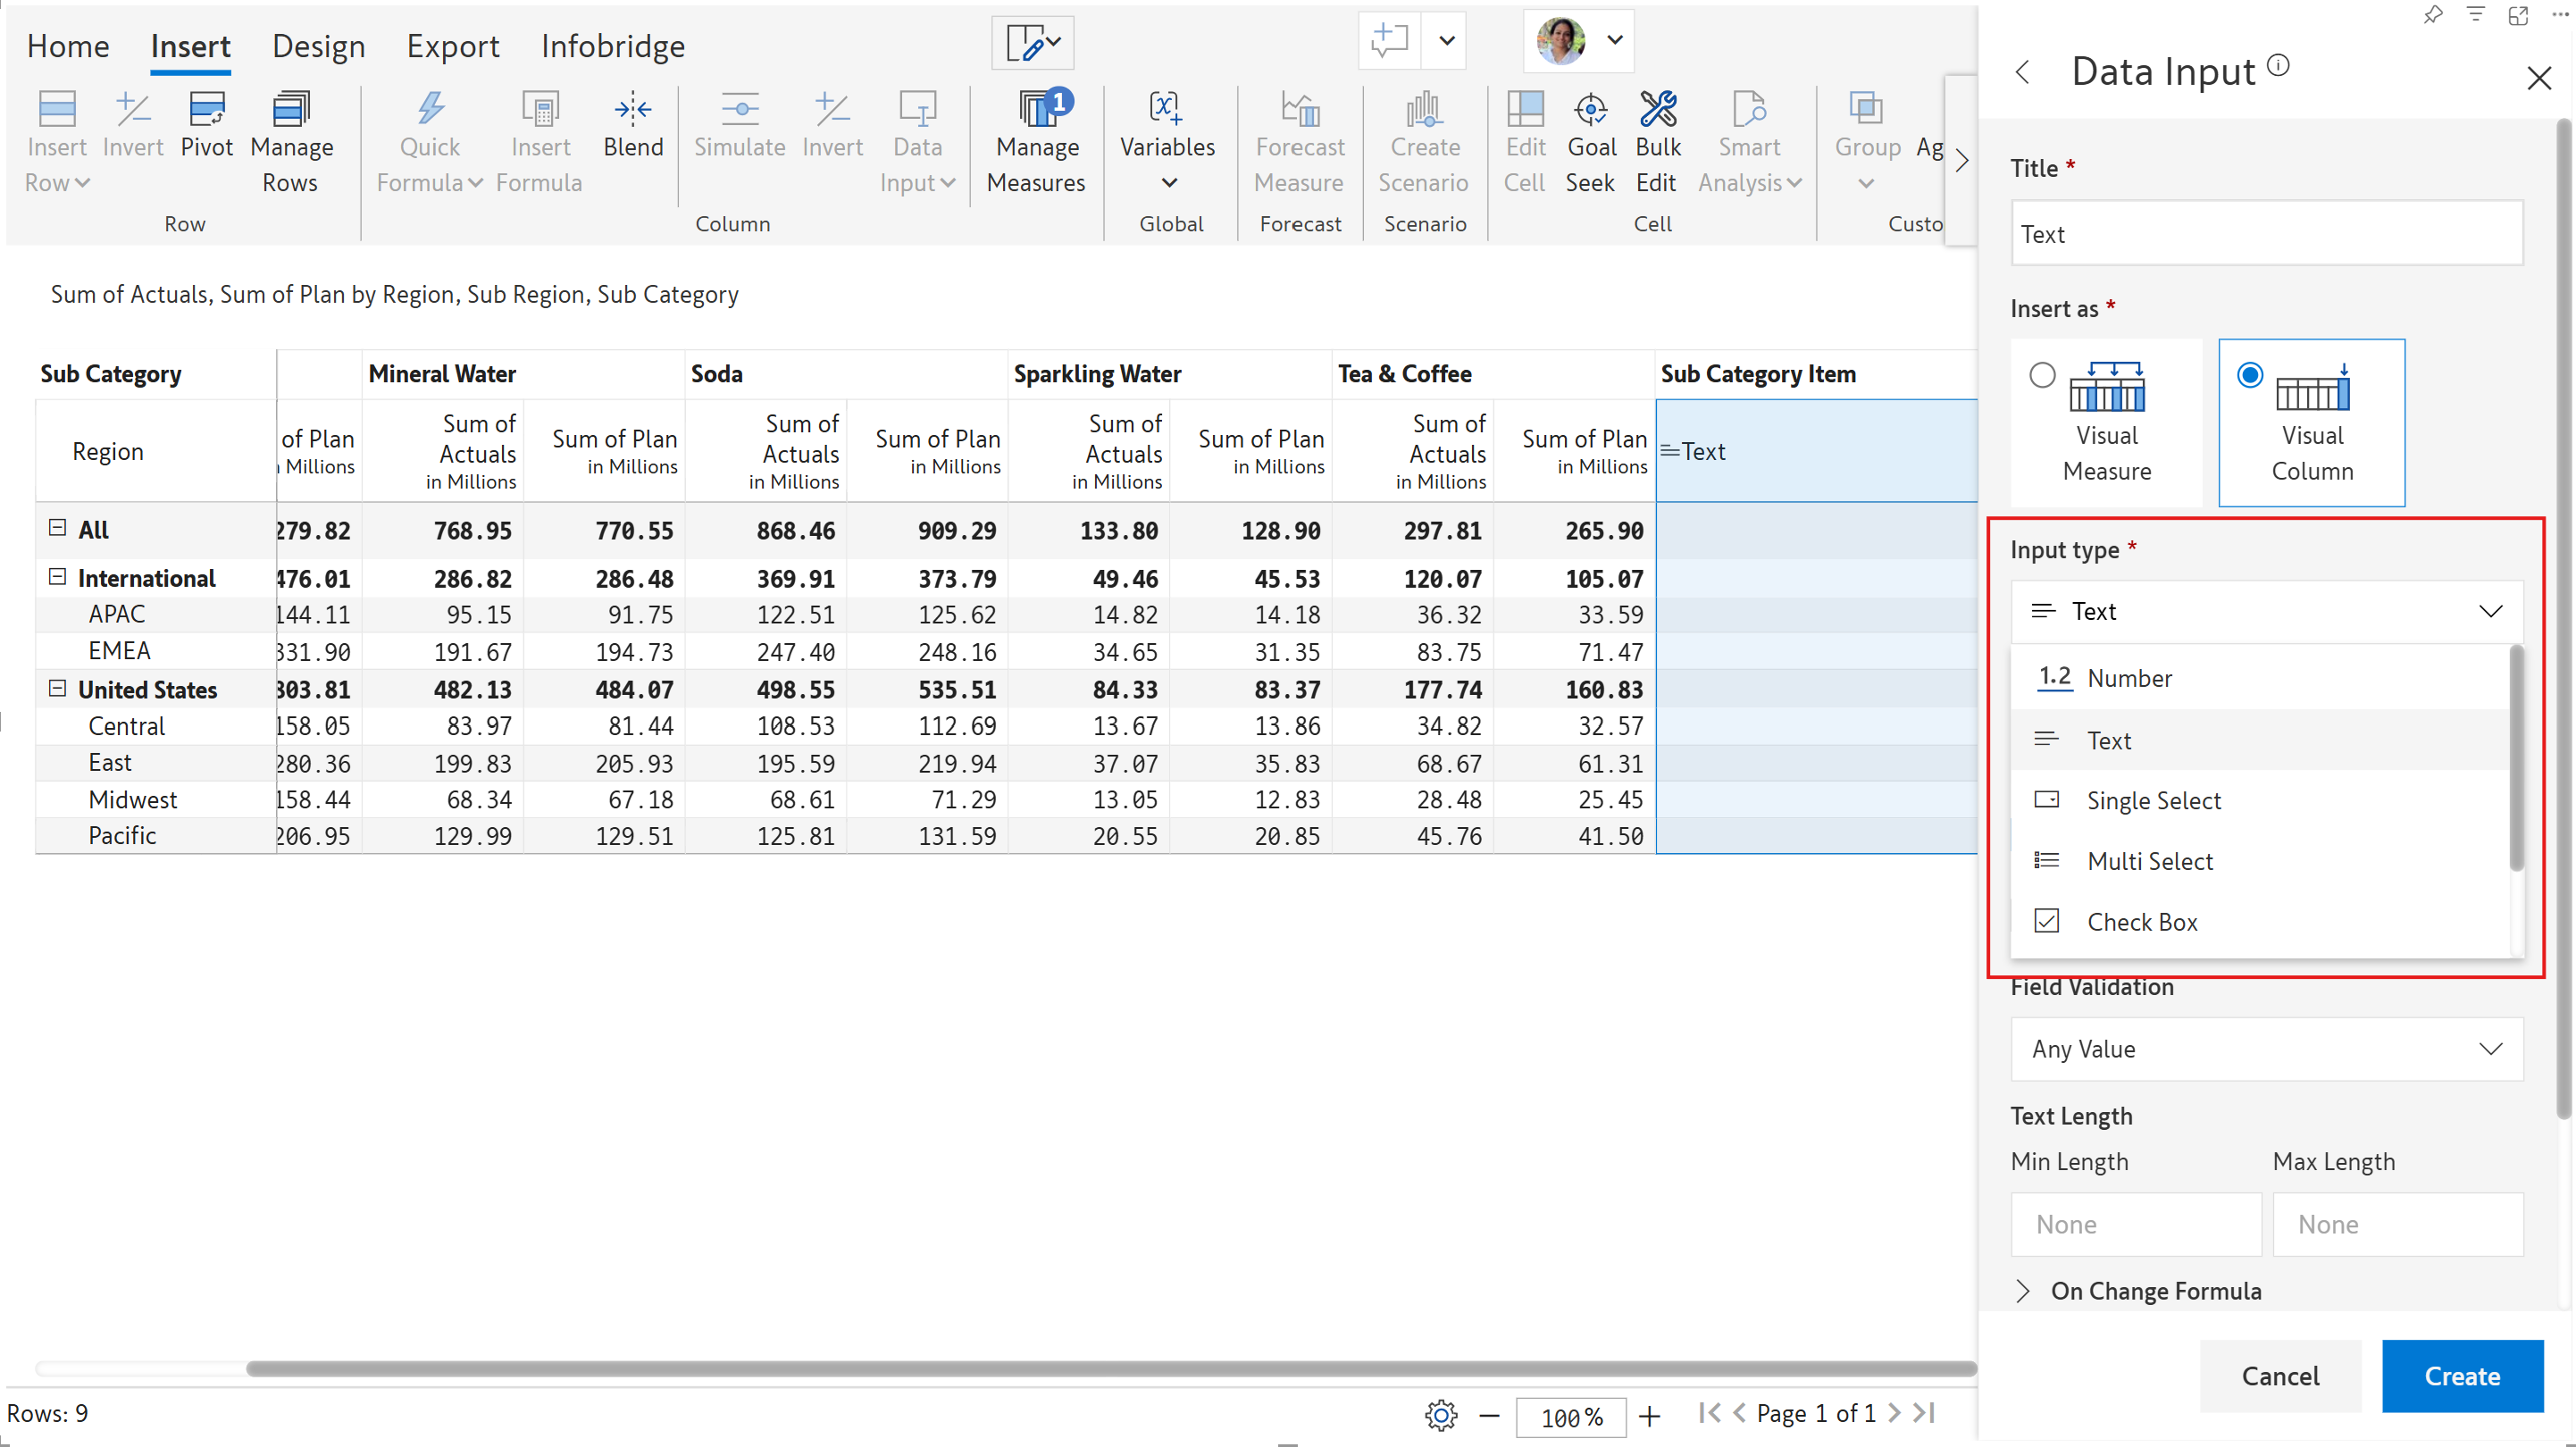
#### 2.2. Input type
Seamlessly switch between different data input types such as number, text, checkbox, single select, multi-select, etc.
Data input type
#### 2.3. Default value
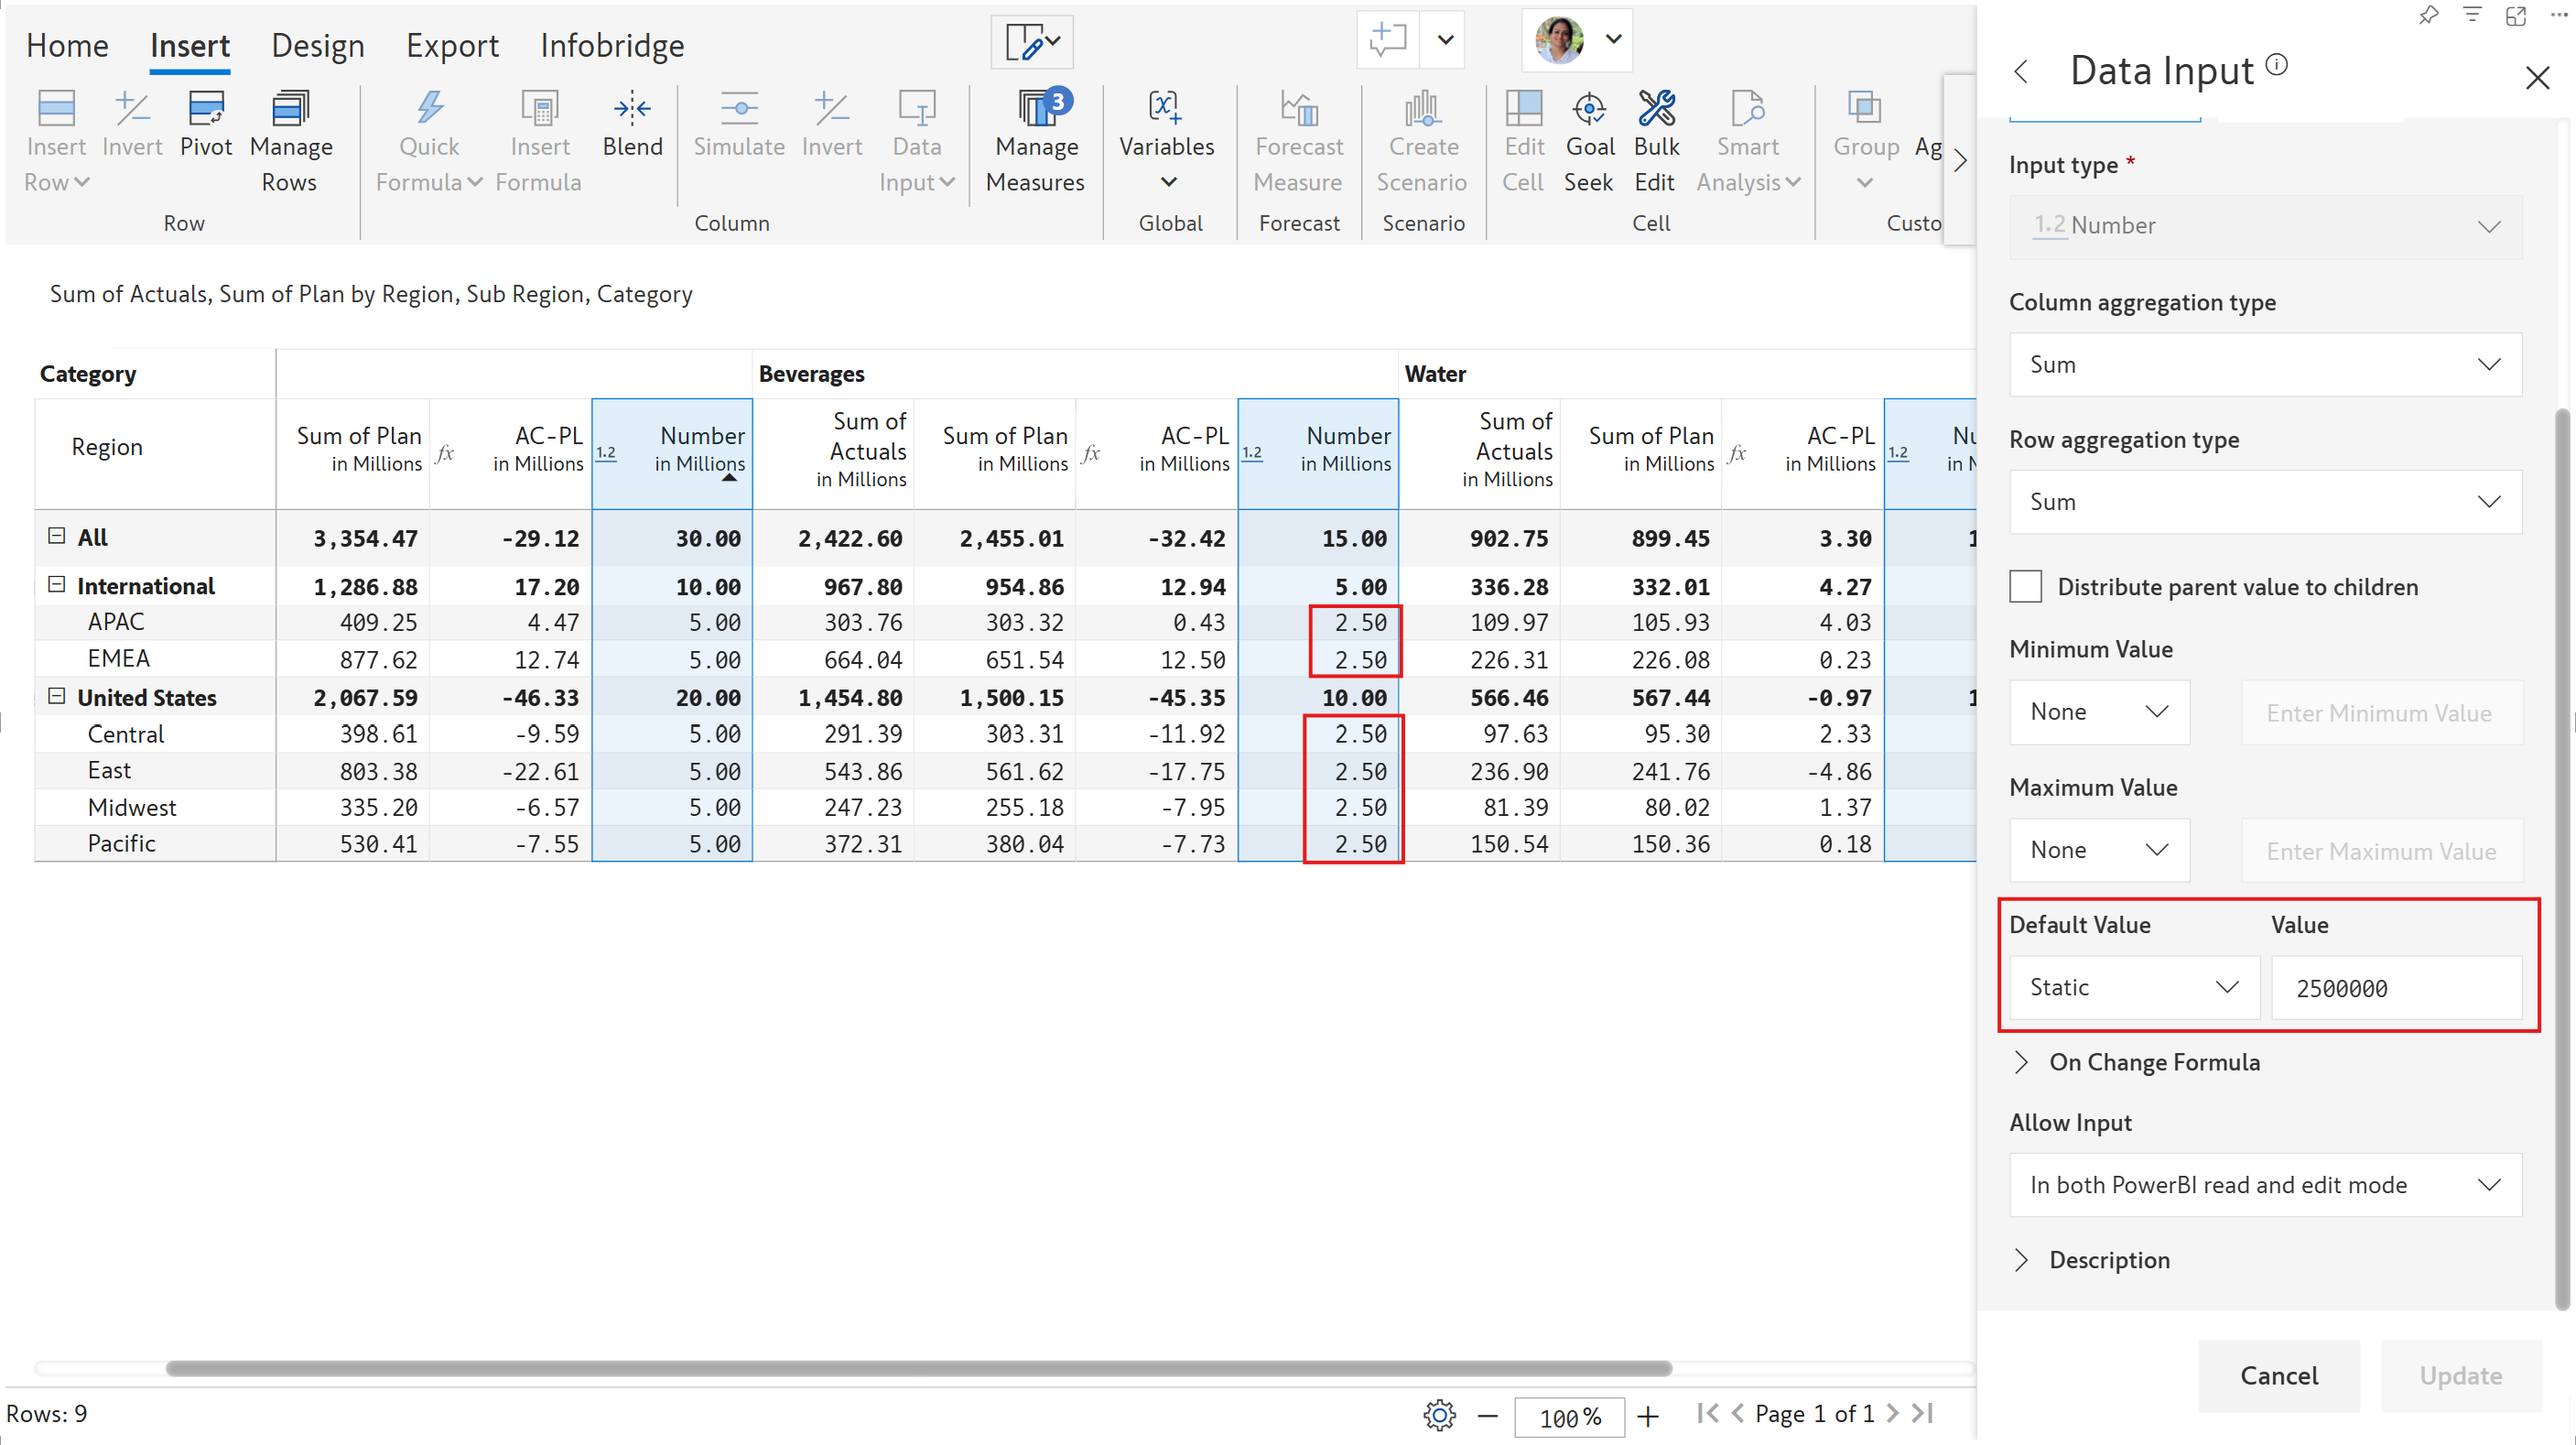
Default values help ensure reports are complete by reducing empty fields, and they also help users understand the type of data that is expected in data input fields. [Learn more about configuring default values.](/working-with-inforiver/4.-adding-business-logic-and-formulae/insert-manual-input-columns/default-values.md)
In this example, notice how a default value of 2.5m is applied to the child rows of the data input measure.
Default values for data input fields
#### 2.4. Allow entry on totals/subtotals
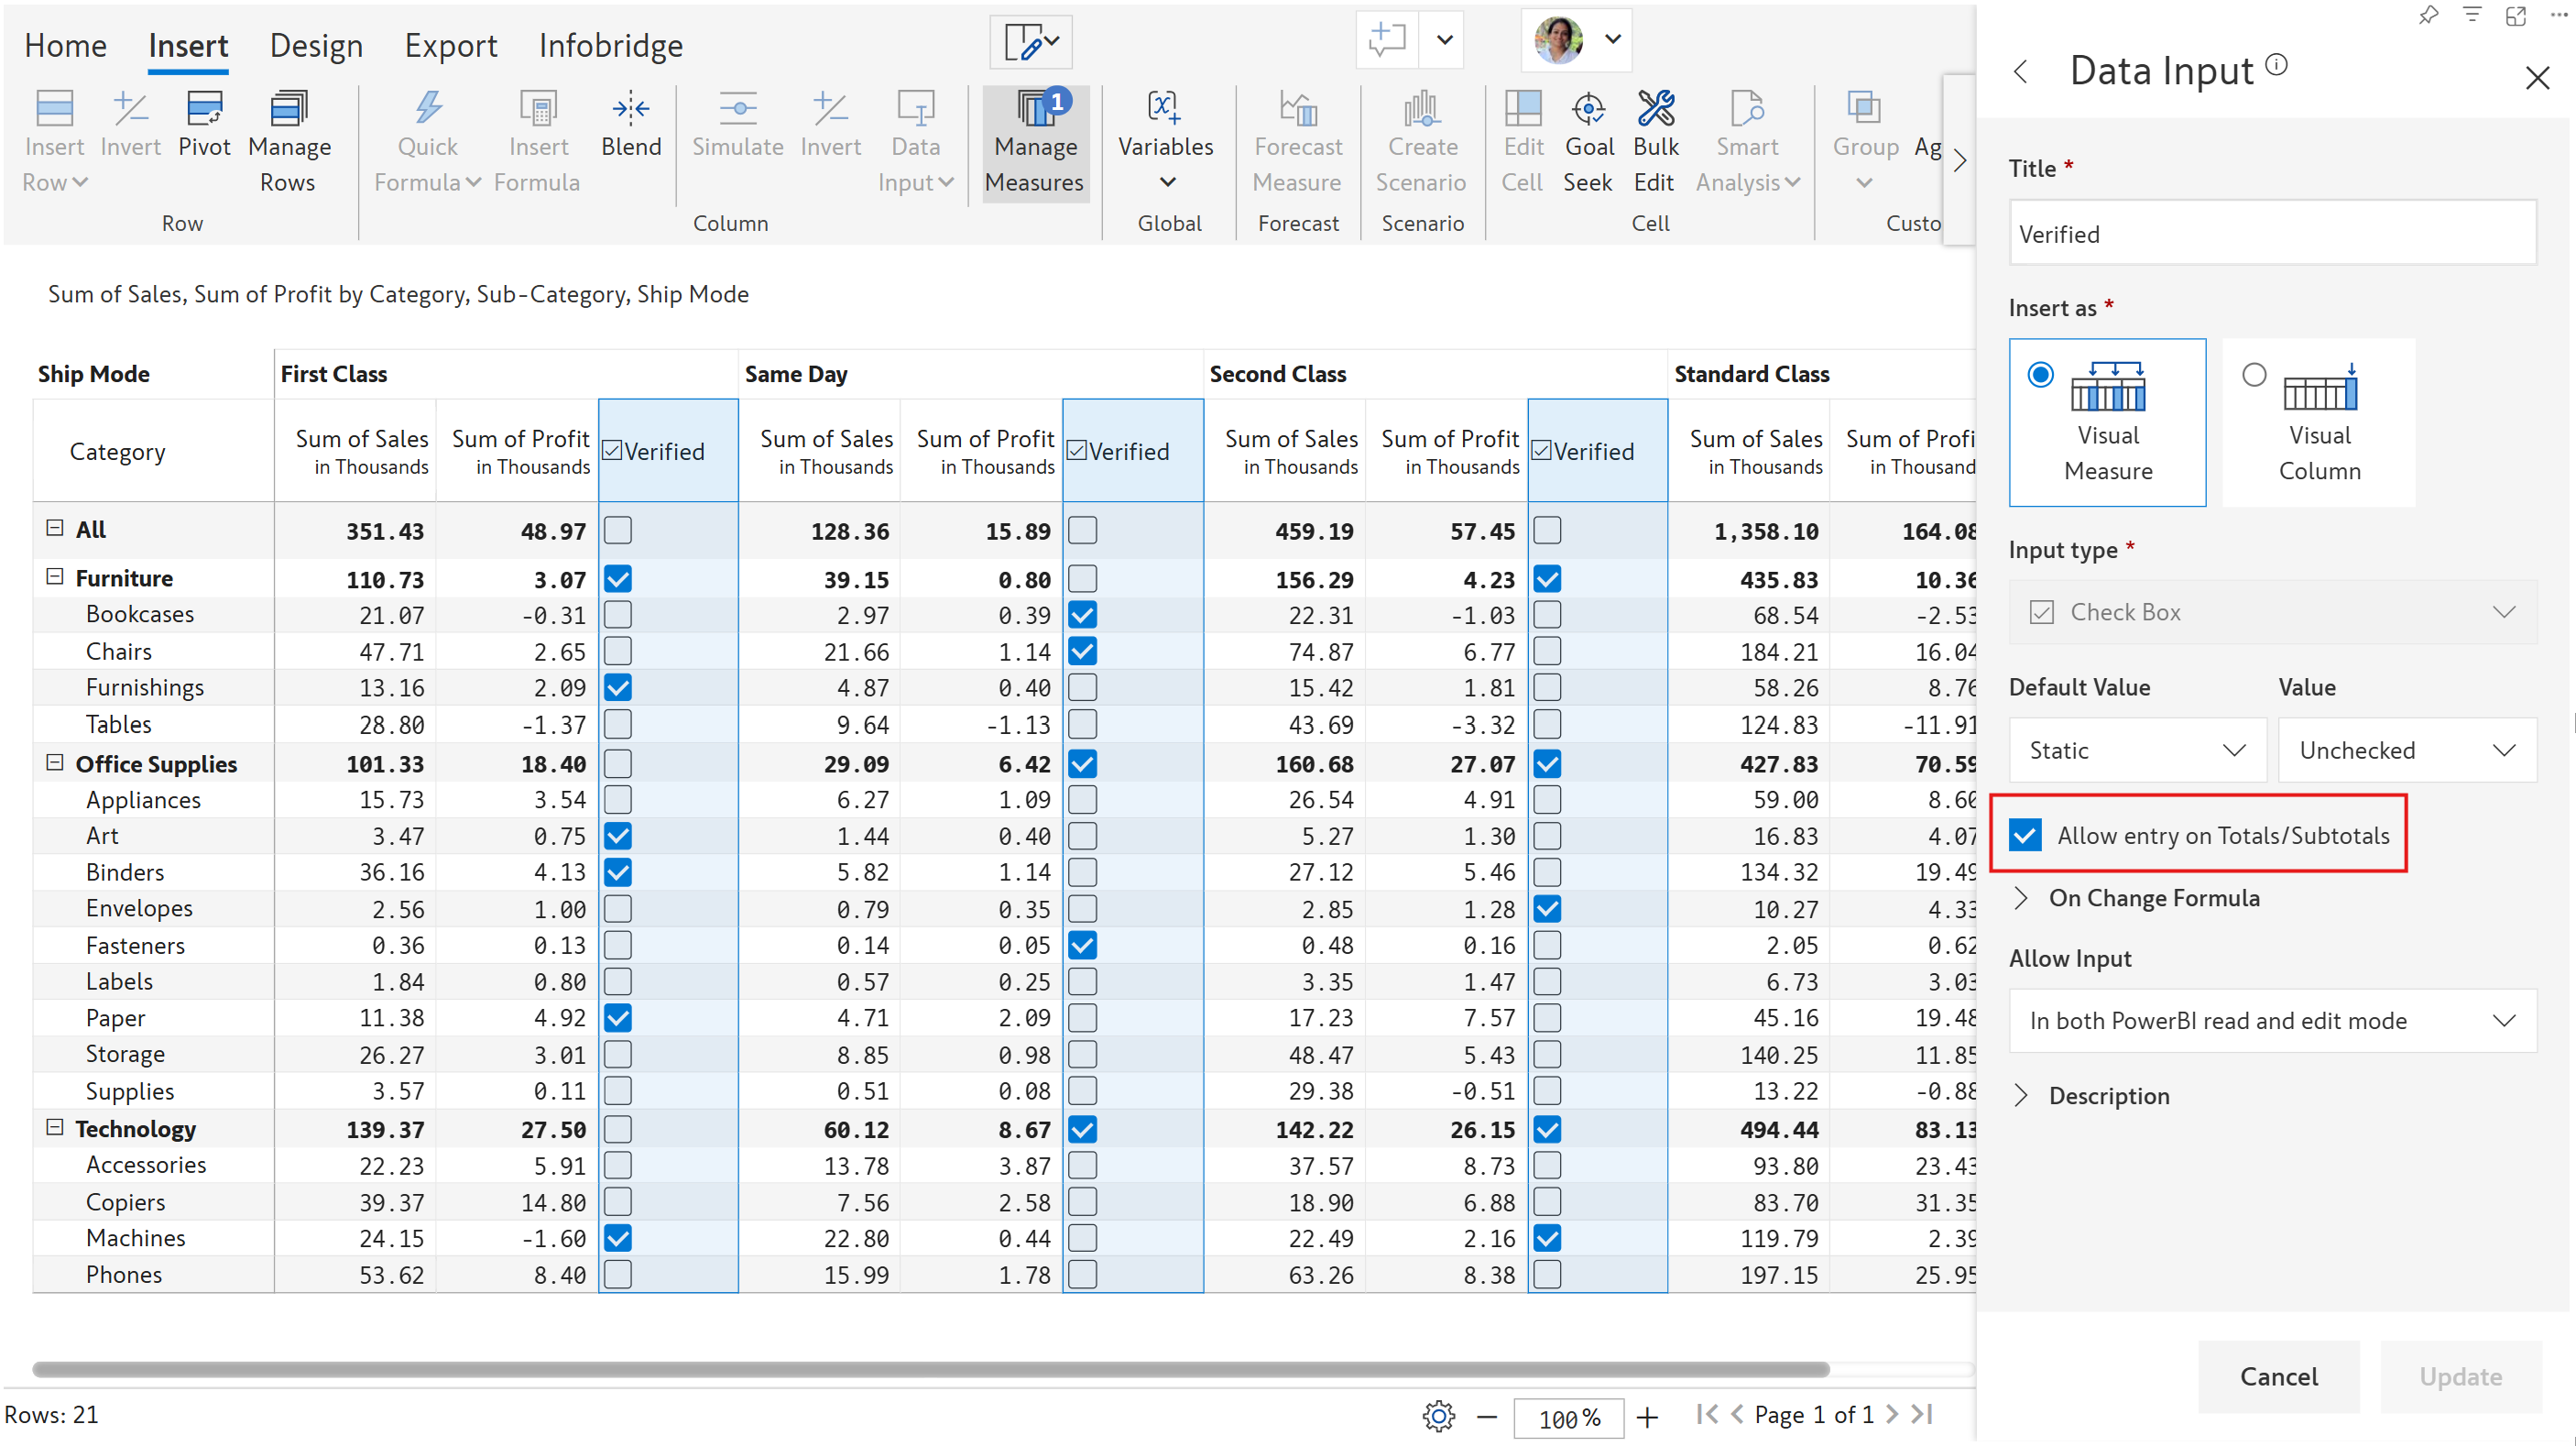
Check this option if data entry can be permitted on parent-level rows in a hierarchy. In this sales report, we are able to make entries for the Grand total, 'Furniture', 'Office Supplies', and 'Technology' rows as the **Allow entry on Totals/Subtotals** option has been enabled.
Allow data entry for total and subtotal rows
#### 2.5. Prevent null
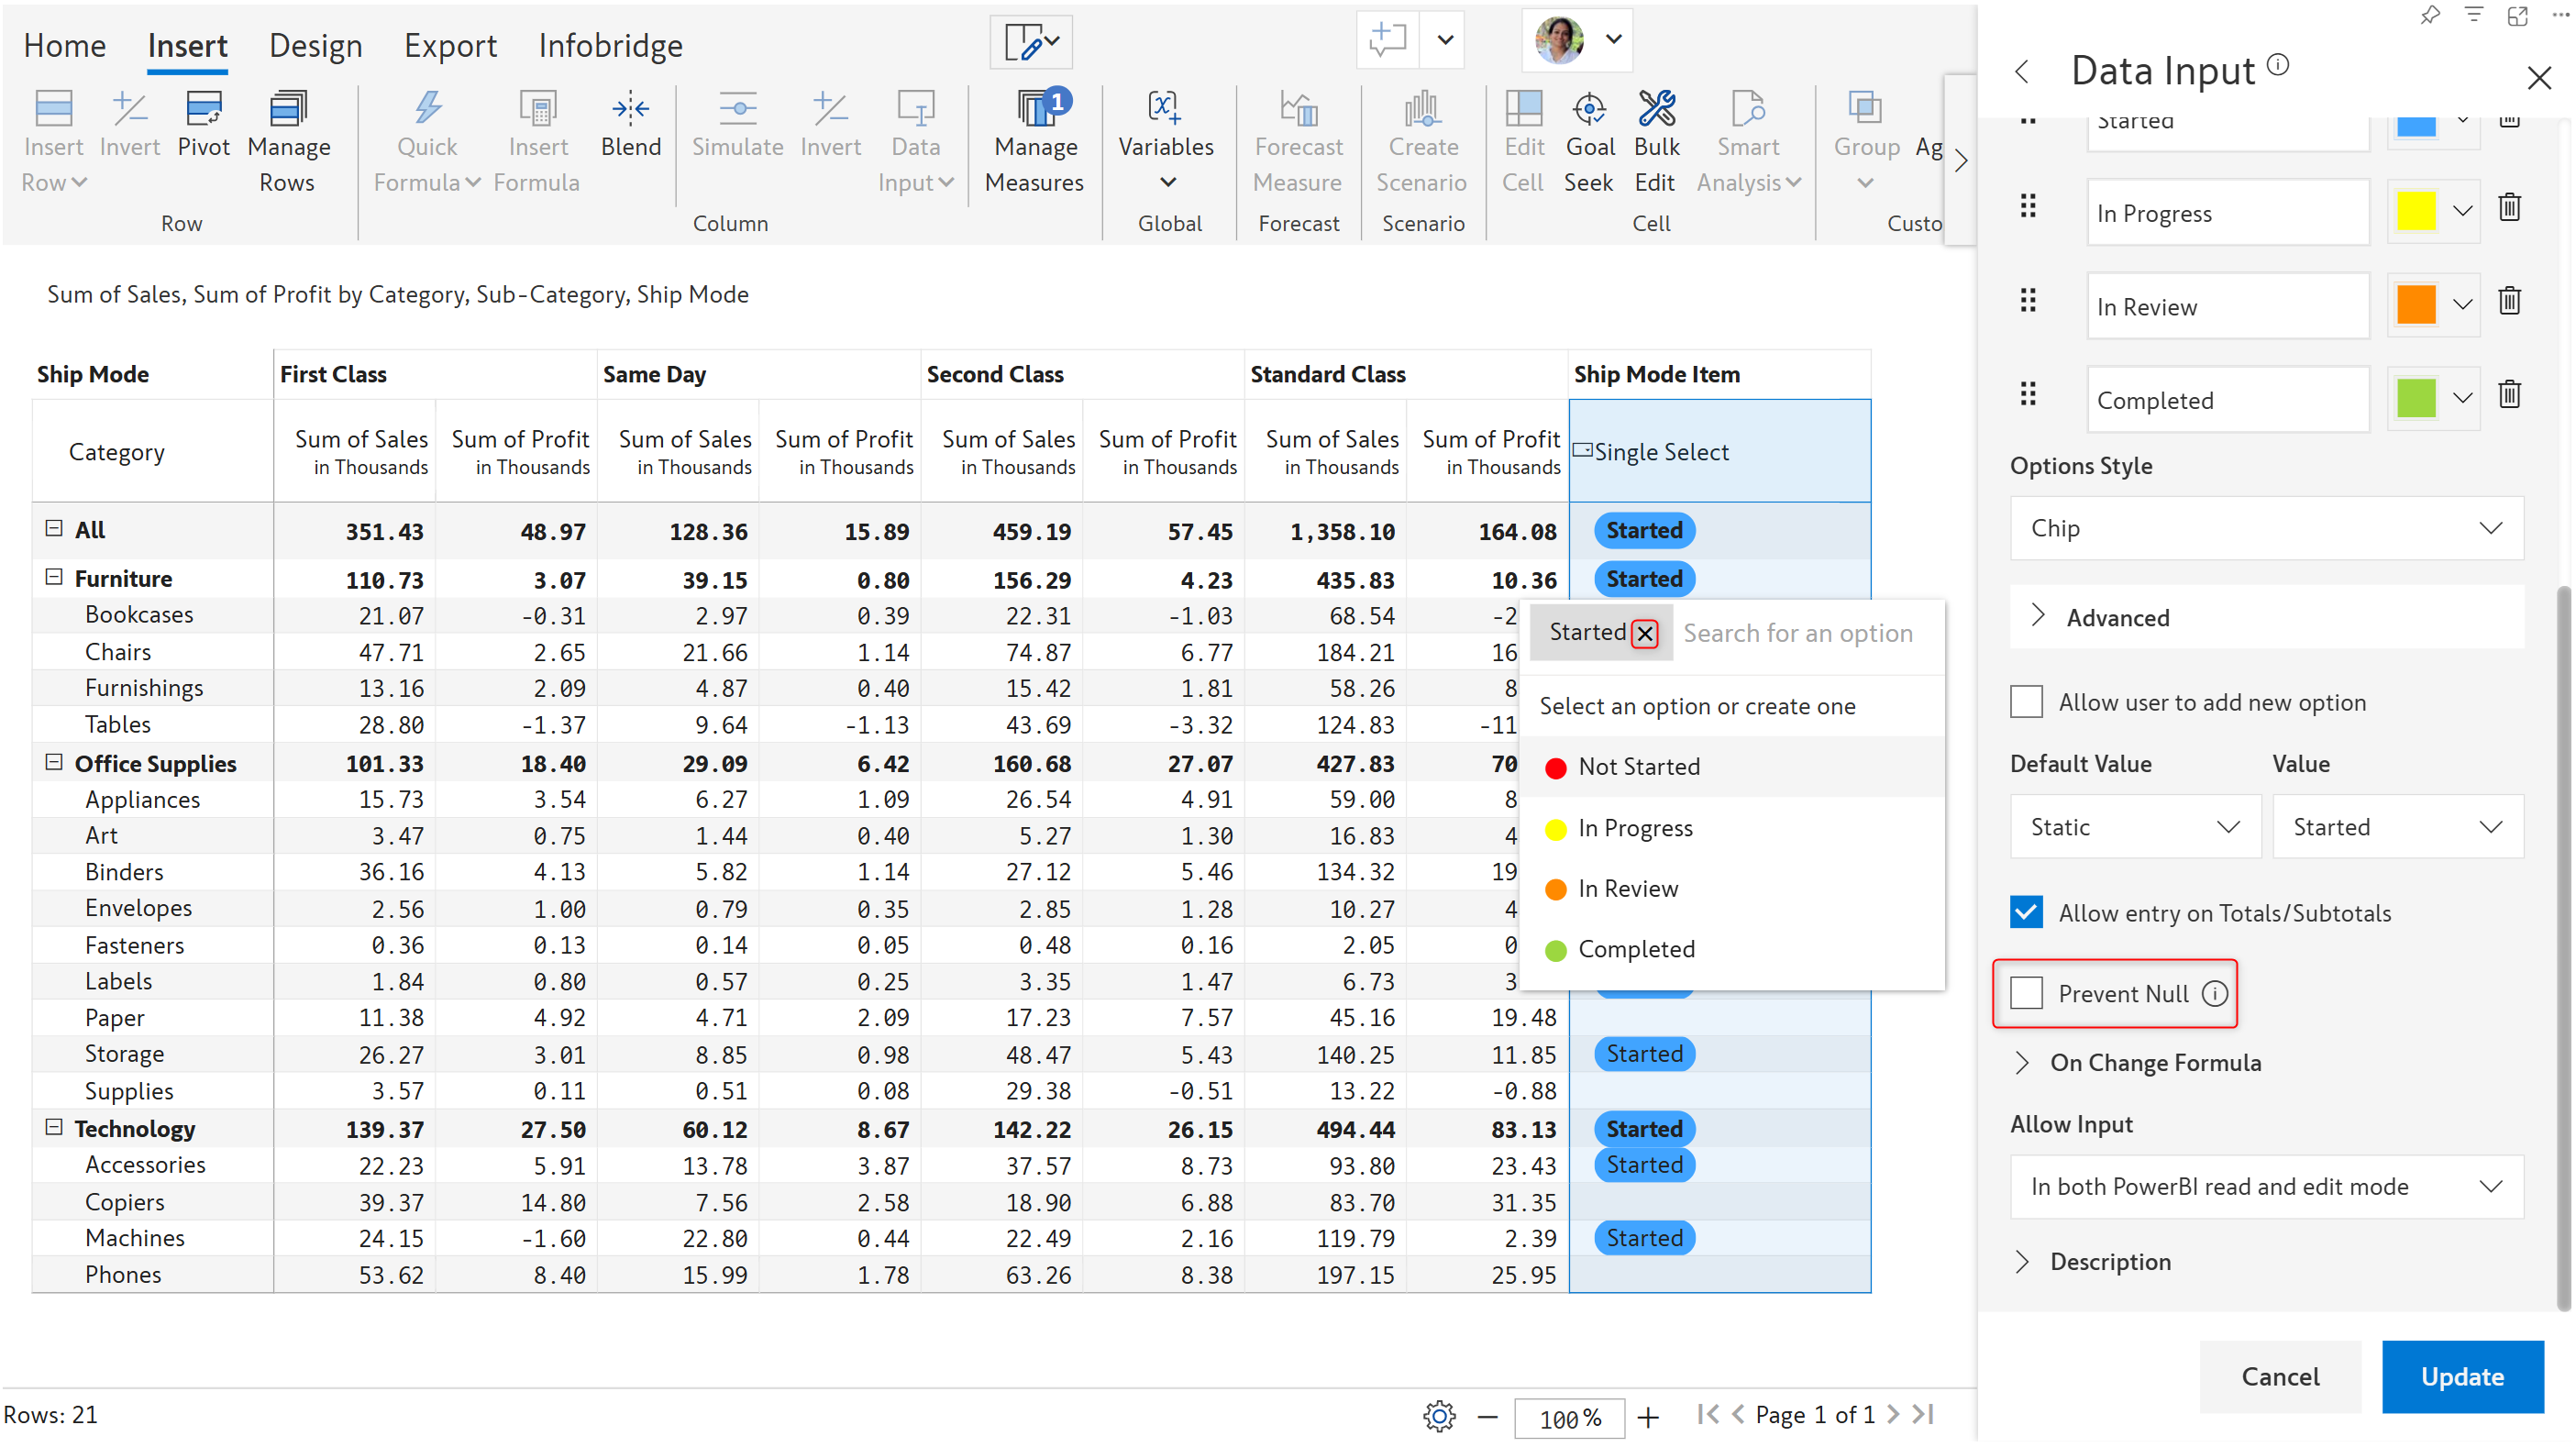
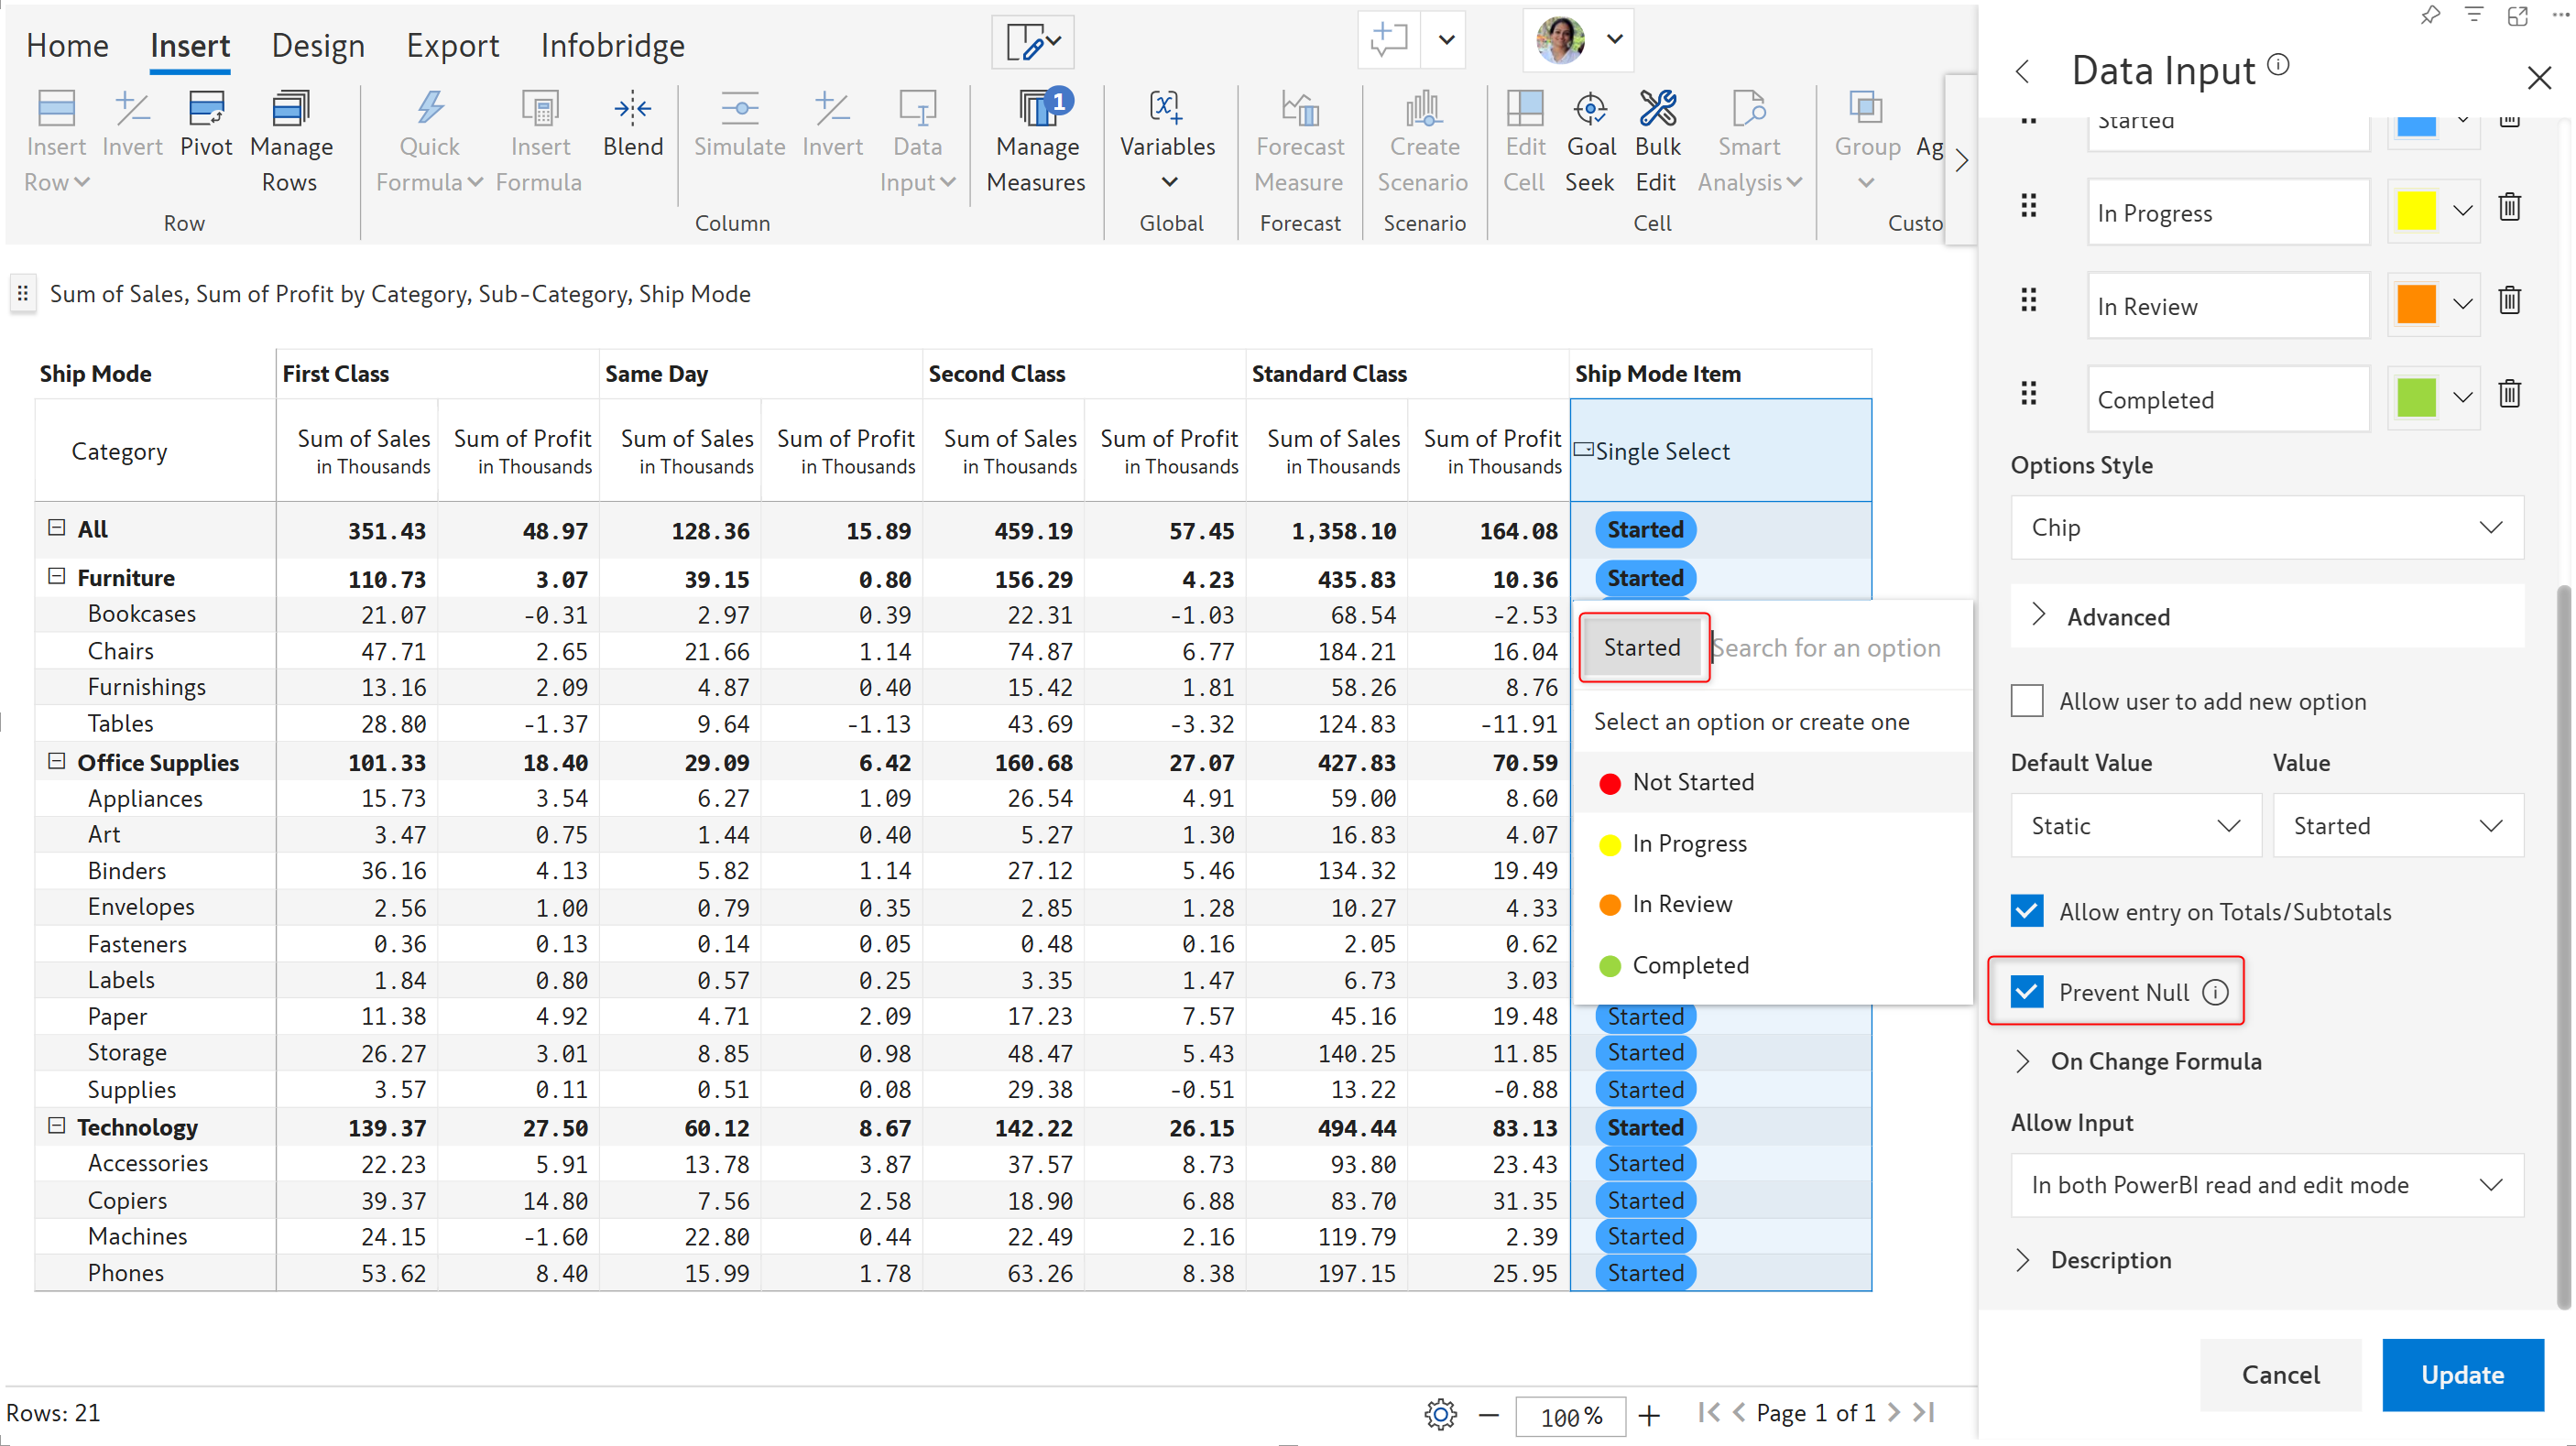
In standard reporting practices, null values should not be permitted on fields such as currency codes, process status, or dates. By default, the **Prevent Null** option is disabled, and empty data input cells are allowed. When the Prevent Null option is enabled, you will have to specify a default value. Notice how the **x** option to remove a value is disabled when Prevent Null is turned on.
Null values permitted in data input
Blank values are not permitted when Prevent Null is enabled
#### 2.6. On change formula
{% hint style="info" %}
This feature is available only in Inforiver Writeback Matrix
{% endhint %}
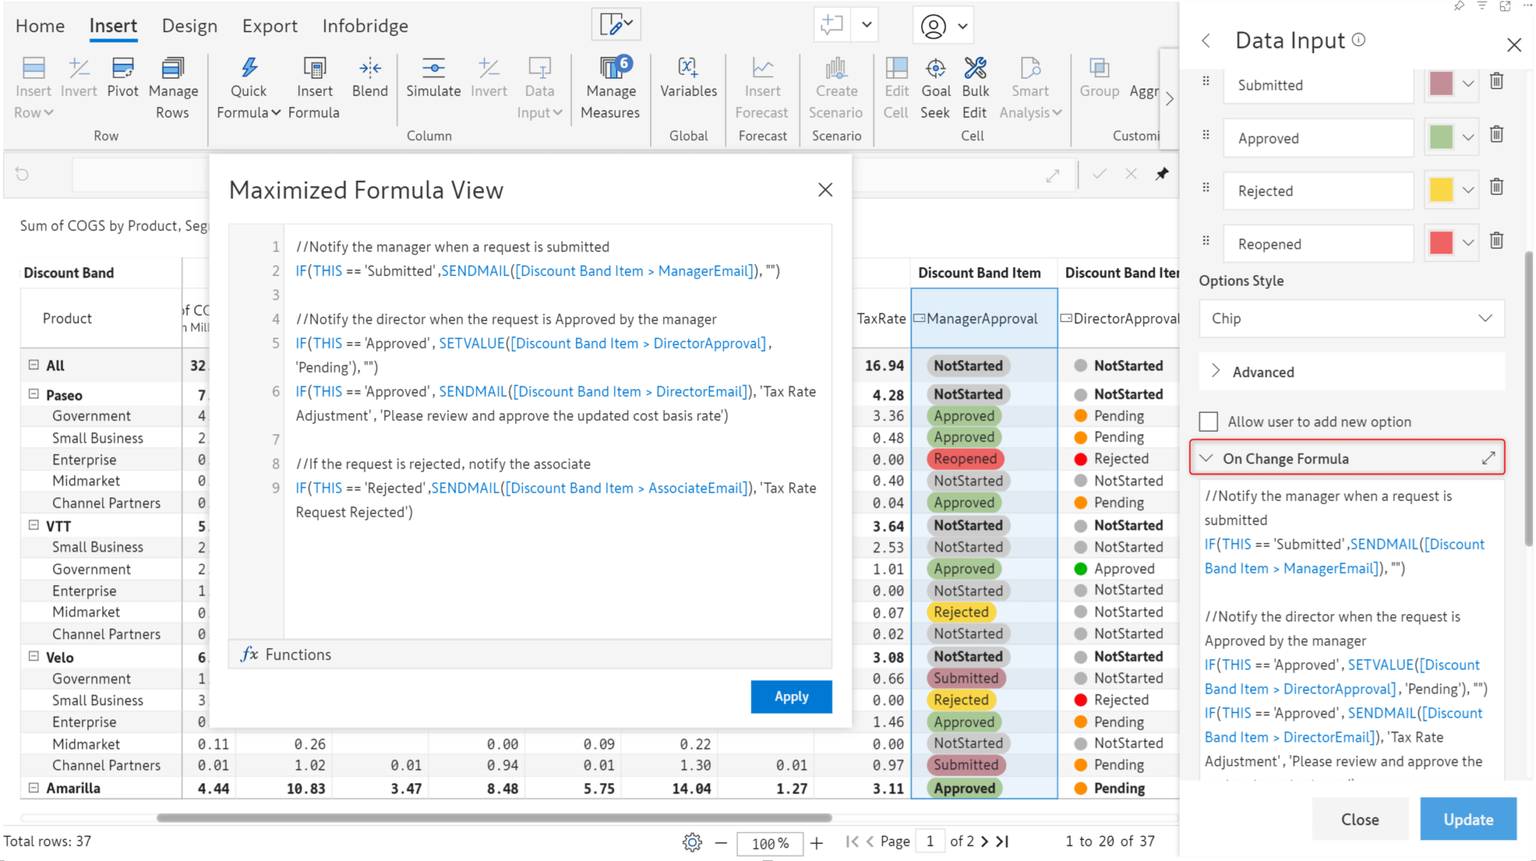
Automatically run scripts when data changes in the data input field. This feature listens for updates, inserts, or deletions and executes your custom logic in real time, enabling automation, validation, and integrations without manual intervention.
The image demonstrates how we can use scripting functions to send emails or set the value of another data input field in response to data changes.
[Learn more about approval workflows.](/working-with-inforiver/16.-approval-workflows.md)
[Learn more about scripting functions.](/formula-syntax/scripting-functions.md)
#### 2.7. Allow input
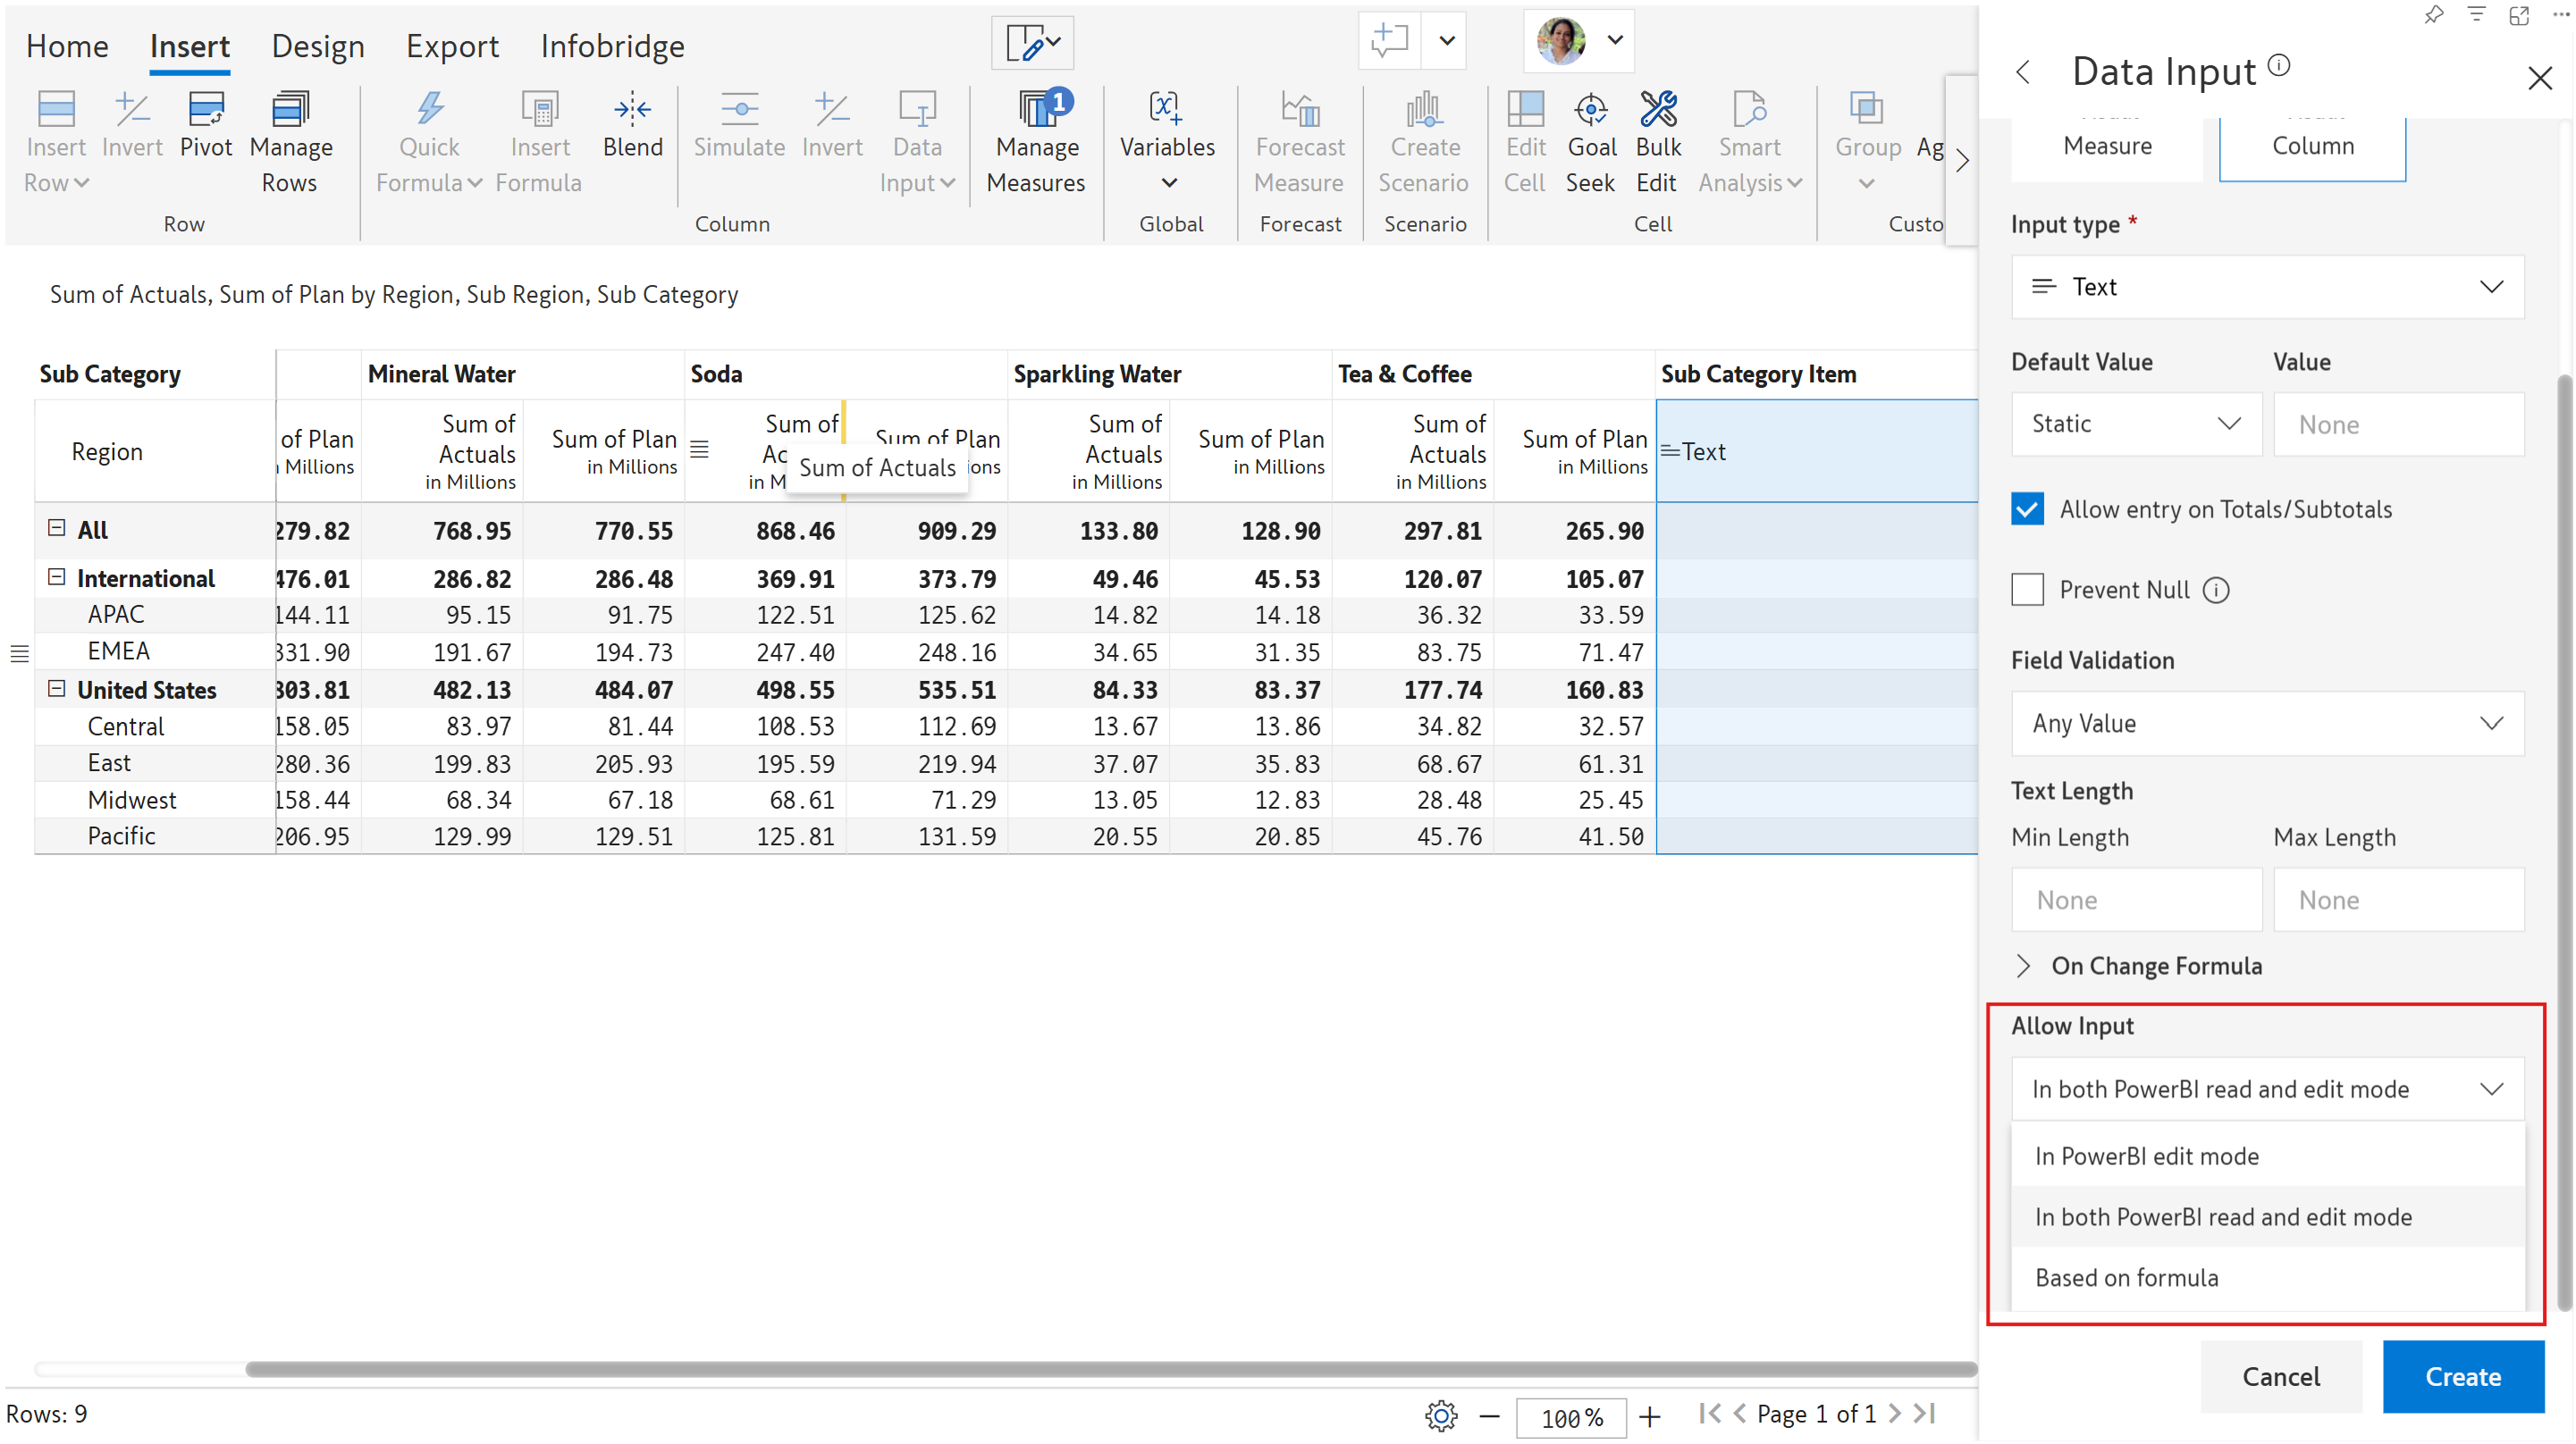
By default, inputs are enabled in both read and edit modes in Power BI. But, based on your requirement, you can allow inputs only in edit mode or based on a formula.
Data input restrictions
* In PowerBI edit mode
The text editor is disabled in reading mode.
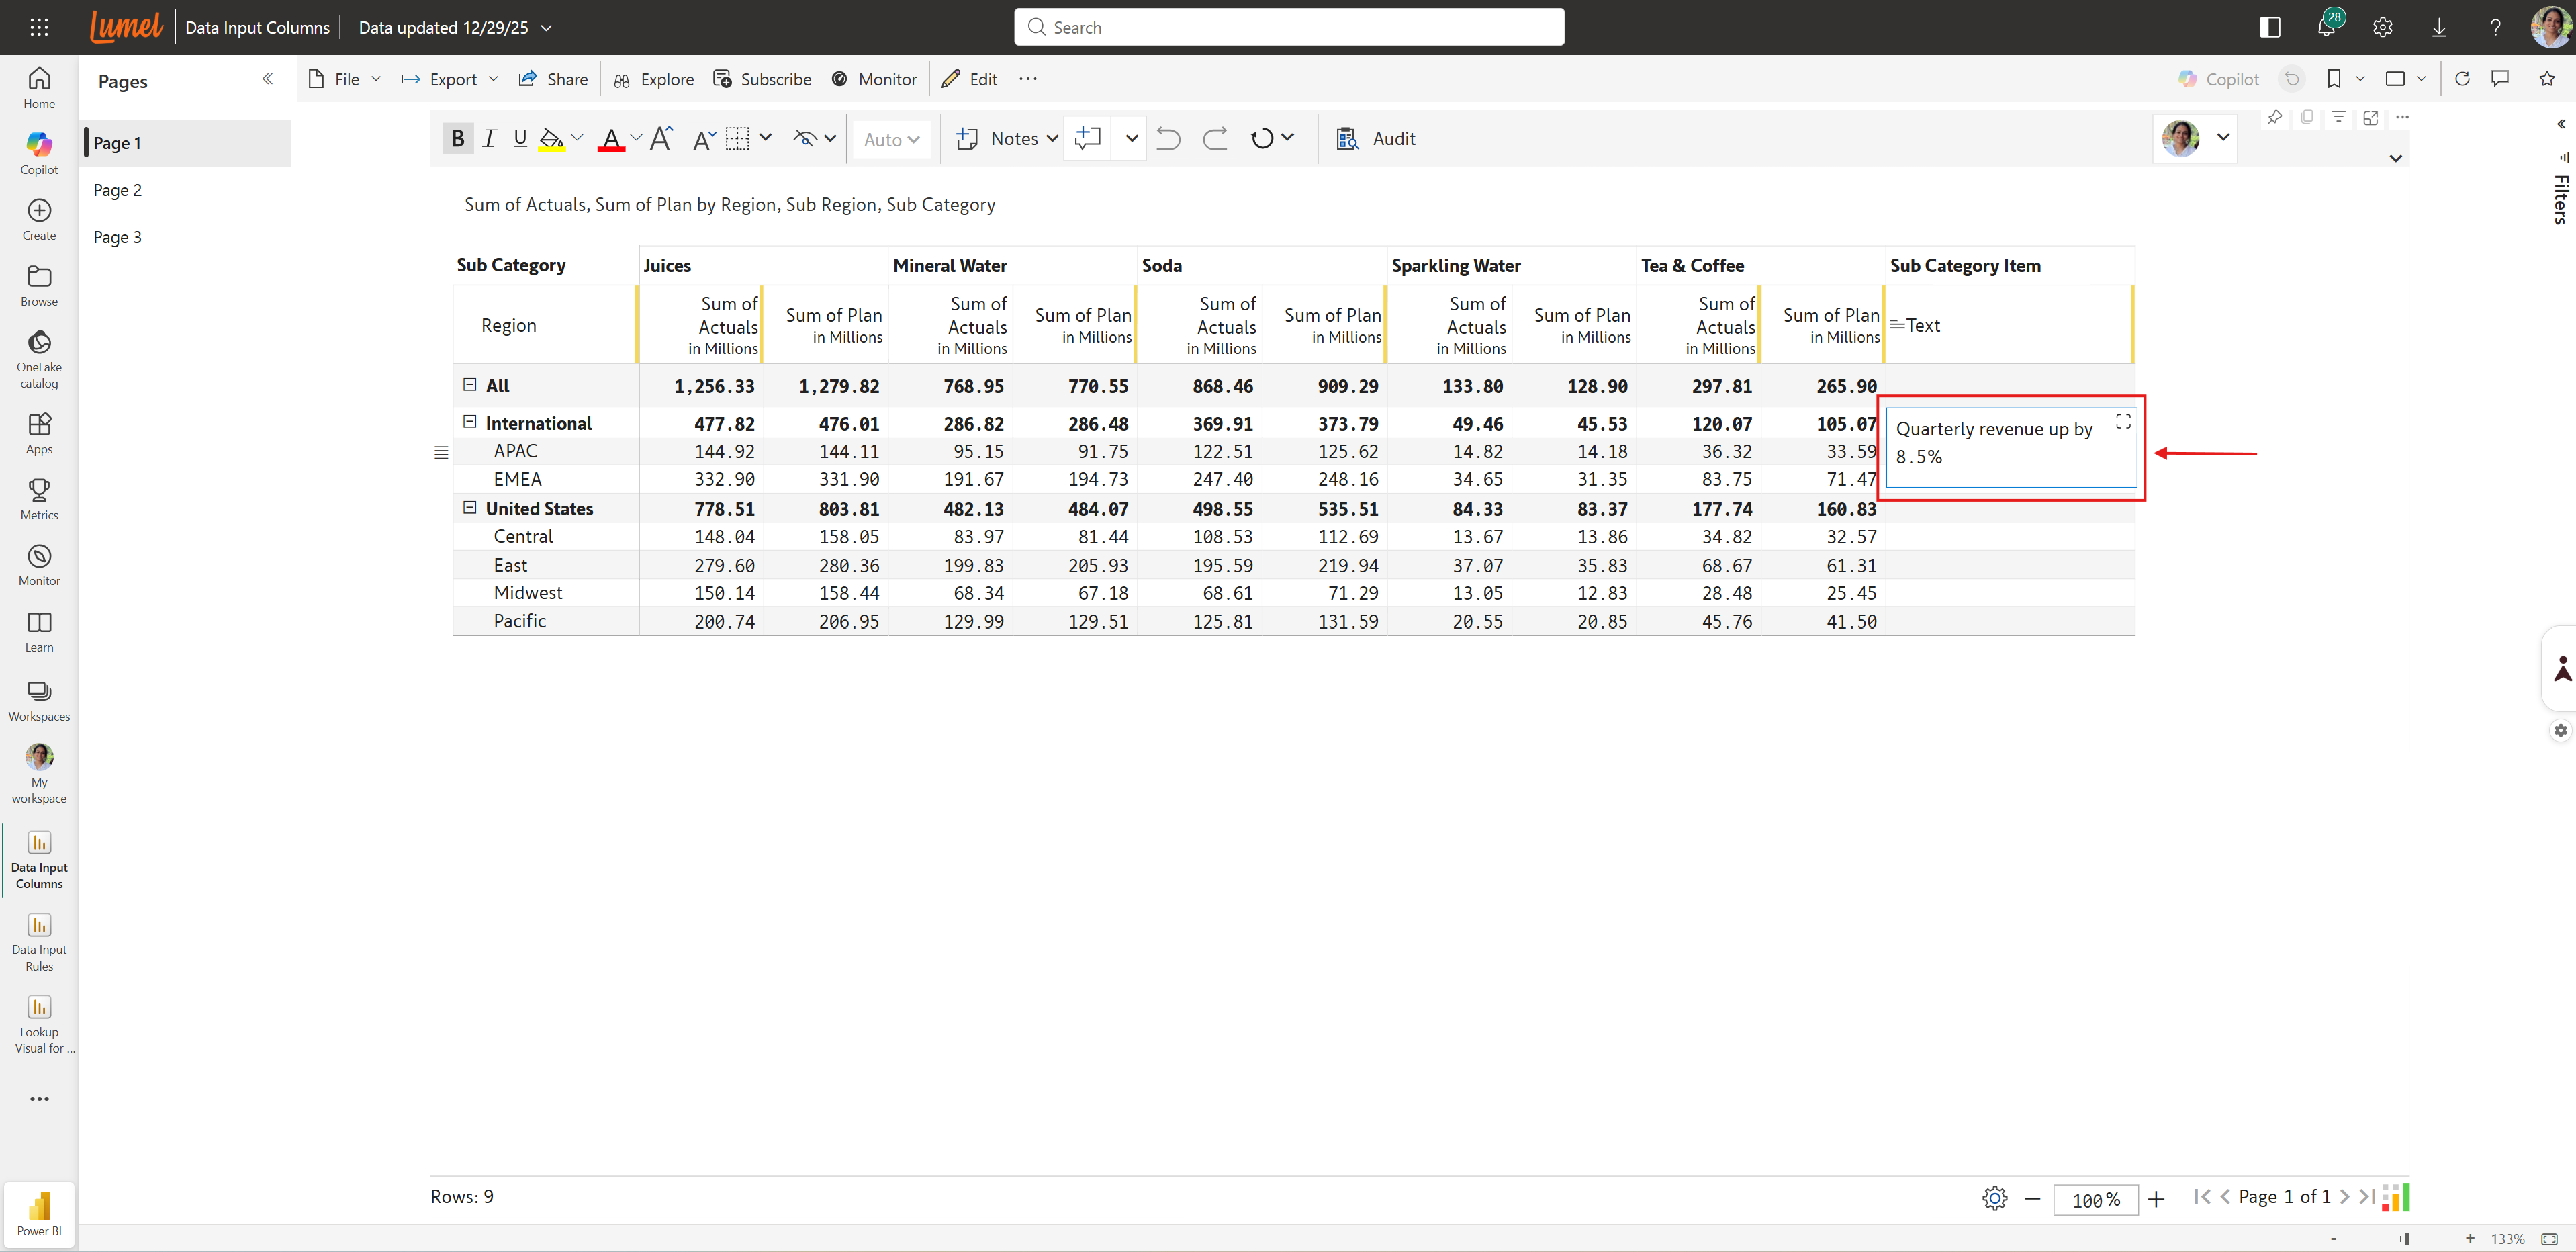
* **In both Power BI read and edit mode**
When this option is selected, you can enter data in the reading view as shown below.
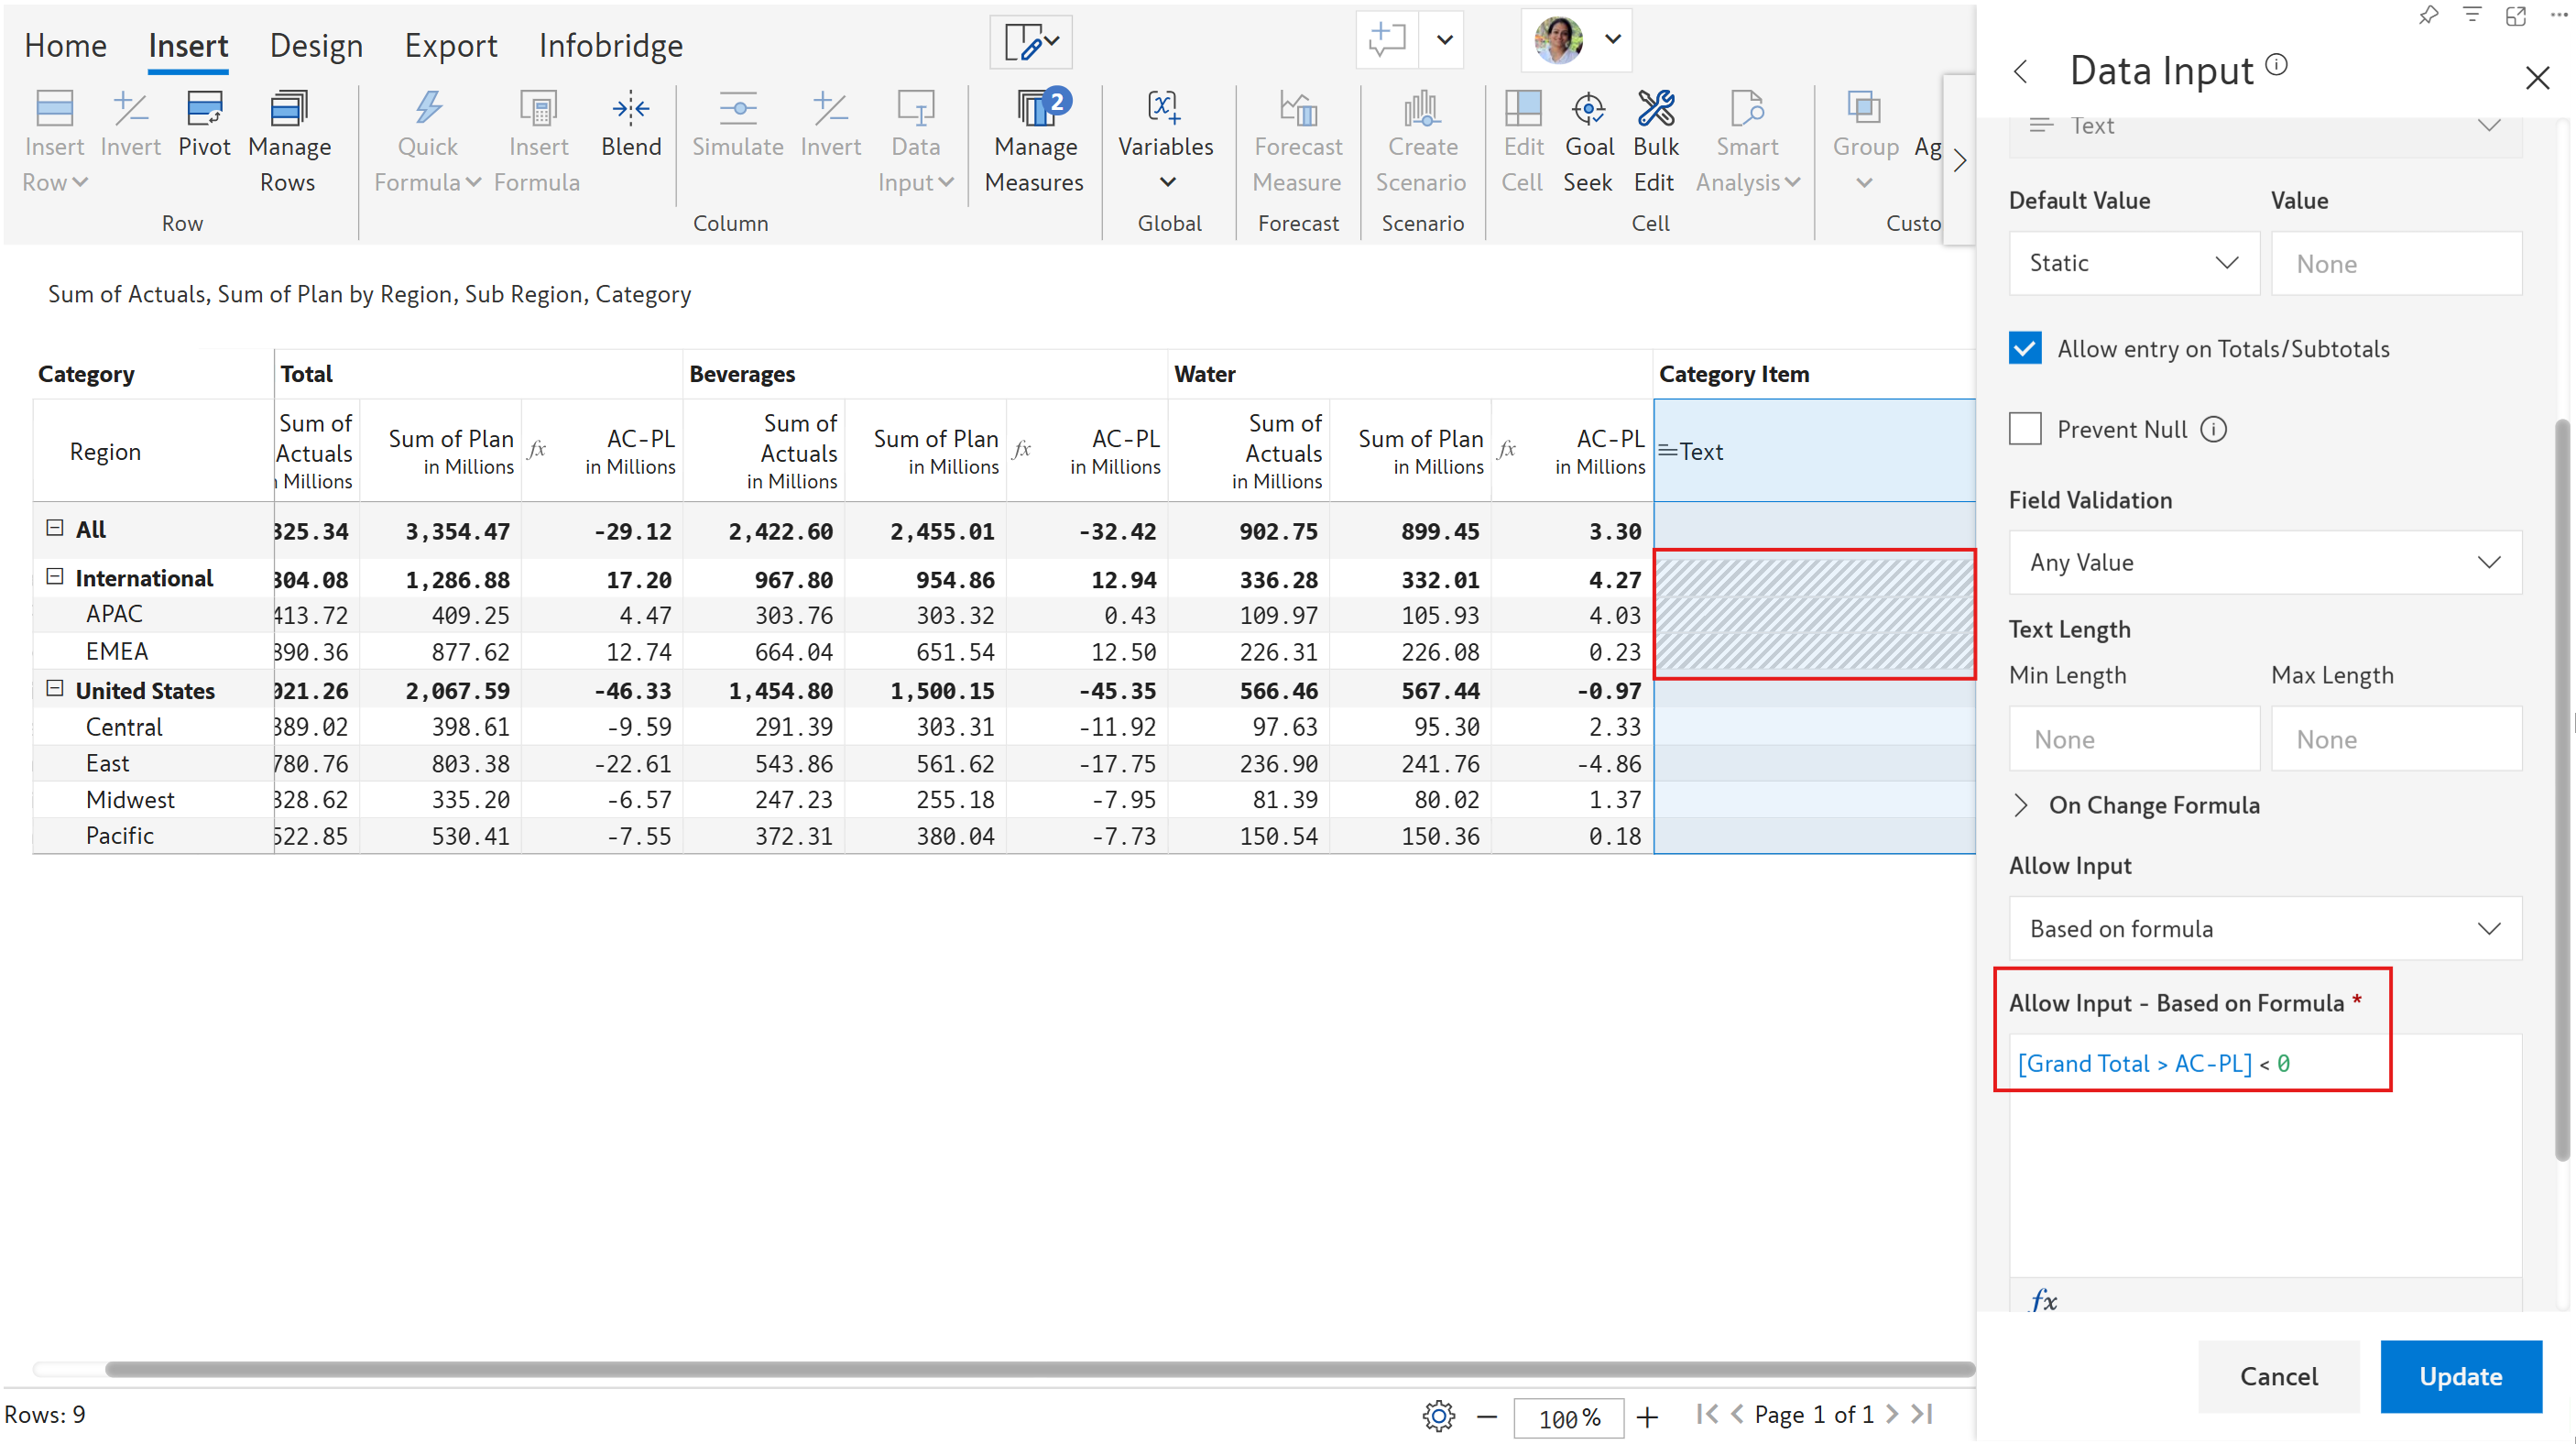
* **Based on formula**
You can allow data input only if a certain condition is met. The formula entered should return a Boolean value.
In the image, data input is allowed only if (AC -PL) < 0. You can see that the text fields for 'International', 'APAC', and 'EMEA' are greyed out, and editing is disabled.
## 3. Access control
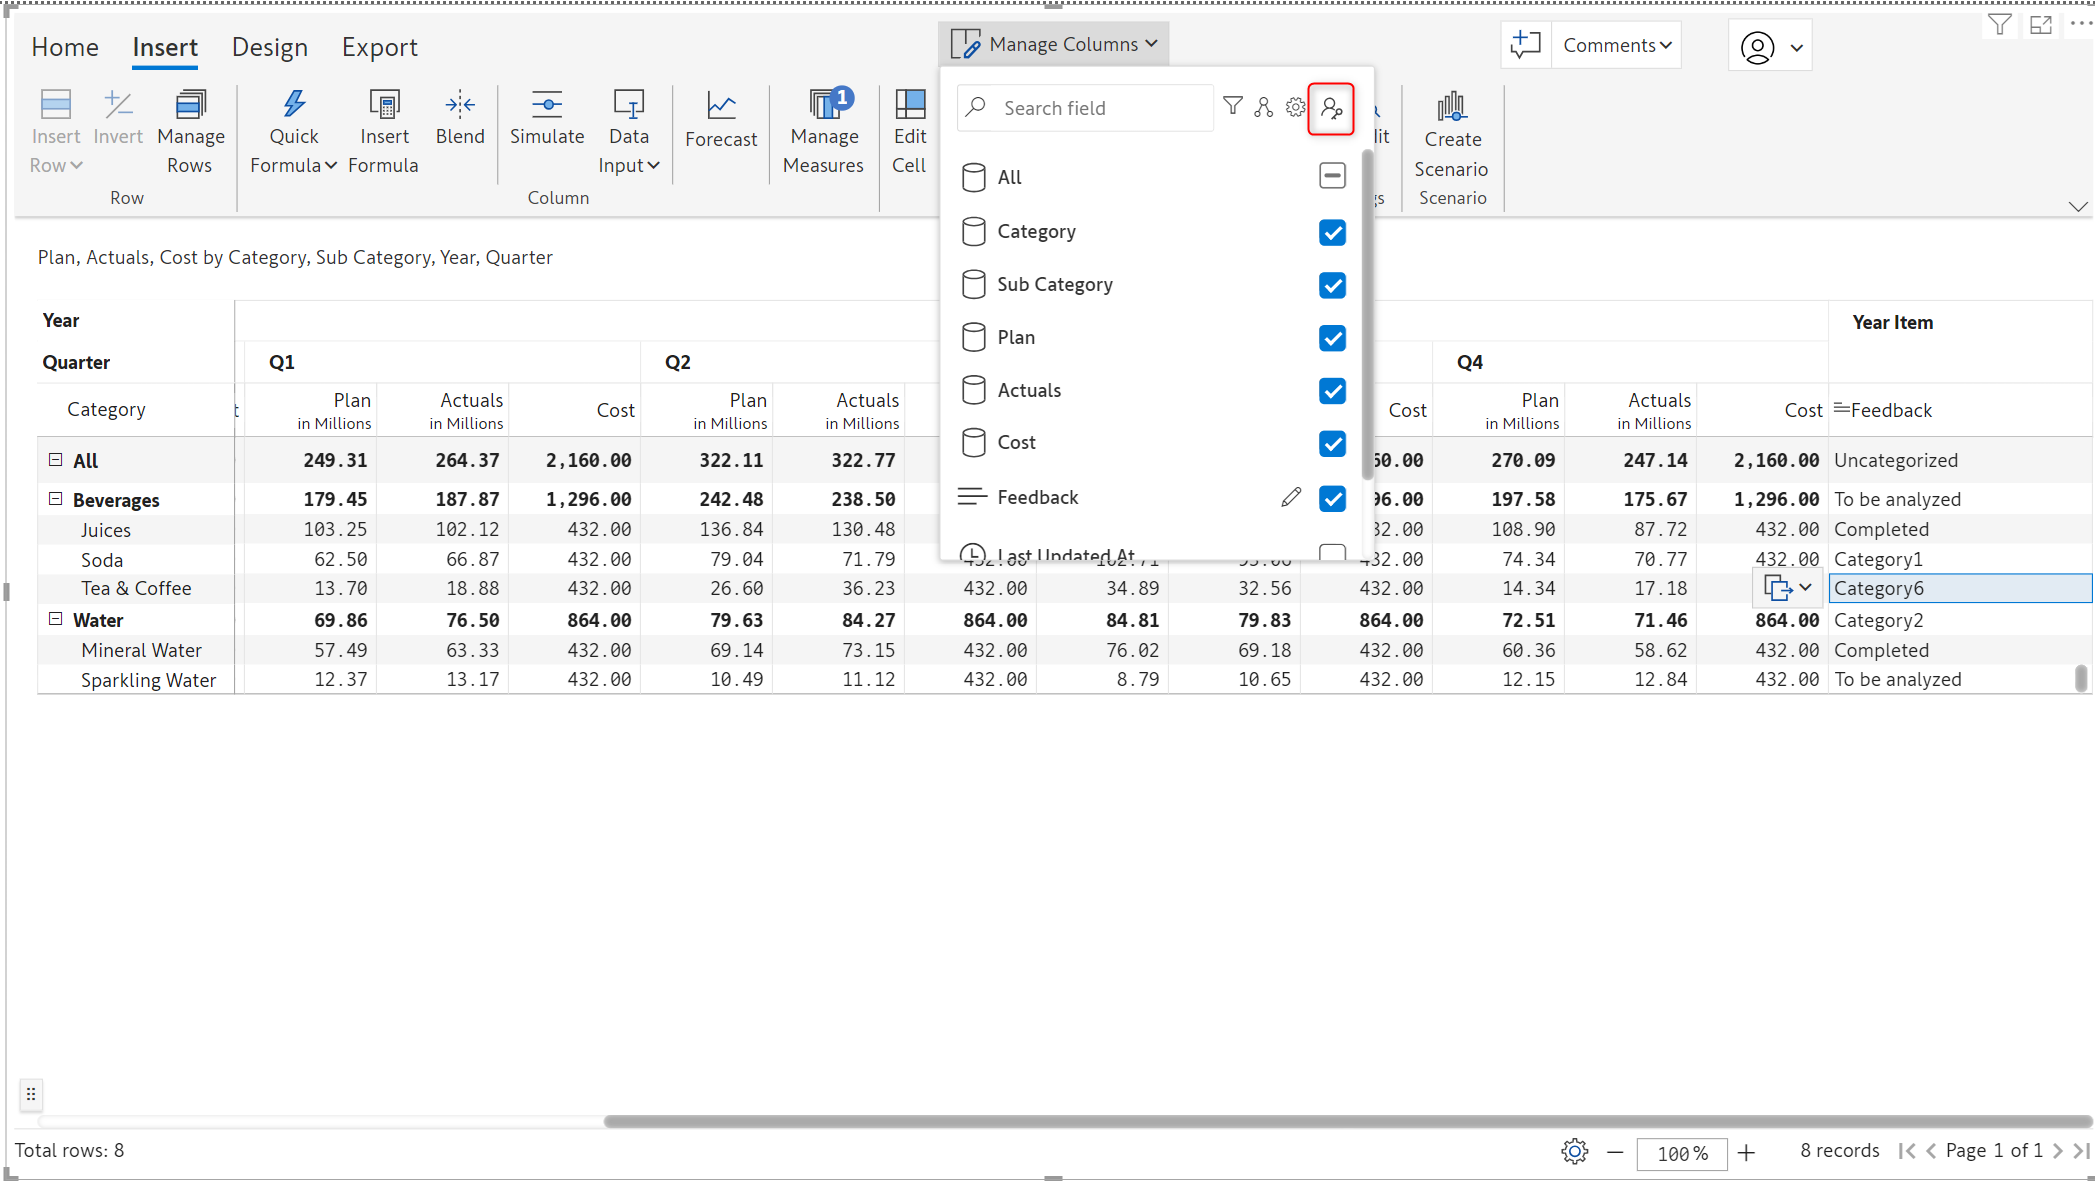
Inforiver Writeback Matrix allows setting explicit read/write access on data input columns for specific users. To set user access control, open the Manage Columns menu and click on the user icon.
{% hint style="info" %}
This feature is available only in Inforiver Writeback Matrix.
{% endhint %}
Data input access
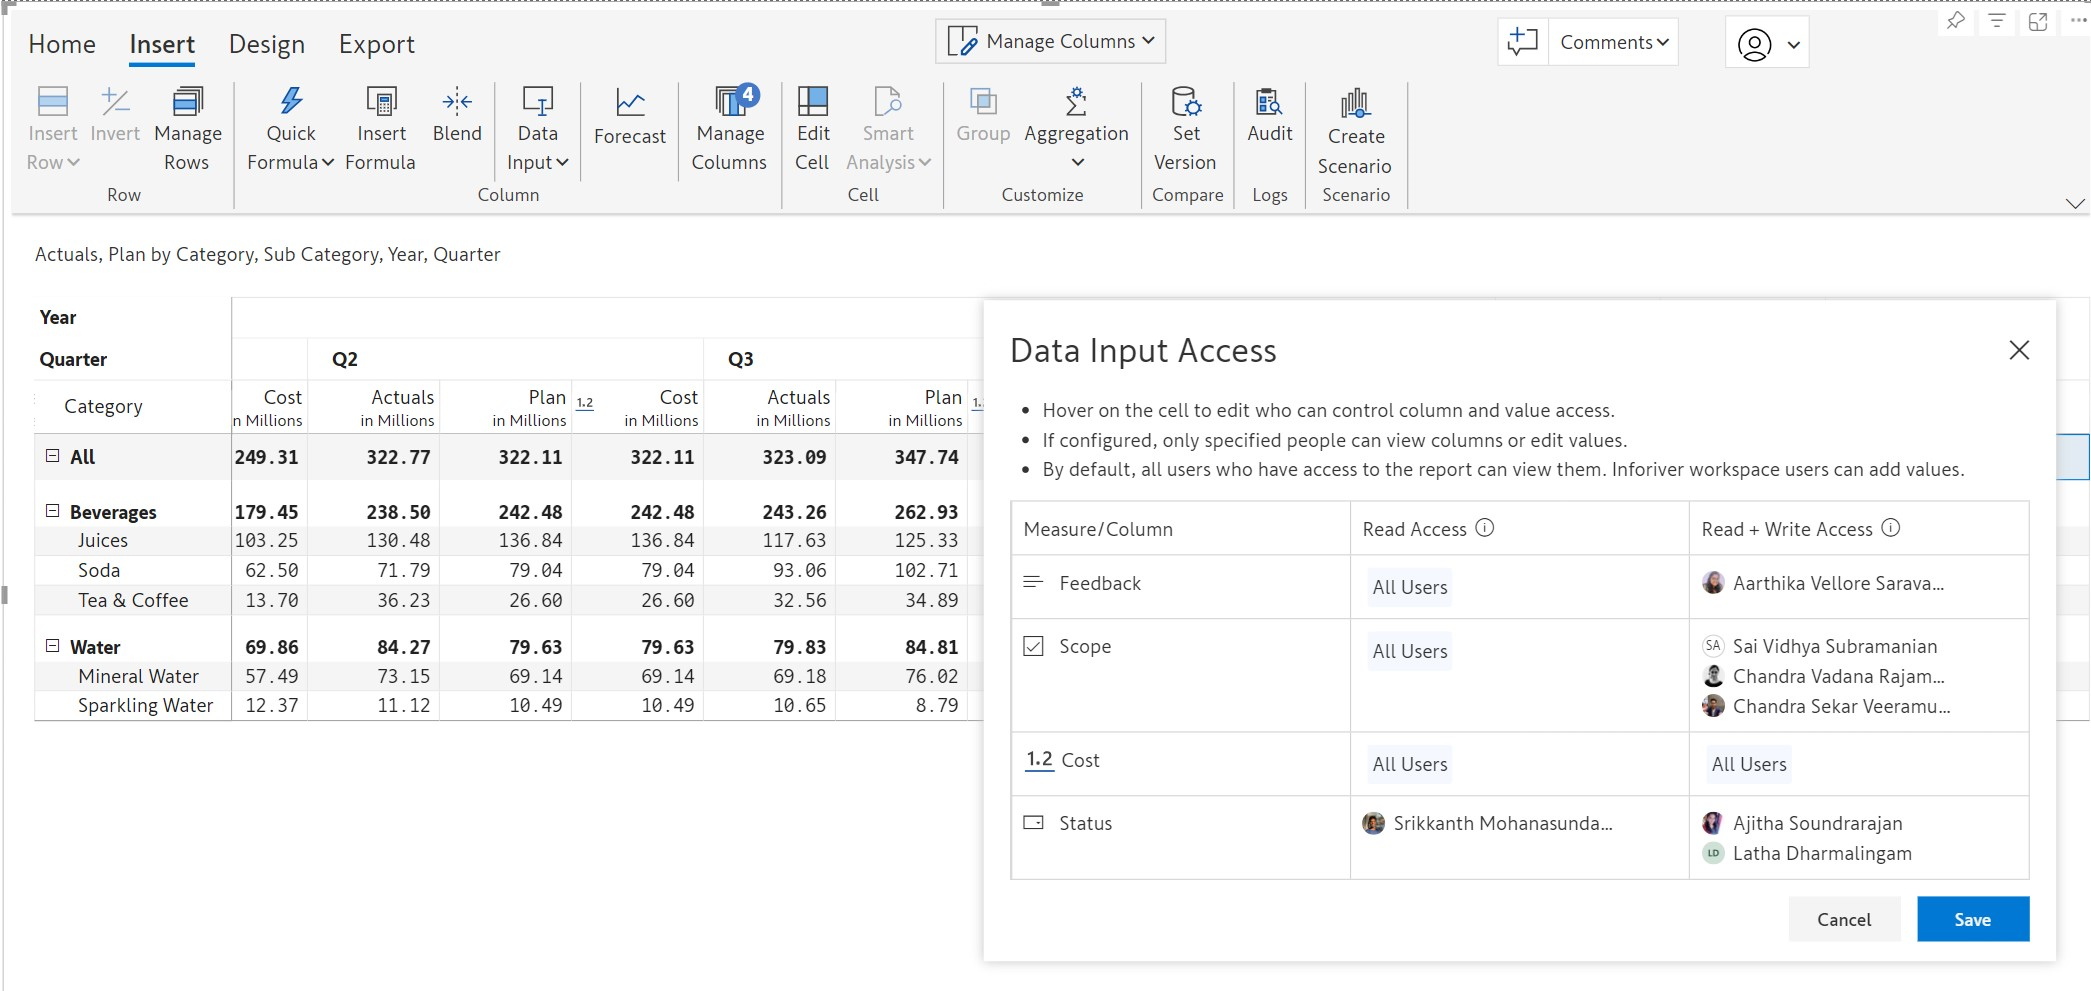
In the Data Input Access dialog box, you can assign access to users for each column or measure.
Setting user access for data input columns or measures
## 4. Model View Icon
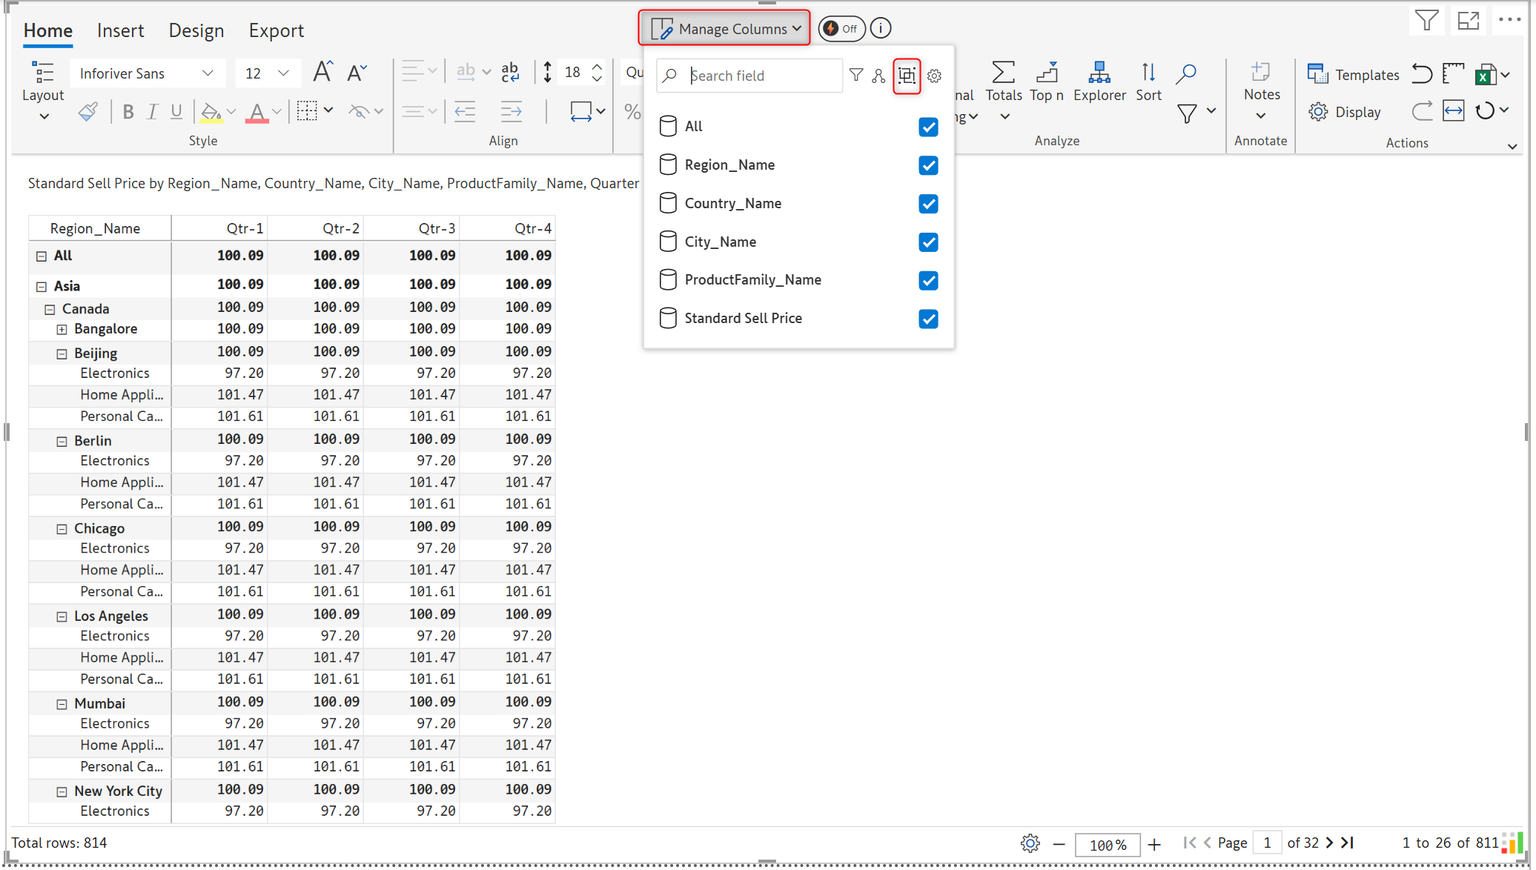
In Reporting Matrix, you can now group columns of your choice and manage them together by clicking on the Model view icon under manage columns.
Grouping under Manage Columns using the Model view icon.
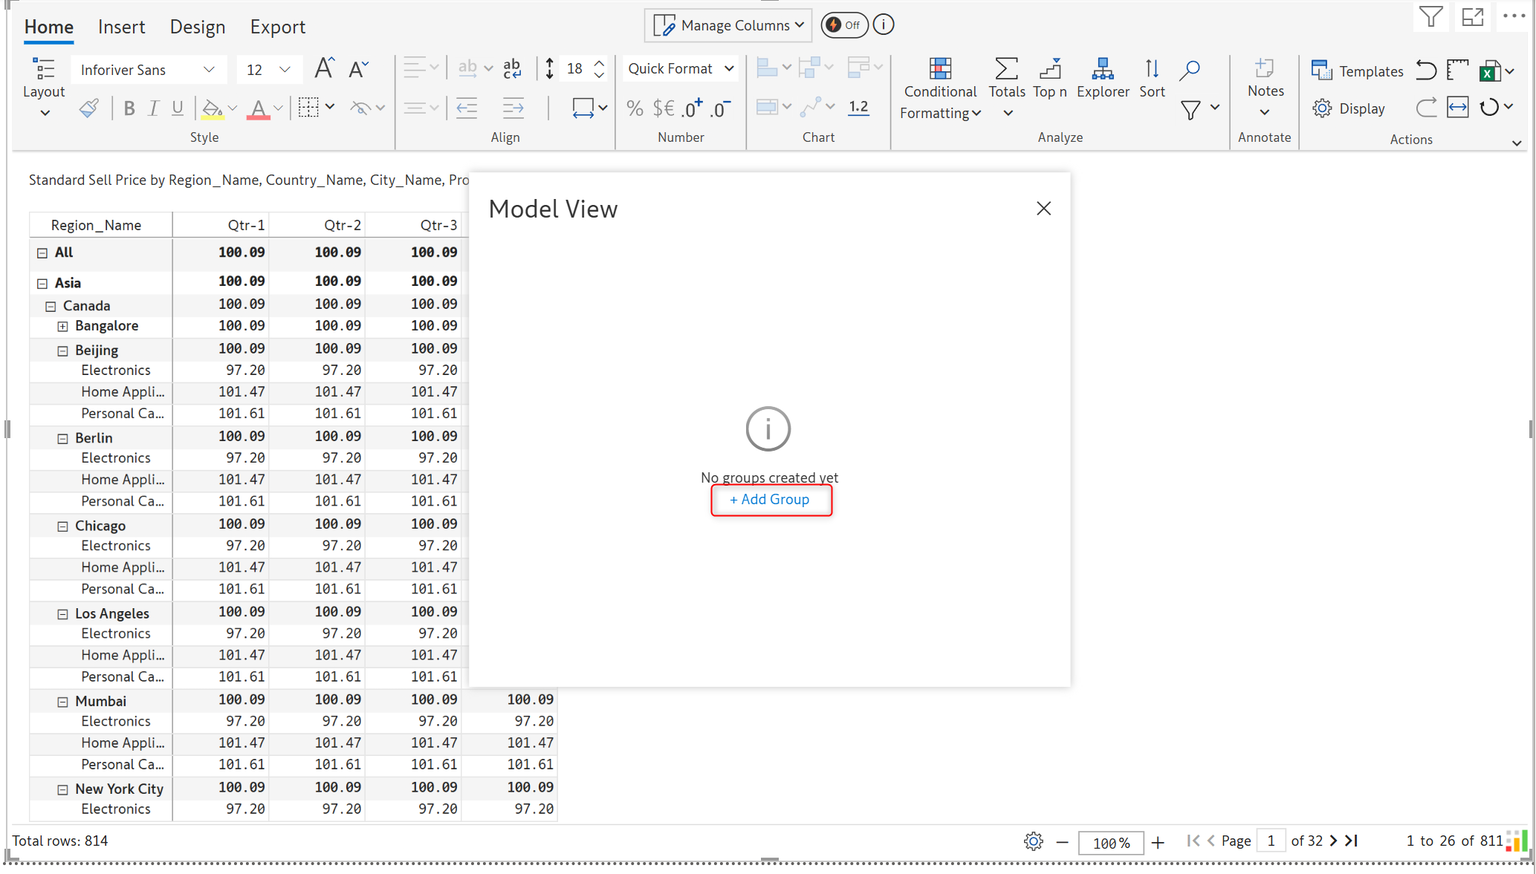
In the Model view pop-up, click on the Add Group options.
Add group option in Model View
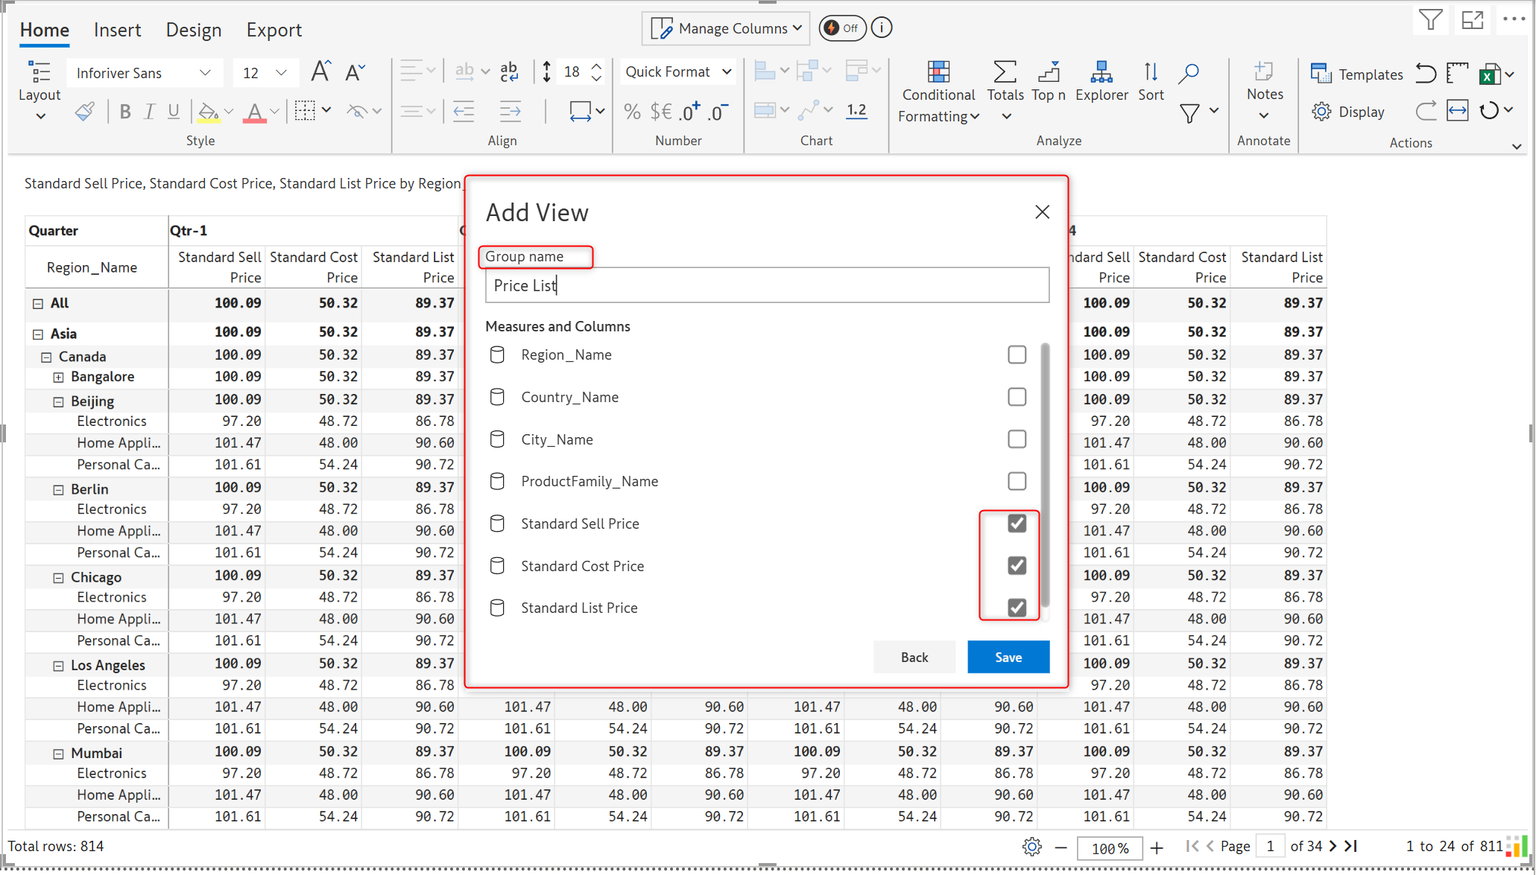
In the Add View pop-up, enter the Group name and select the measures to be grouped, and click Save.
Naming and Grouping of Measures in Add View.
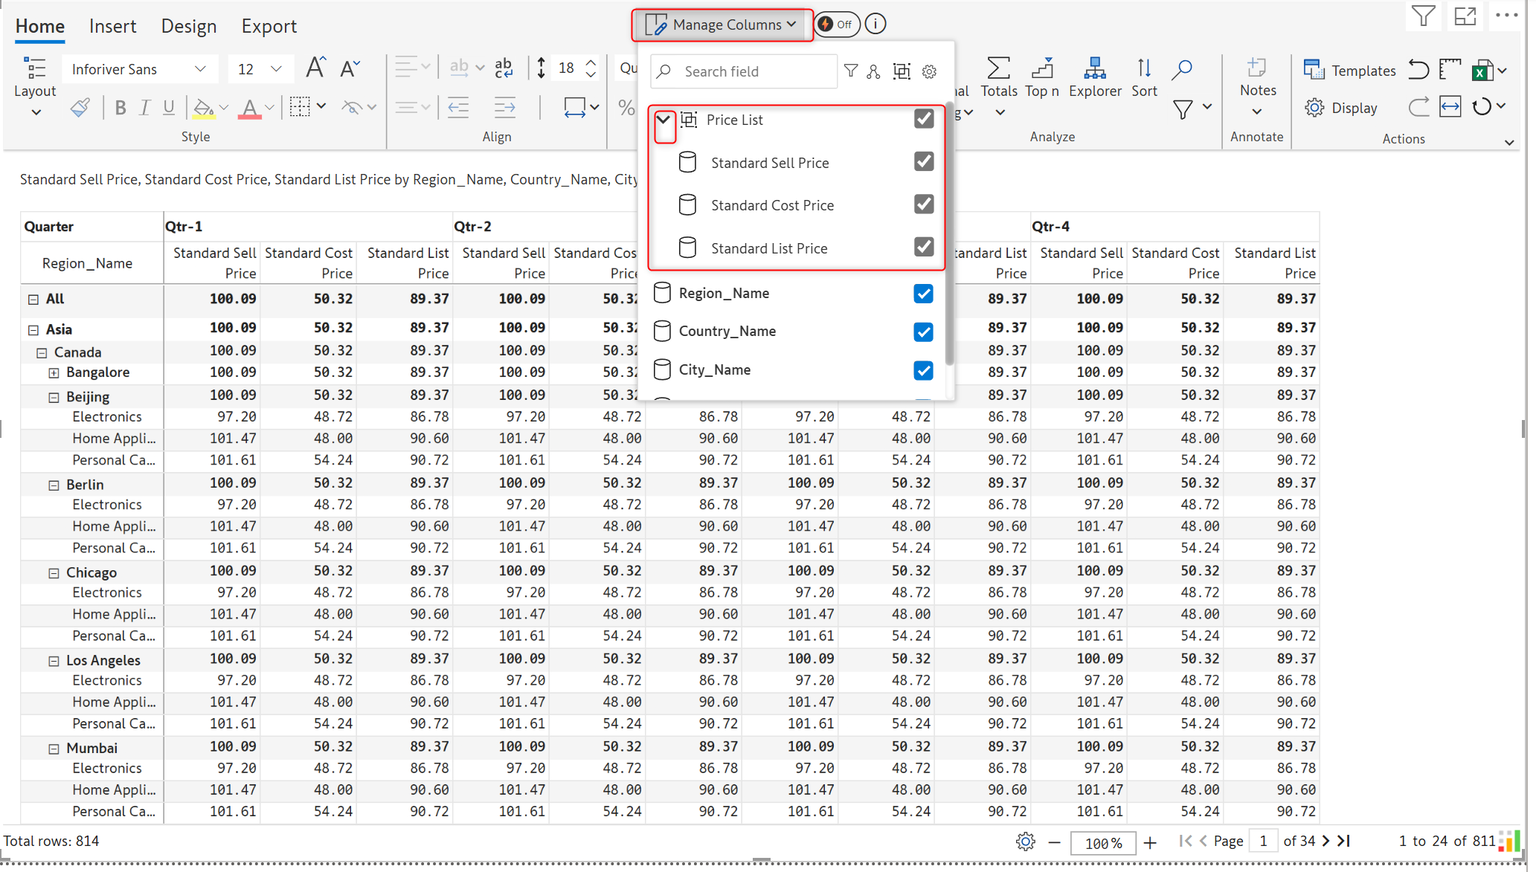
You can now see the Columns being grouped under the group name under Manage columns. Expand the group name to view the measures within.
In the image below, the Price list is the group that contains the measures Standard Sell, Cost, and List Price.
Grouped Columns
## 5. FAQs
#### 1) Can multiple users enter data in a single published report?
Yes. When you use Inforiver Writeback Matrix, **multiple users** can **enter data** in the same form in the **reading** view. Using the audit module, you can also keep track of changes made to your table made by different users.
#### 2. Will a user be able to see data entered by other users?
By default, yes. But if you enable row-level security, users will be able to see only the records they are authorized to see.
#### 3. This is too good to be true. Is there something specific I should set up or configure so that my users can enter data?
Nothing. Just add the Inforiver Writeback Matrix visual to your report, and use the '[Data Input](https://inforiver.com/blog/writeback/5-types-manual-data-entry-powerbi-table-matrix/)' feature to add fields of various types.
#### 4. All of this is great. Can I write back this data to a database?
Yes. You can [write back data to a destination database or shared drive](https://inforiver.com/blog/writeback/writeback-power-bi-10-key-considerations/) storage. Inforiver supports destinations such as SQL Server, Snowflake, Azure SQL, BigQuery, MySQL, SharePoint, OneDrive, and more. You may also simply export the data to a PDF or Excel file.
In the next section, we'll be looking at inserting [number ](/working-with-inforiver/4.-adding-business-logic-and-formulae/insert-manual-input-columns/insert-manual-input-columns.md)columns.
#### Resources
[5 types of manual data entry options in your Power BI table/matrix](https://inforiver.com/blog/writeback/5-types-manual-data-entry-powerbi-table-matrix/)
[Allow multiple users to enter data in a blank table/form in Power BI](https://inforiver.com/blog/writeback/input-data-multiple-users-blank-table-form-powerbi/)
[Input & Edit Sales Forecasts in a Power BI Report](https://inforiver.com/blog/general/input-edit-sales-forecasts-in-a-power-bi-report/)
---
# Agent Instructions
This documentation is published with GitBook. GitBook is the documentation platform designed so that both humans and AI agents can read, navigate, and reason over technical content effectively. Learn more at gitbook.com.
## Querying This Documentation
If you need additional information that is not directly available in this page, you can query the documentation by asking a question.
Perform an HTTP GET request on the following URL with the `ask` and `goal` query parameters:
```
GET https://docs.inforiver.com/working-with-inforiver/4.-adding-business-logic-and-formulae/insert-manual-input-columns.md?ask=&goal=
```
`ask` is the immediate question: it should be specific, self-contained, and written in natural language.
`goal` is what the user is ultimately trying to achieve, the reason they need the answer. Sharing it helps GitBook give you a better, more relevant answer. A goal is most helpful when it describes the outcome the user wants rather than restating the question. For example, with `ask=how do I create an API token`, a goal like `automate deployments from our CI pipeline` lets GitBook tailor the answer to that use case.
The response will contain a direct answer to the question and relevant excerpts and sources from the documentation.
Use this mechanism when the answer is not explicitly present in the current page, you need clarification or additional context, or you want to retrieve related documentation sections.